ZyXEL VMG1312-B10A User Guide - Page 231
Table 100, Label, Description
 |
View all ZyXEL VMG1312-B10A manuals
Add to My Manuals
Save this manual to your list of manuals |
Page 231 highlights
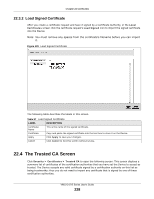
Chapter 22 Certificates Figure 132 Trusted CA: Import Certificate The following table describes the fields in this screen. Table 100 Trusted CA: Import Certificate LABEL DESCRIPTION Certificate File Type in the location of the certificate you want to upload in this field or click Browse ... to Path find it. Enable Trusted CA for 802.1x Authentication If you select this checkbox, the trusted CA will be used for 802.1x authentication. The selected trusted CA will be displayed in the Network Setting > Broadband > 802.1x: Edit screen. Certificate Copy and paste the certificate into the text box to store it on the Device. OK Click OK to save your changes. Cancel Click Cancel to exit this screen without saving. VMG1312-B Series User's Guide 231
-
 1
1 -
2
-
3
-
4
-
5
-
6
-
7
-
8
-
9
-
10
-
11
-
12
-
13
-
14
-
15
-
16
-
17
-
18
-
19
-
20
-
21
-
22
-
23
-
24
-
25
-
26
-
27
-
28
-
29
-
30
-
31
-
32
-
33
-
34
-
35
-
36
-
37
-
38
-
39
-
40
-
41
-
42
-
43
-
44
-
45
-
46
-
47
-
48
-
49
-
50
-
51
-
52
-
53
-
54
-
55
-
56
-
57
-
58
-
59
-
60
-
61
-
62
-
63
-
64
-
65
-
66
-
67
-
68
-
69
-
70
-
71
-
72
-
73
-
74
-
75
-
76
-
77
-
78
-
79
-
80
-
81
-
82
-
83
-
84
-
85
-
86
-
87
-
88
-
89
-
90
-
91
-
92
-
93
-
94
-
95
-
96
-
97
-
98
-
99
-
100
-
101
-
102
-
103
-
104
-
105
-
106
-
107
-
108
-
109
-
110
-
111
-
112
-
113
-
114
-
115
-
116
-
117
-
118
-
119
-
120
-
121
-
122
-
123
-
124
-
125
-
126
-
127
-
128
-
129
-
130
-
131
-
132
-
133
-
134
-
135
-
136
-
137
-
138
-
139
-
140
-
141
-
142
-
143
-
144
-
145
-
146
-
147
-
148
-
149
-
150
-
151
-
152
-
153
-
154
-
155
-
156
-
157
-
158
-
159
-
160
-
161
-
162
-
163
-
164
-
165
-
166
-
167
-
168
-
169
-
170
-
171
-
172
-
173
-
174
-
175
-
176
-
177
-
178
-
179
-
180
-
181
-
182
-
183
-
184
-
185
-
186
-
187
-
188
-
189
-
190
-
191
-
192
-
193
-
194
-
195
-
196
-
197
-
198
-
199
-
200
-
201
-
202
-
203
-
204
-
205
-
206
-
207
-
208
-
209
-
210
-
211
-
212
-
213
-
214
-
215
-
216
-
217
-
218
-
219
-
220
-
221
-
222
-
223
-
224
-
225
-
 226
226 -
 227
227 -
 228
228 -
 229
229 -
 230
230 -
 231
231 -
 232
232 -
 233
233 -
 234
234 -
 235
235 -
 236
236 -
237
-
238
-
239
-
240
-
241
-
242
-
243
-
244
-
245
-
246
-
247
-
248
-
249
-
250
-
251
-
252
-
253
-
254
-
255
-
256
-
257
-
258
-
259
-
260
-
261
-
262
-
263
-
264
-
265
-
266
-
267
-
268
-
269
-
270
-
271
-
272
-
273
-
274
-
275
-
276
-
277
-
278
-
279
-
280
-
281
-
282
-
283
-
284
-
285
-
286
-
287
-
288
-
289
-
290
-
291
-
292
-
293
-
294
-
295
-
296
-
297
-
298
-
299
-
300
-
301
-
302
-
303
-
304
-
305
-
306
-
307
-
308
-
309
-
310
-
311
-
312
-
313
-
314
-
315
-
316
-
317
-
318
-
319
-
320
-
321
-
322
-
323
-
324
-
325
-
326
-
327
-
328
-
329
-
330
-
331
 |
 |
Chapter 22 Certificates
VMG1312-B Series User’s Guide
231
Figure 132
Trusted CA: Import Certificate
The following table describes the fields in this screen.
Table 100
Trusted CA: Import Certificate
LABEL
DESCRIPTION
Certificate File
Path
Type in the location of the certificate you want to upload in this field or click
Browse ...
to
find it.
Enable Trusted
CA for 802.1x
Authentication
If you select this checkbox, the trusted CA will be used for 802.1x authentication. The
selected trusted CA will be displayed in the
Network Setting
>
Broadband
>
802.1x:
Edit
screen.
Certificate
Copy and paste the certificate into the text box to store it on the Device.
OK
Click
OK
to save your changes.
Cancel
Click
Cancel
to exit this screen without saving.