3Com 8760 User Guide - Page 255
Troubleshooting
 |
UPC - 662705506531
View all 3Com 8760 manuals
Add to My Manuals
Save this manual to your list of manuals |
Page 255 highlights
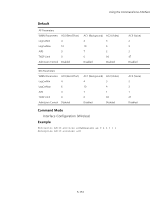
6 TROUBLESHOOTING If you have difficulty with the 3Com Wireless LAN access point, first check the following items in the configuration: „ Radio Settings page: Ensure that the SSID is the same on clients and the access point. „ Security page: Ensure that Encryption is the same on clients and the access point. „ Authentication page: Ensure that the Local MAC Authentication System Default is set to Allow. Ensure that 802.1x Authentication Settings are correct. „ TCP/IP Settings page: If the DHCP Client is set to Disabled, then ensure that the access point IP Address is within the same subnet as the wired LAN. If necessary, reset the access point to the factory defaults. Try the solutions in the following table. If you need further assistance, contact 3Com Technical Support through the following Web page: http://www.3com.com/products/en_US/supportedindex.jsp Symptom Solutions Access point does not power up. Make sure the Ethernet cable is plugged into the port labeled To Access Point on the power brick. Check for a faulty access point power supply. Check for a failed AC power supply Access point powers up, but has no connection to the wired network. Make sure that the Ethernet cable is plugged into the port labeled To Hub/Switch on the power brick. Verify the network wiring and topology for proper configuration. Check that the cables used are the proper type. 6-1
-
 1
1 -
2
-
3
-
4
-
5
-
6
-
7
-
8
-
9
-
10
-
11
-
12
-
13
-
14
-
15
-
16
-
17
-
18
-
19
-
20
-
21
-
22
-
23
-
24
-
25
-
26
-
27
-
28
-
29
-
30
-
31
-
32
-
33
-
34
-
35
-
36
-
37
-
38
-
39
-
40
-
41
-
42
-
43
-
44
-
45
-
46
-
47
-
48
-
49
-
50
-
51
-
52
-
53
-
54
-
55
-
56
-
57
-
58
-
59
-
60
-
61
-
62
-
63
-
64
-
65
-
66
-
67
-
68
-
69
-
70
-
71
-
72
-
73
-
74
-
75
-
76
-
77
-
78
-
79
-
80
-
81
-
82
-
83
-
84
-
85
-
86
-
87
-
88
-
89
-
90
-
91
-
92
-
93
-
94
-
95
-
96
-
97
-
98
-
99
-
100
-
101
-
102
-
103
-
104
-
105
-
106
-
107
-
108
-
109
-
110
-
111
-
112
-
113
-
114
-
115
-
116
-
117
-
118
-
119
-
120
-
121
-
122
-
123
-
124
-
125
-
126
-
127
-
128
-
129
-
130
-
131
-
132
-
133
-
134
-
135
-
136
-
137
-
138
-
139
-
140
-
141
-
142
-
143
-
144
-
145
-
146
-
147
-
148
-
149
-
150
-
151
-
152
-
153
-
154
-
155
-
156
-
157
-
158
-
159
-
160
-
161
-
162
-
163
-
164
-
165
-
166
-
167
-
168
-
169
-
170
-
171
-
172
-
173
-
174
-
175
-
176
-
177
-
178
-
179
-
180
-
181
-
182
-
183
-
184
-
185
-
186
-
187
-
188
-
189
-
190
-
191
-
192
-
193
-
194
-
195
-
196
-
197
-
198
-
199
-
200
-
201
-
202
-
203
-
204
-
205
-
206
-
207
-
208
-
209
-
210
-
211
-
212
-
213
-
214
-
215
-
216
-
217
-
218
-
219
-
220
-
221
-
222
-
223
-
224
-
225
-
226
-
227
-
228
-
229
-
230
-
231
-
232
-
233
-
234
-
235
-
236
-
237
-
238
-
239
-
240
-
241
-
242
-
243
-
244
-
245
-
246
-
247
-
248
-
249
-
 250
250 -
 251
251 -
 252
252 -
 253
253 -
 254
254 -
 255
255 -
 256
256 -
 257
257 -
 258
258 -
 259
259 -
 260
260 -
261
 |
 |
