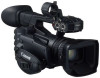
Canon XF205 XF200 XF205 Instruction Manual - Page 146
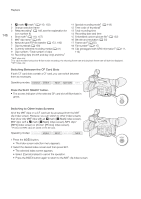
Press the SLOT SELECT button., Switching Between the CF Card Slots, Switching to Other Index Screens
 |
View all Canon XF205 manuals
Add to My Manuals
Save this manual to your list of manuals |
Page 146 highlights
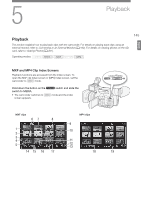
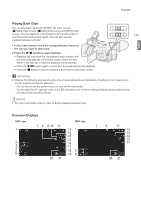
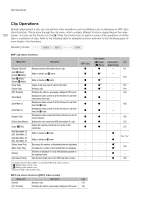
Playback 146 1 $ mark/% mark1 (A 110, 152) 2 Orange selection frame 3 Relay recording1 (A 148, see the explanation for 11 Special recording mode1 (A 118) 12 Time code of thumbnail1 13 Total recording time icon number 8) 4 Shot mark1 (A 110, 157) 5 MXF clip name1 (A 49) 6 Network type/FTP file transfer (A 173, 190) 7 Clip thumbnail (A 158) 8 Currently selected recording media (A 41) 14 Recording date and time 15 Embedded custom picture file1 (A 132) 16 Bit rate and resolution (A 55) 17 Frame rate2 (A 55) 18 File number3 (A 117) 19 Clip geotagged with GPS information3 (A 111, 9 Clip number / Total number of clips 114) 10 Recording date (month and day only) and time1 1 MXF clips only. 2 For clips recorded using slow & fast motion recording, the shooting frame rate and playback frame rate will both be displayed. 3 MP4 clips only. Switching Between the CF Card Slots If both CF card slots contain a CF card, you can switch between them as necessary. Operating modes: Press the SLOT SELECT button. • The access indicator of the selected CF card slot will illuminate in green. Switching to Other Index Screens All of the MXF clips on a CF card can be accessed from the MXF clip index screen. However, you can switch to other index screens that show only MXF clips with an $ mark ([$ Mark] index screen), MXF clips with a % mark ([% Mark] index screen), MP4 clips* ([MP4] index screen) or photos* ([Photos] index screen). * Photos and MP4 clips are saved on the SD card. Operating modes: 1 Press the INDEX button. • The index screen selection menu appears. 2 Select the desired index screen and then press SET. • The selected index screen appears. • Select [Cancel] instead to cancel the operation. • Press the INDEX button again to return to the MXF clip index screen.
-
 1
1 -
2
-
3
-
4
-
5
-
6
-
7
-
8
-
9
-
10
-
11
-
12
-
13
-
14
-
15
-
16
-
17
-
18
-
19
-
20
-
21
-
22
-
23
-
24
-
25
-
26
-
27
-
28
-
29
-
30
-
31
-
32
-
33
-
34
-
35
-
36
-
37
-
38
-
39
-
40
-
41
-
42
-
43
-
44
-
45
-
46
-
47
-
48
-
49
-
50
-
51
-
52
-
53
-
54
-
55
-
56
-
57
-
58
-
59
-
60
-
61
-
62
-
63
-
64
-
65
-
66
-
67
-
68
-
69
-
70
-
71
-
72
-
73
-
74
-
75
-
76
-
77
-
78
-
79
-
80
-
81
-
82
-
83
-
84
-
85
-
86
-
87
-
88
-
89
-
90
-
91
-
92
-
93
-
94
-
95
-
96
-
97
-
98
-
99
-
100
-
101
-
102
-
103
-
104
-
105
-
106
-
107
-
108
-
109
-
110
-
111
-
112
-
113
-
114
-
115
-
116
-
117
-
118
-
119
-
120
-
121
-
122
-
123
-
124
-
125
-
126
-
127
-
128
-
129
-
130
-
131
-
132
-
133
-
134
-
135
-
136
-
137
-
138
-
139
-
140
-
 141
141 -
 142
142 -
 143
143 -
 144
144 -
 145
145 -
 146
146 -
 147
147 -
 148
148 -
 149
149 -
 150
150 -
 151
151 -
152
-
153
-
154
-
155
-
156
-
157
-
158
-
159
-
160
-
161
-
162
-
163
-
164
-
165
-
166
-
167
-
168
-
169
-
170
-
171
-
172
-
173
-
174
-
175
-
176
-
177
-
178
-
179
-
180
-
181
-
182
-
183
-
184
-
185
-
186
-
187
-
188
-
189
-
190
-
191
-
192
-
193
-
194
-
195
-
196
-
197
-
198
-
199
-
200
-
201
-
202
-
203
-
204
-
205
-
206
-
207
-
208
-
209
-
210
-
211
-
212
-
213
-
214
-
215
-
216
-
217
-
218
-
219
-
220
-
221
-
222
-
223
-
224
-
225
-
226
-
227
-
228
-
229
-
230
-
231
-
232
-
233
-
234
-
235
-
236
-
237
-
238
-
239
-
240
-
241
-
242
-
243
-
244
-
245
-
246
-
247
-
248
-
249
-
250
 |
 |
