Canon XF205 XF200 XF205 Instruction Manual - Page 177
Continue with the procedure to con the IP address assignment
 |
View all Canon XF205 manuals
Add to My Manuals
Save this manual to your list of manuals |
Page 177 highlights
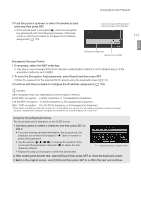
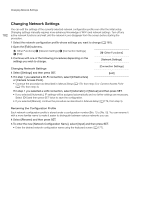
Connecting to a Wi-Fi Network English 3 Push the joystick up/down to select the desired access point and then press SET. • If the access point is encrypted (C), enter the encryption key (password) with the following procedure. Otherwise, continue with the procedure to configure the IP address assignment (A 179). Current access point/Total number of active access points detected 177 Encrypted access point Network name (SSID) Encrypted Access Points 1 If necessary, select the WEP index key. • This step is only necessary if the Wi-Fi network's authentication method is set to [Shared Key] or if the encryption method is set to [WEP]. 2 To enter the [Encryption Key] (password), select [Input] and then press SET. • Enter the password of the selected Wi-Fi network using the keyboard screen (A 177). 3 Continue with the procedure to configure the IP address assignment (A 179). NOTES Valid encryption keys vary depending on the encryption method. 64-bit WEP encryption: 5 ASCII characters or 10 hexadecimal characters. 128-bit WEP encryption: 13 ASCII characters or 26 hexadecimal characters. AES / TKIP encryption: 8 to 63 ASCII characters or 64 hexadecimal characters. * Note: ASCII characters include the numbers 0 to 9, the letters a to z and A to Z and some punctuation marks and special symbols. Hexadecimal characters comprise the numbers 0 to 9 and the letters a to f and A to F. Using the Virtual Keyboard Screen The virtual keyboard is displayed on the OLED screen. 1 Use the joystick to select a character and then press SET to add it. • If you are entering sensitive information, like a password, the character you entered will change to "‹" after a moment to protect the password. • Use the arrows to change the position of the cursor and the backspace character (™) to delete the last character entered. • Repeat this step as necessary to enter the desired text. Current character / Character limit 2 After entering the desired text, select [OK] and then press SET to close the keyboard screen. 3 Back in the original screen, select [OK] and then press SET to confirm the text and continue.
-
 1
1 -
2
-
3
-
4
-
5
-
6
-
7
-
8
-
9
-
10
-
11
-
12
-
13
-
14
-
15
-
16
-
17
-
18
-
19
-
20
-
21
-
22
-
23
-
24
-
25
-
26
-
27
-
28
-
29
-
30
-
31
-
32
-
33
-
34
-
35
-
36
-
37
-
38
-
39
-
40
-
41
-
42
-
43
-
44
-
45
-
46
-
47
-
48
-
49
-
50
-
51
-
52
-
53
-
54
-
55
-
56
-
57
-
58
-
59
-
60
-
61
-
62
-
63
-
64
-
65
-
66
-
67
-
68
-
69
-
70
-
71
-
72
-
73
-
74
-
75
-
76
-
77
-
78
-
79
-
80
-
81
-
82
-
83
-
84
-
85
-
86
-
87
-
88
-
89
-
90
-
91
-
92
-
93
-
94
-
95
-
96
-
97
-
98
-
99
-
100
-
101
-
102
-
103
-
104
-
105
-
106
-
107
-
108
-
109
-
110
-
111
-
112
-
113
-
114
-
115
-
116
-
117
-
118
-
119
-
120
-
121
-
122
-
123
-
124
-
125
-
126
-
127
-
128
-
129
-
130
-
131
-
132
-
133
-
134
-
135
-
136
-
137
-
138
-
139
-
140
-
141
-
142
-
143
-
144
-
145
-
146
-
147
-
148
-
149
-
150
-
151
-
152
-
153
-
154
-
155
-
156
-
157
-
158
-
159
-
160
-
161
-
162
-
163
-
164
-
165
-
166
-
167
-
168
-
169
-
170
-
171
-
 172
172 -
 173
173 -
 174
174 -
 175
175 -
 176
176 -
 177
177 -
 178
178 -
 179
179 -
 180
180 -
 181
181 -
 182
182 -
183
-
184
-
185
-
186
-
187
-
188
-
189
-
190
-
191
-
192
-
193
-
194
-
195
-
196
-
197
-
198
-
199
-
200
-
201
-
202
-
203
-
204
-
205
-
206
-
207
-
208
-
209
-
210
-
211
-
212
-
213
-
214
-
215
-
216
-
217
-
218
-
219
-
220
-
221
-
222
-
223
-
224
-
225
-
226
-
227
-
228
-
229
-
230
-
231
-
232
-
233
-
234
-
235
-
236
-
237
-
238
-
239
-
240
-
241
-
242
-
243
-
244
-
245
-
246
-
247
-
248
-
249
-
250
 |
 |
