Canon XF205 XF200 XF205 Instruction Manual - Page 191
FTP Transfer in CAMERA Mode, Back in the [FTP Transfer Settings] submenu, select [Same
 |
View all Canon XF205 manuals
Add to My Manuals
Save this manual to your list of manuals |
Page 191 highlights
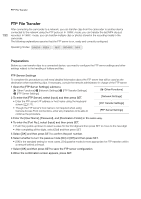
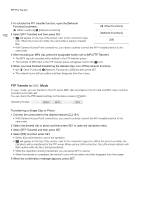
FTP File Transfer English FTP Transfer Settings These settings determine the handling of files and folders on the FTP server. 1 Open the [Create Folder by Date] submenu. [w Other Functions] > [Network Settings] > [FTP Transfer Settings] > [Create Folder by Date] 2 Select the desired option and then press SET. 3 Back in the [FTP Transfer Settings] submenu, select [Same Named Files] and then press SET. 4 Select the desired option and then press SET. [w Other Functions] [Network Settings] [FTP Transfer Settings] [Create Folder by Date] [On] [w Other Functions] 191 [Network Settings] [FTP Transfer Settings] [Same Named Files] Options [On]: [Off]: [Skip] A new subfolder under the transfer destination folder "YYYYMMDD\HHMMSS" will be created for every transfer operation. All the files will be transferred to the folder set as [Destination Folder] in the FTP server settings. [Skip]: If a file with the same name already exists in the destination folder, the file will not be transferred. [Overwrite]: Even if a file with the same name already exists in the destination folder, the file will be transferred, overwriting any file with the same name in the destination folder. FTP Transfer in Mode If you activate the FTP transfer function and set in advance an assignable button to [MP4 FTP Transfer], you can press the button to add the last MP4 clip recorded to the FTP transfer queue (up to 5 clips). MP4 clips are then transferred to the FTP server one by one. The FTP transfer is performed in the background so you can continue recording while the files are transferred. In fact, the transfer will not be interrupted even if you set the camcorder to mode. You can check the FTP-related settings on the status screens (A 221). Operating modes: 1 Set an assignable button to [MP4 FTP Transfer] in advance (A 129). 2 Connect the camcorder to the desired network (A 181).
-
 1
1 -
2
-
3
-
4
-
5
-
6
-
7
-
8
-
9
-
10
-
11
-
12
-
13
-
14
-
15
-
16
-
17
-
18
-
19
-
20
-
21
-
22
-
23
-
24
-
25
-
26
-
27
-
28
-
29
-
30
-
31
-
32
-
33
-
34
-
35
-
36
-
37
-
38
-
39
-
40
-
41
-
42
-
43
-
44
-
45
-
46
-
47
-
48
-
49
-
50
-
51
-
52
-
53
-
54
-
55
-
56
-
57
-
58
-
59
-
60
-
61
-
62
-
63
-
64
-
65
-
66
-
67
-
68
-
69
-
70
-
71
-
72
-
73
-
74
-
75
-
76
-
77
-
78
-
79
-
80
-
81
-
82
-
83
-
84
-
85
-
86
-
87
-
88
-
89
-
90
-
91
-
92
-
93
-
94
-
95
-
96
-
97
-
98
-
99
-
100
-
101
-
102
-
103
-
104
-
105
-
106
-
107
-
108
-
109
-
110
-
111
-
112
-
113
-
114
-
115
-
116
-
117
-
118
-
119
-
120
-
121
-
122
-
123
-
124
-
125
-
126
-
127
-
128
-
129
-
130
-
131
-
132
-
133
-
134
-
135
-
136
-
137
-
138
-
139
-
140
-
141
-
142
-
143
-
144
-
145
-
146
-
147
-
148
-
149
-
150
-
151
-
152
-
153
-
154
-
155
-
156
-
157
-
158
-
159
-
160
-
161
-
162
-
163
-
164
-
165
-
166
-
167
-
168
-
169
-
170
-
171
-
172
-
173
-
174
-
175
-
176
-
177
-
178
-
179
-
180
-
181
-
182
-
183
-
184
-
185
-
 186
186 -
 187
187 -
 188
188 -
 189
189 -
 190
190 -
 191
191 -
 192
192 -
 193
193 -
 194
194 -
 195
195 -
 196
196 -
197
-
198
-
199
-
200
-
201
-
202
-
203
-
204
-
205
-
206
-
207
-
208
-
209
-
210
-
211
-
212
-
213
-
214
-
215
-
216
-
217
-
218
-
219
-
220
-
221
-
222
-
223
-
224
-
225
-
226
-
227
-
228
-
229
-
230
-
231
-
232
-
233
-
234
-
235
-
236
-
237
-
238
-
239
-
240
-
241
-
242
-
243
-
244
-
245
-
246
-
247
-
248
-
249
-
250
 |
 |
