Canon XF205 XF200 XF205 Instruction Manual - Page 212
LAN Ethernet LED], Delete Last Clip]
 |
View all Canon XF205 manuals
Add to My Manuals
Save this manual to your list of manuals |
Page 212 highlights
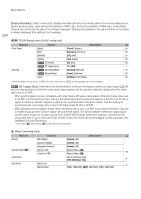
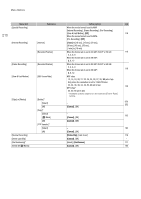
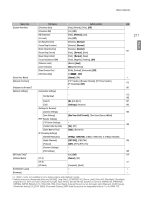
Menu Options 212 Transfer], [Add Shot Mark 1], [Add Shot Mark 2], [Add $ Mark], [Add % Mark], [Time Code], [Time Code Hold], [HEADPHONE +], [HEADPHONE -], [Monitor Channels], [Audio Level], [Wireless Controller], [Photo], [Status], [My Menu], [Initialize Media], [User Setting]. The default settings are as follows. [1]: [PEAKING], [2]: [ZEBRA], [3]: [POWERED IS], [4]: [MAGN.], [5] to [10]: [NONE], [11]: [HEADPHONE +], [12]: [HEADPHONE -], [13]: [WFM]. 3 Available only when the optional GP-E2 GPS Receiver is connected to the camcorder. [Reset]: Reset various camcorder settings. [All Settings]: Resets all the camcorder's settings to default settings, except for the hour meter. [Camera Settings] ( mode only): Resets the white balance, iris, gain, shutter speed, [~ Camera Setup] settings and custom picture settings to default settings. [Assignable Buttons]: Resets the assignable buttons to default settings. [Tally Lamp] ( mode only): Allows you to set whether the front and rear tally lamps illuminate while the camcorder is recording. [POWER LED]: Allows you to set whether the power indicator illuminates while the camcorder is on. [Media Access LED]: Allows you to set whether the CF card access indicators or the SD card access indicator illuminate while the camcorder is accessing a CF card or SD card. [LAN (Ethernet) LED]: Allows you to set whether the LAN access indicator illuminates when the camcorder is accessing a network via the LAN cable. [Genlock Adjustment] ( mode only): The phase difference between the external Genlock signal and the camcorder is initially set to 0. This function allows you to adjust it within the range of approx. ±0.4 H (-1023 to 1023). When setting to 1000 or more or -1000 or less, set the first field to 10 or -10, respectively. [MXF] > [Clips] settings ( mode only) [Title Prefix]: Determines the first 2 characters of the clip name. Combined with the [Number Setting] setting, this constitutes the 6-character clip name. [Number Setting]: Determines the last 4 digits of the clip name. Combined with the [Title Prefix] setting, this constitutes the 6-character clip name. Select [Set] to assign a desired number to the first clip you record or select [Reset] to reset the number to [0001]. The numerals increase every time a clip is recorded. [MXF] > [Set Metadata] settings ( mode only) [Country Code]: This identifier is the country code defined by ISO-3166-1 and is to be entered starting from the left. [Organization]: This identifier represents the organization that owns or operates the camcorder and can be obtained by registering with the SMPTE Registration Authority. If the organization is not registered, enter [0000]. [User Code]: This identifier designates the user. Leave this blank if [Organization] is set to [0000]. [Delete Last Clip]: ( mode only): Deletes the last clip you recorded. This setting option will not appear if you turned the camcorder off since recording the last clip. [Reset Hour Meter]: The camcorder has two "hour meters" - the first keeps track of total operation time and the second keeps track of operation time since the last time the second hour meter was reset with this function. [Certification Logos] ( mode only): This setting displays certification logos that apply to this camcorder. [Firmware] ( mode only): You can verify the current version of the camcorder's firmware. This menu option is usually unavailable. [¥ My Menu] ( mode only) Menu item Submenu Setting options A [Edit] [Register] [Cancel], [OK] 30 [Move] [Cancel], [OK] [Delete] [Cancel], [OK] [Reset All] [Cancel], [OK]
-
 1
1 -
2
-
3
-
4
-
5
-
6
-
7
-
8
-
9
-
10
-
11
-
12
-
13
-
14
-
15
-
16
-
17
-
18
-
19
-
20
-
21
-
22
-
23
-
24
-
25
-
26
-
27
-
28
-
29
-
30
-
31
-
32
-
33
-
34
-
35
-
36
-
37
-
38
-
39
-
40
-
41
-
42
-
43
-
44
-
45
-
46
-
47
-
48
-
49
-
50
-
51
-
52
-
53
-
54
-
55
-
56
-
57
-
58
-
59
-
60
-
61
-
62
-
63
-
64
-
65
-
66
-
67
-
68
-
69
-
70
-
71
-
72
-
73
-
74
-
75
-
76
-
77
-
78
-
79
-
80
-
81
-
82
-
83
-
84
-
85
-
86
-
87
-
88
-
89
-
90
-
91
-
92
-
93
-
94
-
95
-
96
-
97
-
98
-
99
-
100
-
101
-
102
-
103
-
104
-
105
-
106
-
107
-
108
-
109
-
110
-
111
-
112
-
113
-
114
-
115
-
116
-
117
-
118
-
119
-
120
-
121
-
122
-
123
-
124
-
125
-
126
-
127
-
128
-
129
-
130
-
131
-
132
-
133
-
134
-
135
-
136
-
137
-
138
-
139
-
140
-
141
-
142
-
143
-
144
-
145
-
146
-
147
-
148
-
149
-
150
-
151
-
152
-
153
-
154
-
155
-
156
-
157
-
158
-
159
-
160
-
161
-
162
-
163
-
164
-
165
-
166
-
167
-
168
-
169
-
170
-
171
-
172
-
173
-
174
-
175
-
176
-
177
-
178
-
179
-
180
-
181
-
182
-
183
-
184
-
185
-
186
-
187
-
188
-
189
-
190
-
191
-
192
-
193
-
194
-
195
-
196
-
197
-
198
-
199
-
200
-
201
-
202
-
203
-
204
-
205
-
206
-
 207
207 -
 208
208 -
 209
209 -
 210
210 -
 211
211 -
 212
212 -
 213
213 -
 214
214 -
 215
215 -
 216
216 -
 217
217 -
218
-
219
-
220
-
221
-
222
-
223
-
224
-
225
-
226
-
227
-
228
-
229
-
230
-
231
-
232
-
233
-
234
-
235
-
236
-
237
-
238
-
239
-
240
-
241
-
242
-
243
-
244
-
245
-
246
-
247
-
248
-
249
-
250
 |
 |