Canon XF205 XF200 XF205 Instruction Manual - Page 182
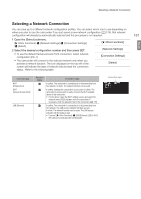
Changing Network Settings, or [Camera Access Point].
 |
View all Canon XF205 manuals
Add to My Manuals
Save this manual to your list of manuals |
Page 182 highlights
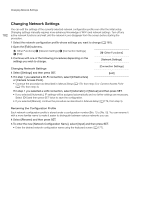
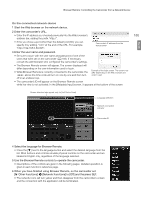
Changing Network Settings Changing Network Settings 182 You can edit the settings of the currently selected network configuration profile even after the initial setup. Changing settings manually requires more advanced knowledge of Wi-Fi and network settings. Turn off any active network functions and wait until the network icons disappear from the screen before starting the procedure. 1 Select the network configuration profile whose settings you want to change (A 181). 2 Open the [Edit] submenu. [w Other Functions] > [Network Settings] > [Connection Settings] > [Edit] [w Other Functions] 3 Continue with one of the following procedures depending on the settings you wish to change. [Network Settings] Changing Network Settings [Connection Settings] 4 Select [Settings] and then press SET. [Edit] 5 If in step 1 you selected a Wi-Fi connection, select [Infrastructure] or [Camera Access Point]. • Continue the procedure as described in Manual Setup (A 178, from step 3) or Camera Access Point (A 178, from step 3). If in step 1 you selected a LAN connection, select [Automatic] or [Manual] and then press SET. • If you selected [Automatic], IP settings will be assigned automatically and no further settings are necessary. Select [OK] and then press SET twice to save the configuration. • If you selected [Manual], continue the procedure as described in Manual Setup (A 178, from step 3). Renaming the Configuration Profile Each network configuration profile is stored under a configuration number ([No. 1] to [No. 5]). You can rename it with a more familiar name to make it easier to distinguish between various networks you use. 4 Select [Rename] and then press SET. 5 To enter the new [Network Configuration Name], select [Input] and then press SET. • Enter the desired network configuration name using the keyboard screen (A 177).
-
 1
1 -
2
-
3
-
4
-
5
-
6
-
7
-
8
-
9
-
10
-
11
-
12
-
13
-
14
-
15
-
16
-
17
-
18
-
19
-
20
-
21
-
22
-
23
-
24
-
25
-
26
-
27
-
28
-
29
-
30
-
31
-
32
-
33
-
34
-
35
-
36
-
37
-
38
-
39
-
40
-
41
-
42
-
43
-
44
-
45
-
46
-
47
-
48
-
49
-
50
-
51
-
52
-
53
-
54
-
55
-
56
-
57
-
58
-
59
-
60
-
61
-
62
-
63
-
64
-
65
-
66
-
67
-
68
-
69
-
70
-
71
-
72
-
73
-
74
-
75
-
76
-
77
-
78
-
79
-
80
-
81
-
82
-
83
-
84
-
85
-
86
-
87
-
88
-
89
-
90
-
91
-
92
-
93
-
94
-
95
-
96
-
97
-
98
-
99
-
100
-
101
-
102
-
103
-
104
-
105
-
106
-
107
-
108
-
109
-
110
-
111
-
112
-
113
-
114
-
115
-
116
-
117
-
118
-
119
-
120
-
121
-
122
-
123
-
124
-
125
-
126
-
127
-
128
-
129
-
130
-
131
-
132
-
133
-
134
-
135
-
136
-
137
-
138
-
139
-
140
-
141
-
142
-
143
-
144
-
145
-
146
-
147
-
148
-
149
-
150
-
151
-
152
-
153
-
154
-
155
-
156
-
157
-
158
-
159
-
160
-
161
-
162
-
163
-
164
-
165
-
166
-
167
-
168
-
169
-
170
-
171
-
172
-
173
-
174
-
175
-
176
-
 177
177 -
 178
178 -
 179
179 -
 180
180 -
 181
181 -
 182
182 -
 183
183 -
 184
184 -
 185
185 -
 186
186 -
 187
187 -
188
-
189
-
190
-
191
-
192
-
193
-
194
-
195
-
196
-
197
-
198
-
199
-
200
-
201
-
202
-
203
-
204
-
205
-
206
-
207
-
208
-
209
-
210
-
211
-
212
-
213
-
214
-
215
-
216
-
217
-
218
-
219
-
220
-
221
-
222
-
223
-
224
-
225
-
226
-
227
-
228
-
229
-
230
-
231
-
232
-
233
-
234
-
235
-
236
-
237
-
238
-
239
-
240
-
241
-
242
-
243
-
244
-
245
-
246
-
247
-
248
-
249
-
250
 |
 |
