Canon XF205 XF200 XF205 Instruction Manual - Page 184
Starting Browser Remote, To enter the [User Name] for the [Full Control User] or [Camera
 |
View all Canon XF205 manuals
Add to My Manuals
Save this manual to your list of manuals |
Page 184 highlights
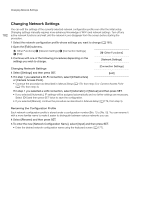
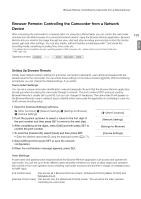
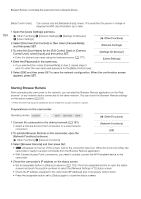
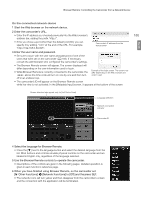
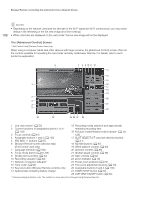
Browser Remote: Controlling the Camcorder from a Network Device [Meta Control User] Can access only the [Metadata Input] screen. This would be the person in charge of keeping the MXF clip information up to date. 184 1 Open the [Users Settings] submenu. [w Other Functions] > [Network Settings] > [Settings for Browser] > [Users Settings] [w Other Functions] 2 Select [One User (Full Control)] or [Two Users (Camera/Meta)] and then press SET. [Network Settings] 3 To enter the [User Name] for the [Full Control User] or [Camera Control User], select [Input] and then press SET. • Enter the desired user name using the keyboard screen (A 177). 4 Enter the [Password] in the same way. [Settings for Browser] [Users Settings] • If you selected [Two Users (Camera/Meta)] in step 2, repeat steps 3 and 4 to enter the user name and password for the [Meta Control User]. 5 Select [OK] and then press SET to save the network configuration. When the confirmation screen appears, press SET. Starting Browser Remote After connecting the camcorder to the network, you can start the Browser Remote application on the Web browser* of any network device connected to the same network. You can check the Browser Remote settings on the status screens (A 220). * A Web browser that supports JavaScript and is enabled to accept cookies is required. Preparations on the camcorder Operating modes: [w Other Functions] 1 Connect the camcorder to the desired network (A 181). • Select a Camera Access Point connection or a wired network connection. 2 To activate Browser Remote on the camcorder, open the [Network Functions] submenu. [w Other Functions] > [Network Functions] [Network Functions] [Off] 3 Select [Browser Remote] and then press SET. • will appear on the top of the screen, next to the connection type icon. When the icons turn white, the camcorder is ready to accept commands from the Browser Remote application. • With Camera Access Point connections, you need to actively connect the Wi-Fi enabled device to the camcorder. 4 Check the camcorder's IP address on the status screen. • Set an assignable button to [Status] in advance (A 129). Press the assignable button to open the status screens and push the joystick up/down to select the [Network Settings 4/12] status screen. • Check the IP address assigned to the camcorder ([IP Address]) and, if necessary, write it down. • Press the assignable button set to [Status] again to close the status screens
-
 1
1 -
2
-
3
-
4
-
5
-
6
-
7
-
8
-
9
-
10
-
11
-
12
-
13
-
14
-
15
-
16
-
17
-
18
-
19
-
20
-
21
-
22
-
23
-
24
-
25
-
26
-
27
-
28
-
29
-
30
-
31
-
32
-
33
-
34
-
35
-
36
-
37
-
38
-
39
-
40
-
41
-
42
-
43
-
44
-
45
-
46
-
47
-
48
-
49
-
50
-
51
-
52
-
53
-
54
-
55
-
56
-
57
-
58
-
59
-
60
-
61
-
62
-
63
-
64
-
65
-
66
-
67
-
68
-
69
-
70
-
71
-
72
-
73
-
74
-
75
-
76
-
77
-
78
-
79
-
80
-
81
-
82
-
83
-
84
-
85
-
86
-
87
-
88
-
89
-
90
-
91
-
92
-
93
-
94
-
95
-
96
-
97
-
98
-
99
-
100
-
101
-
102
-
103
-
104
-
105
-
106
-
107
-
108
-
109
-
110
-
111
-
112
-
113
-
114
-
115
-
116
-
117
-
118
-
119
-
120
-
121
-
122
-
123
-
124
-
125
-
126
-
127
-
128
-
129
-
130
-
131
-
132
-
133
-
134
-
135
-
136
-
137
-
138
-
139
-
140
-
141
-
142
-
143
-
144
-
145
-
146
-
147
-
148
-
149
-
150
-
151
-
152
-
153
-
154
-
155
-
156
-
157
-
158
-
159
-
160
-
161
-
162
-
163
-
164
-
165
-
166
-
167
-
168
-
169
-
170
-
171
-
172
-
173
-
174
-
175
-
176
-
177
-
178
-
 179
179 -
 180
180 -
 181
181 -
 182
182 -
 183
183 -
 184
184 -
 185
185 -
 186
186 -
 187
187 -
 188
188 -
 189
189 -
190
-
191
-
192
-
193
-
194
-
195
-
196
-
197
-
198
-
199
-
200
-
201
-
202
-
203
-
204
-
205
-
206
-
207
-
208
-
209
-
210
-
211
-
212
-
213
-
214
-
215
-
216
-
217
-
218
-
219
-
220
-
221
-
222
-
223
-
224
-
225
-
226
-
227
-
228
-
229
-
230
-
231
-
232
-
233
-
234
-
235
-
236
-
237
-
238
-
239
-
240
-
241
-
242
-
243
-
244
-
245
-
246
-
247
-
248
-
249
-
250
 |
 |