D-Link DSN-540 Software User's Guide for DSN-1100-10 - Page 102
Restoring Factory Default Settings Control Tab, Upgrading Software Control Tab
 |
UPC - 790069324017
View all D-Link DSN-540 manuals
Add to My Manuals
Save this manual to your list of manuals |
Page 102 highlights
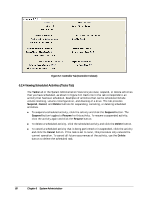
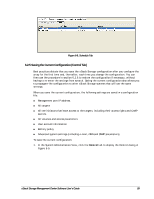
6.2.7 Restoring Factory Default Settings (Control Tab) There may be times when you want to return the xStack Storage array to its factory default settings. Using the Restore Factory Defaults button in the Settings tab of the System Administration view, you can return the xStack Storage to the settings that were in effect when it was shipped from the factory. However, any volumes you set up will remain intact. For a complete list of the xStack Storage's factory default settings, refer to Appendix B. 1. In the System Administration View, click the Control tab. 2. Click the Restore Factory Defaults button. The Restore Factory Defaults message in Figure 6-13 appears. Figure 6-13. Restore Factory Defaults Message 3. If you want to return the management port to its default factory setting, click Yes. Doing so, however, means you will have to change the IP address of your Management Center to the same subnet as the xStack Storage's default port of 192.168.1.1. Otherwise, click No to not restore the management port to the factory default setting. Or you can click Cancel to cancel the operation. 6.2.8 Upgrading Software (Control Tab) From time to time, software upgrades will be made available that contain new features and other improvements. Using the Control tab, you can update the xStack Storage software. If your xStack Storage system is equipped with redundant controllers that are already running version 2.5.0 (or later), this procedure will update the software on both controllers at the same time. To upgrade software, you must download the software file to a location where the xStack Storage can access it. If your environment uses a portbased firewall, either disable the firewall prior to upgrading software or create a rule that will allow the xStack Storage to go outside the firewall. For more information, see section 9.3. To upgrade the software: 1. Download the xStack Storage software file and note the location where the file has been downloaded. 2. In the System Administration View, click the Control tab. 3. Click the Upgrade button. The Open dialog box appears (see Figure 6-10). 92 Chapter 6 System Administration
-
 1
1 -
2
-
3
-
4
-
5
-
6
-
7
-
8
-
9
-
10
-
11
-
12
-
13
-
14
-
15
-
16
-
17
-
18
-
19
-
20
-
21
-
22
-
23
-
24
-
25
-
26
-
27
-
28
-
29
-
30
-
31
-
32
-
33
-
34
-
35
-
36
-
37
-
38
-
39
-
40
-
41
-
42
-
43
-
44
-
45
-
46
-
47
-
48
-
49
-
50
-
51
-
52
-
53
-
54
-
55
-
56
-
57
-
58
-
59
-
60
-
61
-
62
-
63
-
64
-
65
-
66
-
67
-
68
-
69
-
70
-
71
-
72
-
73
-
74
-
75
-
76
-
77
-
78
-
79
-
80
-
81
-
82
-
83
-
84
-
85
-
86
-
87
-
88
-
89
-
90
-
91
-
92
-
93
-
94
-
95
-
96
-
 97
97 -
 98
98 -
 99
99 -
 100
100 -
 101
101 -
 102
102 -
 103
103 -
 104
104 -
 105
105 -
 106
106 -
 107
107 -
108
-
109
-
110
-
111
-
112
-
113
-
114
-
115
-
116
-
117
-
118
-
119
-
120
-
121
-
122
-
123
-
124
-
125
-
126
-
127
-
128
-
129
-
130
-
131
-
132
-
133
-
134
-
135
-
136
-
137
-
138
-
139
-
140
-
141
-
142
-
143
-
144
-
145
-
146
-
147
-
148
-
149
-
150
-
151
-
152
-
153
-
154
-
155
-
156
-
157
-
158
 |
 |
