D-Link DSN-540 Software User's Guide for DSN-1100-10 - Page 118
Deleting a Network Portal
 |
UPC - 790069324017
View all D-Link DSN-540 manuals
Add to My Manuals
Save this manual to your list of manuals |
Page 118 highlights
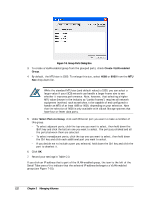
Figure 7-5. Create Portal dialogs If the selected Ethernet port is not part of a VLAN, the VLAN ID field is not present in the Create Portal dialog box. 3. In the IP Address field, enter the IP address for the network portal. The IP address must be a unique address that is different than the management port and reside on the same subnet as the iSCSI initiator. 4. In the Subnet Mask field, enter a subnet mask for the network portal. 5. In the Gateway field, enter the default gateway, if appropriate. 6. If the selected Ethernet port is part of a VLAN, use the VLAN id field to specify the ID of the VLAN to which this portal will belong, within the range of 2 through 4094. A value of cannot be set to 1, since it is reserved. 7. Click the OK button. The network portal appears below the selected Ethernet port in the Main Display. 7.4.2 Deleting a Network Portal If you no longer need a network portal, use the following procedure to delete it. 1. In the Network Settings View, click an IP address in the Main Display for the network portal you want to delete. 2. Perform one of the following steps: - On the Network menu, click Delete Portal. - In the System Actions panel, click Delete Portal. - Press the right mouse button and click Delete Portal from the shortcut menu. Any of these steps displays the message in Figure 7-6. 108 Chapter 3 Managing Volumes
-
 1
1 -
2
-
3
-
4
-
5
-
6
-
7
-
8
-
9
-
10
-
11
-
12
-
13
-
14
-
15
-
16
-
17
-
18
-
19
-
20
-
21
-
22
-
23
-
24
-
25
-
26
-
27
-
28
-
29
-
30
-
31
-
32
-
33
-
34
-
35
-
36
-
37
-
38
-
39
-
40
-
41
-
42
-
43
-
44
-
45
-
46
-
47
-
48
-
49
-
50
-
51
-
52
-
53
-
54
-
55
-
56
-
57
-
58
-
59
-
60
-
61
-
62
-
63
-
64
-
65
-
66
-
67
-
68
-
69
-
70
-
71
-
72
-
73
-
74
-
75
-
76
-
77
-
78
-
79
-
80
-
81
-
82
-
83
-
84
-
85
-
86
-
87
-
88
-
89
-
90
-
91
-
92
-
93
-
94
-
95
-
96
-
97
-
98
-
99
-
100
-
101
-
102
-
103
-
104
-
105
-
106
-
107
-
108
-
109
-
110
-
111
-
112
-
 113
113 -
 114
114 -
 115
115 -
 116
116 -
 117
117 -
 118
118 -
 119
119 -
 120
120 -
 121
121 -
 122
122 -
 123
123 -
124
-
125
-
126
-
127
-
128
-
129
-
130
-
131
-
132
-
133
-
134
-
135
-
136
-
137
-
138
-
139
-
140
-
141
-
142
-
143
-
144
-
145
-
146
-
147
-
148
-
149
-
150
-
151
-
152
-
153
-
154
-
155
-
156
-
157
-
158
 |
 |
