Epson 1520 User Manual - Page 103
Selecting Character Tables
 |
UPC - 010343813328
View all Epson 1520 manuals
Add to My Manuals
Save this manual to your list of manuals |
Page 103 highlights
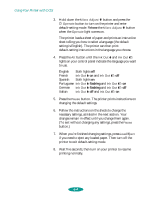
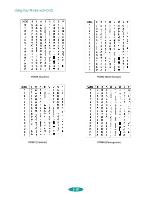
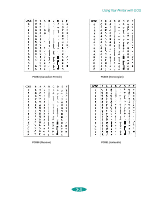
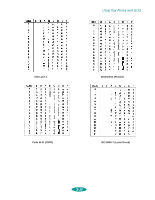
Using Your Printer with DOS Note: You can use a mouse with the utility if you have a DOS mouse driver installed. 2. Load several sheets of paper at least 8.3 inches (210 mm) wide in the built-in sheet feeder, making sure the right edge guide is positioned correctly for your paper's width. Also make sure the paper release lever is set to the single sheet position. (See page 3-6 for instructions.) 3. Insert the EPSON printer software CD-ROM or diskette into a drive. 4. At the DOS prompt, type d:\SETUP (where d is the drive letter of your drive) and press Enter. 5. You see an installation instruction screen. Follow the instructions on the screen to install the utility on your computer's hard disk drive. 6. Once the utility is installed, log onto the directory you specified for the utility. Then type EPCALIB and press Enter to start the program. 7. You see the EPSON Print Head Alignment Utility main screen. Make sure your printer is listed on the screen and select Next. 8. Follow the instructions on the utility screens to align your print heads. Note: Some tables contain the same characters for hex codes 00 to 7F as the PC437 table, so these samples list only characters for codes 80 to FF. Selecting Character Tables Most of the time you can select character tables using your application software. If you can't select them with your software, follow the instructions here to select one of the printer's internal character tables. You can select a character table using default-setting mode (as described on page 5-3) or printer sofware commands (as described on page 5-17). Each character table is identified by the code shown beneath the sample, beginning on the next page. 5-8
-
 1
1 -
2
-
3
-
4
-
5
-
6
-
7
-
8
-
9
-
10
-
11
-
12
-
13
-
14
-
15
-
16
-
17
-
18
-
19
-
20
-
21
-
22
-
23
-
24
-
25
-
26
-
27
-
28
-
29
-
30
-
31
-
32
-
33
-
34
-
35
-
36
-
37
-
38
-
39
-
40
-
41
-
42
-
43
-
44
-
45
-
46
-
47
-
48
-
49
-
50
-
51
-
52
-
53
-
54
-
55
-
56
-
57
-
58
-
59
-
60
-
61
-
62
-
63
-
64
-
65
-
66
-
67
-
68
-
69
-
70
-
71
-
72
-
73
-
74
-
75
-
76
-
77
-
78
-
79
-
80
-
81
-
82
-
83
-
84
-
85
-
86
-
87
-
88
-
89
-
90
-
91
-
92
-
93
-
94
-
95
-
96
-
97
-
 98
98 -
 99
99 -
 100
100 -
 101
101 -
 102
102 -
 103
103 -
 104
104 -
 105
105 -
 106
106 -
 107
107 -
 108
108 -
109
-
110
-
111
-
112
-
113
-
114
-
115
-
116
-
117
-
118
-
119
-
120
-
121
-
122
-
123
-
124
-
125
-
126
-
127
-
128
-
129
-
130
-
131
-
132
-
133
-
134
-
135
-
136
-
137
-
138
-
139
-
140
-
141
-
142
-
143
-
144
-
145
-
146
-
147
-
148
-
149
-
150
-
151
-
152
-
153
-
154
-
155
-
156
-
157
-
158
-
159
-
160
-
161
-
162
-
163
-
164
-
165
-
166
-
167
 |
 |
