Epson 1520 User Manual - Page 129
Vertical lines are misaligned or vertical banding appears.
 |
UPC - 010343813328
View all Epson 1520 manuals
Add to My Manuals
Save this manual to your list of manuals |
Page 129 highlights
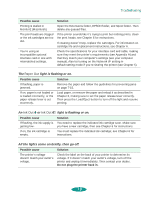
Troubleshooting Vertical lines are misaligned or vertical banding appears. Possible cause The print head nozzles are clogged. Solution Clean the print heads. See Chapter 6 for instructions. High Speed mode or Bi-D mode are turned on. If vertical lines are misaligned, turn off High Speed mode in the printer software (see Chapter 2 for information). If you're printing with DOS, turn off Bi-D printing using default-setting mode (see Chapter 5 for instructions). The print heads are misaligned. Run the Print Head Alignment utility. See Chapter 6 for Windows or Macintosh instructions; see Chapter 5 for DOS instructions. The printed image has incorrect or missing colors. Possible cause Solution The Ink option is set to Black. Change the Ink setting to Color. See Chapter 1 for instructions. The Media Type setting doesn't match the loaded paper. Make sure the Media Type setting matches the paper or media you're using. Then the printer software can automatically select other settings for the best quality. See Chapters 1 through 3. The printable side of the paper is loaded upside down. Remove the paper and reload it correctly for the media and feeder you're using. See Chapter 3 for instructions. The Halftoning and Color Adjustment Mode options are set incorrectly for your document type. Use the correct settings for the project you are printing, following the instructions in Chapter 2. The print head nozzles are Clean the print heads. See Chapter 6 for instructions. clogged. The ICM (Windows 95) or ColorSync (Macintosh) settings are incorrect for your document. Use the Automatic mode setting or choose a different project type setting. See Chapter 2 for more information. The ink cartridges are low on ink or one or more ink colors are empty. Check the Ink Out B and Ink Out A lights to see which cartridge you need to replace. See Chapter 6 for instructions. 7-5
-
 1
1 -
2
-
3
-
4
-
5
-
6
-
7
-
8
-
9
-
10
-
11
-
12
-
13
-
14
-
15
-
16
-
17
-
18
-
19
-
20
-
21
-
22
-
23
-
24
-
25
-
26
-
27
-
28
-
29
-
30
-
31
-
32
-
33
-
34
-
35
-
36
-
37
-
38
-
39
-
40
-
41
-
42
-
43
-
44
-
45
-
46
-
47
-
48
-
49
-
50
-
51
-
52
-
53
-
54
-
55
-
56
-
57
-
58
-
59
-
60
-
61
-
62
-
63
-
64
-
65
-
66
-
67
-
68
-
69
-
70
-
71
-
72
-
73
-
74
-
75
-
76
-
77
-
78
-
79
-
80
-
81
-
82
-
83
-
84
-
85
-
86
-
87
-
88
-
89
-
90
-
91
-
92
-
93
-
94
-
95
-
96
-
97
-
98
-
99
-
100
-
101
-
102
-
103
-
104
-
105
-
106
-
107
-
108
-
109
-
110
-
111
-
112
-
113
-
114
-
115
-
116
-
117
-
118
-
119
-
120
-
121
-
122
-
123
-
 124
124 -
 125
125 -
 126
126 -
 127
127 -
 128
128 -
 129
129 -
 130
130 -
 131
131 -
 132
132 -
 133
133 -
 134
134 -
135
-
136
-
137
-
138
-
139
-
140
-
141
-
142
-
143
-
144
-
145
-
146
-
147
-
148
-
149
-
150
-
151
-
152
-
153
-
154
-
155
-
156
-
157
-
158
-
159
-
160
-
161
-
162
-
163
-
164
-
165
-
166
-
167
 |
 |
