Epson 1520 User Manual - Page 126
Running a Self Test, making sure the right edge guide is positioned correctly - stylus color test page
 |
UPC - 010343813328
View all Epson 1520 manuals
Add to My Manuals
Save this manual to your list of manuals |
Page 126 highlights
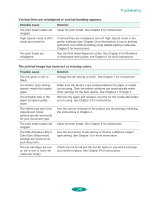
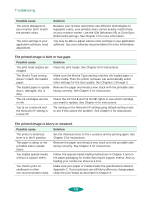
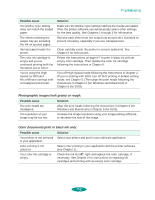
Troubleshooting If you're experienced with reading hexadecimal code, you can print a hex dump to identify possible communication problems. See page 7-3 for instructions. For the latest information, check the EPSON Stylus COLOR 1520 Help program and the ReadMe file in the EPSON program group or folder. If none of the suggested solutions in this chapter solve your problem, contact EPSON as described under "Where to Get Help" in the Introduction. Caution: Use paper that's at least 8.3 inches (210 mm) wide so ink doesn't spray onto the platen. Running a Self Test You can run a printer self test to determine whether the problem lies with the printer itself or some other source. If the test results are satisfactory, the problem lies in software settings, the interface cable, or your computer. If the test pages don't print correctly, you may have a problem with your printer. See the suggestions in this chapter for possible solutions. Follow these steps to test the printer: 1. Load several sheets of paper in the built-in sheet feeder, making sure the right edge guide is positioned correctly for your paper's width and the paper release lever is in the single sheet position. See page 3-6 for instructions. 2. Turn off the printer. 3. Hold down the Load/Eject button and press the POperate button to turn on the printer. Then release both buttons. This prints the test pages at 360 dpi. (To print test pages at 180 dpi, hold down the LF/FF button while turning on the printer instead of Load/Eject.) 7-2
-
 1
1 -
2
-
3
-
4
-
5
-
6
-
7
-
8
-
9
-
10
-
11
-
12
-
13
-
14
-
15
-
16
-
17
-
18
-
19
-
20
-
21
-
22
-
23
-
24
-
25
-
26
-
27
-
28
-
29
-
30
-
31
-
32
-
33
-
34
-
35
-
36
-
37
-
38
-
39
-
40
-
41
-
42
-
43
-
44
-
45
-
46
-
47
-
48
-
49
-
50
-
51
-
52
-
53
-
54
-
55
-
56
-
57
-
58
-
59
-
60
-
61
-
62
-
63
-
64
-
65
-
66
-
67
-
68
-
69
-
70
-
71
-
72
-
73
-
74
-
75
-
76
-
77
-
78
-
79
-
80
-
81
-
82
-
83
-
84
-
85
-
86
-
87
-
88
-
89
-
90
-
91
-
92
-
93
-
94
-
95
-
96
-
97
-
98
-
99
-
100
-
101
-
102
-
103
-
104
-
105
-
106
-
107
-
108
-
109
-
110
-
111
-
112
-
113
-
114
-
115
-
116
-
117
-
118
-
119
-
120
-
 121
121 -
 122
122 -
 123
123 -
 124
124 -
 125
125 -
 126
126 -
 127
127 -
 128
128 -
 129
129 -
 130
130 -
 131
131 -
132
-
133
-
134
-
135
-
136
-
137
-
138
-
139
-
140
-
141
-
142
-
143
-
144
-
145
-
146
-
147
-
148
-
149
-
150
-
151
-
152
-
153
-
154
-
155
-
156
-
157
-
158
-
159
-
160
-
161
-
162
-
163
-
164
-
165
-
166
-
167
 |
 |
