Epson 1520 User Manual - Page 93
Network Printing on a Macintosh
 |
UPC - 010343813328
View all Epson 1520 manuals
Add to My Manuals
Save this manual to your list of manuals |
Page 93 highlights
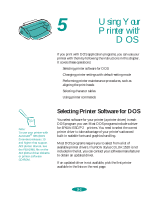
Managing Print Jobs and Network Printing The following dialog box appears: Note: To print from DOS applications as well as Windows applications, click the Capture Printer Port button instead of Add Port. Select the printer port in the Device list, then specify its network path. Select Reconnect at logon, then click OK. 5. Click the Add Port button, then specify the network path to the printer and click OK. 6. Open the Spool Manager window as described on page 4-2. 7. In the Spool Manager window, double-click your printer's queue. The Queue Setup dialog box appears. 8. Make sure the Use Print Manager for this port option is checked. Then click OK. Network Printing on a Macintosh If you want to use your printer on an AppleTalk™ network, you need to install an optional interface board: either the LocalTalk® board or the Ethernet™ board. See Appendix A for more information about optional interfaces. Then you can use the EPSON Namer utility and set up your printer in the Chooser. The EPSON Namer was installed on your hard drive along with the other printer software. 4-13
-
 1
1 -
2
-
3
-
4
-
5
-
6
-
7
-
8
-
9
-
10
-
11
-
12
-
13
-
14
-
15
-
16
-
17
-
18
-
19
-
20
-
21
-
22
-
23
-
24
-
25
-
26
-
27
-
28
-
29
-
30
-
31
-
32
-
33
-
34
-
35
-
36
-
37
-
38
-
39
-
40
-
41
-
42
-
43
-
44
-
45
-
46
-
47
-
48
-
49
-
50
-
51
-
52
-
53
-
54
-
55
-
56
-
57
-
58
-
59
-
60
-
61
-
62
-
63
-
64
-
65
-
66
-
67
-
68
-
69
-
70
-
71
-
72
-
73
-
74
-
75
-
76
-
77
-
78
-
79
-
80
-
81
-
82
-
83
-
84
-
85
-
86
-
87
-
 88
88 -
 89
89 -
 90
90 -
 91
91 -
 92
92 -
 93
93 -
 94
94 -
 95
95 -
 96
96 -
 97
97 -
 98
98 -
99
-
100
-
101
-
102
-
103
-
104
-
105
-
106
-
107
-
108
-
109
-
110
-
111
-
112
-
113
-
114
-
115
-
116
-
117
-
118
-
119
-
120
-
121
-
122
-
123
-
124
-
125
-
126
-
127
-
128
-
129
-
130
-
131
-
132
-
133
-
134
-
135
-
136
-
137
-
138
-
139
-
140
-
141
-
142
-
143
-
144
-
145
-
146
-
147
-
148
-
149
-
150
-
151
-
152
-
153
-
154
-
155
-
156
-
157
-
158
-
159
-
160
-
161
-
162
-
163
-
164
-
165
-
166
-
167
 |
 |
