Epson C7500G Technical Reference Guide - Page 165
State, Cause, Recovery method, Select Advanced in Print Settings of the General tab
 |
View all Epson C7500G manuals
Add to My Manuals
Save this manual to your list of manuals |
Page 165 highlights
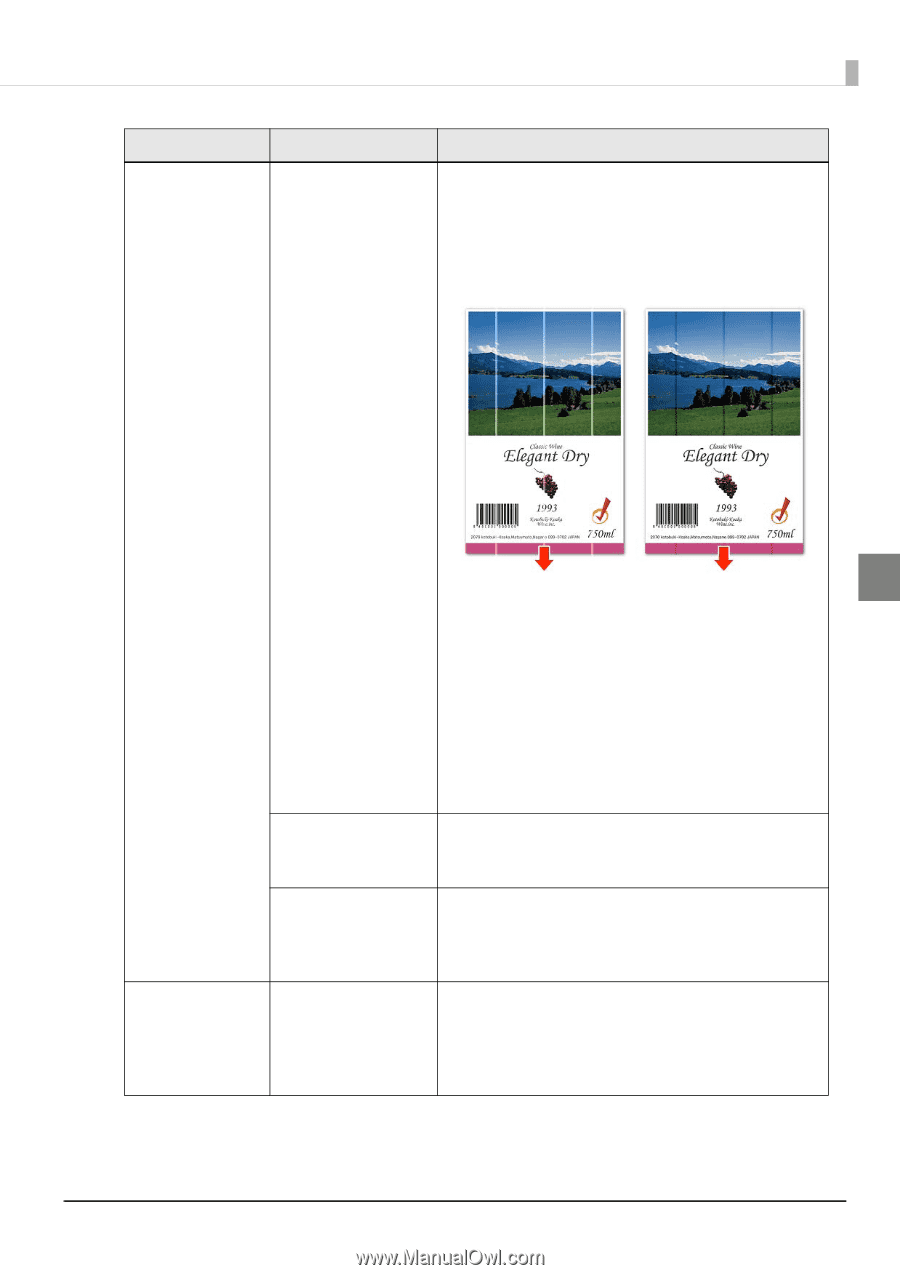
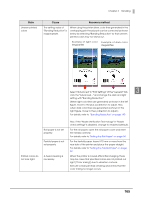
Chapter 3 Handling State Uneven printed colors Cause Recovery method The setting value of "Banding Reduction" is inappropriate. When using the printer driver, color lines generated in the overlapping print head parts can be corrected as shown below by selecting "Banding Reduction" so that uneven printed colors may not stand out. Example of light color Example of dark color irregularities irregularities Select "Advanced" in "Print Settings" of the "General" tab, 3 click the "Advanced..." and change the dark and light setting with "Banding Reduction". (When light color lines are generated as shown in the left figure, move to the plus (+) direction to adjust. Also, when dark color lines are generated as shown in the right figure, move to the (-) direction to adjust.) For details, refer to "Banding Reduction" on page 140 Printed colors do not look right. Roll paper is not set properly. Fanfold paper is not set properly. A head cleaning is necessary. Also, if the "Nozzle Verification Technology" in "Nozzle check settings" is disabled, change to enabled (default). For the roll paper, open the roll paper cover and reset the media correctly. For details, refer to "Setting the Roll Paper" on page 54 For the fanfold paper, leave it 15 mm or more from the rear side of the printer and place the paper straight. For details, refer to "Setting the Fanfold Paper" on page 62 When the printer is moved after initial charging, there may be cases that specified colors are not printed out right ("Color mixing") due to vibration or shock. Execute a manual head cleaning and check that the color mixing no longer occurs. 165
-
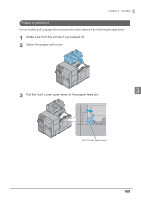
 1
1 -
2
-
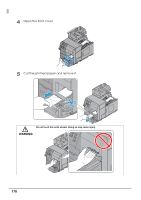
3
-
4
-
5
-
6
-
7
-
8
-
9
-
10
-
11
-
12
-
13
-
14
-
15
-
16
-
17
-
18
-
19
-
20
-
21
-
22
-
23
-
24
-
25
-
26
-
27
-
28
-
29
-
30
-
31
-
32
-
33
-
34
-
35
-
36
-
37
-
38
-
39
-
40
-
41
-
42
-
43
-
44
-
45
-
46
-
47
-
48
-
49
-
50
-
51
-
52
-
53
-
54
-
55
-
56
-
57
-
58
-
59
-
60
-
61
-
62
-
63
-
64
-
65
-
66
-
67
-
68
-
69
-
70
-
71
-
72
-
73
-
74
-
75
-
76
-
77
-
78
-
79
-
80
-
81
-
82
-
83
-
84
-
85
-
86
-
87
-
88
-
89
-
90
-
91
-
92
-
93
-
94
-
95
-
96
-
97
-
98
-
99
-
100
-
101
-
102
-
103
-
104
-
105
-
106
-
107
-
108
-
109
-
110
-
111
-
112
-
113
-
114
-
115
-
116
-
117
-
118
-
119
-
120
-
121
-
122
-
123
-
124
-
125
-
126
-
127
-
128
-
129
-
130
-
131
-
132
-
133
-
134
-
135
-
136
-
137
-
138
-
139
-
140
-
141
-
142
-
143
-
144
-
145
-
146
-
147
-
148
-
149
-
150
-
151
-
152
-
153
-
154
-
155
-
156
-
157
-
158
-
159
-
 160
160 -
 161
161 -
 162
162 -
 163
163 -
 164
164 -
 165
165 -
 166
166 -
 167
167 -
 168
168 -
 169
169 -
 170
170 -
171
-
172
-
173
-
174
-
175
-
176
-
177
-
178
-
179
-
180
-
181
-
182
-
183
-
184
-
185
-
186
-
187
-
188
-
189
-
190
-
191
-
192
-
193
-
194
-
195
-
196
-
197
-
198
-
199
-
200
-
201
-
202
-
203
-
204
-
205
-
206
-
207
-
208
-
209
-
210
-
211
-
212
-
213
-
214
-
215
-
216
-
217
-
218
-
219
-
220
-
221
-
222
-
223
-
224
 |
 |