Epson C7500G Technical Reference Guide - Page 36
Work flow to set up this product without using the Install Navi, Connecting the Power Cable
 |
View all Epson C7500G manuals
Add to My Manuals
Save this manual to your list of manuals |
Page 36 highlights
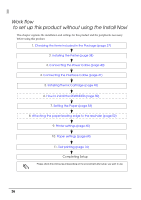
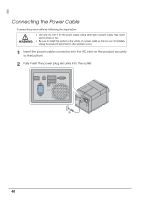
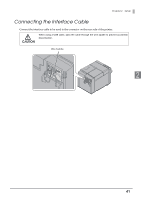
Work flow to set up this product without using the Install Navi This chapter explains the installation and settings for this product and the peripherals necessary before using this product. 1. Checking the Items Included in the Package (page 37) 2. Installing the Printer (page 38) 3. Connecting the Power Cable (page 40) 4. Connecting the Interface Cable (page 41) 5. Installing the Ink Cartridge (page 43) 6. How to install the REWINDER (page 50) 7. Setting the Paper (page 54) 8. Attaching the paper leading edge to the rewinder (page 52) 9. Printer settings (page 65) 10. Paper settings (page 69) 11. Test printing (page 76) Completing Setup Please check the printing result depending on the environment after setup, you want to use. 36
-
 1
1 -
2
-
3
-
4
-
5
-
6
-
7
-
8
-
9
-
10
-
11
-
12
-
13
-
14
-
15
-
16
-
17
-
18
-
19
-
20
-
21
-
22
-
23
-
24
-
25
-
26
-
27
-
28
-
29
-
30
-
 31
31 -
 32
32 -
 33
33 -
 34
34 -
 35
35 -
 36
36 -
 37
37 -
 38
38 -
 39
39 -
 40
40 -
 41
41 -
42
-
43
-
44
-
45
-
46
-
47
-
48
-
49
-
50
-
51
-
52
-
53
-
54
-
55
-
56
-
57
-
58
-
59
-
60
-
61
-
62
-
63
-
64
-
65
-
66
-
67
-
68
-
69
-
70
-
71
-
72
-
73
-
74
-
75
-
76
-
77
-
78
-
79
-
80
-
81
-
82
-
83
-
84
-
85
-
86
-
87
-
88
-
89
-
90
-
91
-
92
-
93
-
94
-
95
-
96
-
97
-
98
-
99
-
100
-
101
-
102
-
103
-
104
-
105
-
106
-
107
-
108
-
109
-
110
-
111
-
112
-
113
-
114
-
115
-
116
-
117
-
118
-
119
-
120
-
121
-
122
-
123
-
124
-
125
-
126
-
127
-
128
-
129
-
130
-
131
-
132
-
133
-
134
-
135
-
136
-
137
-
138
-
139
-
140
-
141
-
142
-
143
-
144
-
145
-
146
-
147
-
148
-
149
-
150
-
151
-
152
-
153
-
154
-
155
-
156
-
157
-
158
-
159
-
160
-
161
-
162
-
163
-
164
-
165
-
166
-
167
-
168
-
169
-
170
-
171
-
172
-
173
-
174
-
175
-
176
-
177
-
178
-
179
-
180
-
181
-
182
-
183
-
184
-
185
-
186
-
187
-
188
-
189
-
190
-
191
-
192
-
193
-
194
-
195
-
196
-
197
-
198
-
199
-
200
-
201
-
202
-
203
-
204
-
205
-
206
-
207
-
208
-
209
-
210
-
211
-
212
-
213
-
214
-
215
-
216
-
217
-
218
-
219
-
220
-
221
-
222
-
223
-
224
 |
 |
36
Work flow
to set up this product without using the Install Navi
Th
i
s chap
t
er expla
in
s
t
he
in
s
t
alla
ti
o
n
a
n
d se
tting
s for
t
h
i
s prod
u
c
t
a
n
d
t
he per
i
pherals
n
ecessary
before
u
s
ing
t
h
i
s prod
u
c
t
.
Please check the printing result depending on the environment after setup, you want to use.
3.
Connecting the Power Cable (page 40)
2.
Installing the Printer (page 38)
1.
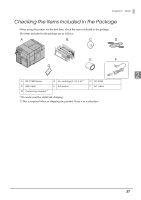
Checking the Items Included in the Package (page 37)
4.
Connecting the Interface Cable (page 41)
5.
Installing the Ink Cartridge (page 43)
8.
Attaching the paper leading edge to the rewinder (page 52)
7.
Setting the Paper (page 54)
9.
Printer settings (page 65)
10.
Paper settings (page 69)
11.
Test printing (page 76)
Completing Setup
6.
How to install the REWINDER (page 50)