Epson FX-185 User Manual - Page 209
Pin Pattern Calculation, P0=127-P: IF PASS=LAST THEN P0=P0+1-2^7-R
 |
View all Epson FX-185 manuals
Add to My Manuals
Save this manual to your list of manuals |
Page 209 highlights
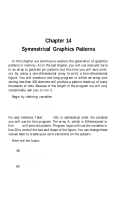
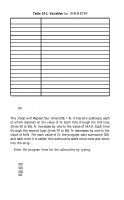
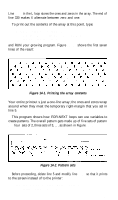
Pin Pattern Calculation You will use the one-line array that you just created to generate a two-dimensional pattern. This technique results in a significant saving of memory compared to the method of generating an array that we used in the last chapter. Two patterns are used in each pass of the print head. P is the pattern formed by the seven vertical dots at the start of each print line, and PO is its black/white reverse image. The program prints the pattern P in each column that is headed by a black dot. Pattern PO is printed in the other columns. The pin patterns are created this way: 140 FOR PASS=0 TO LAST: P=0: PRINT "PASS";PASS;"OF";LAST 160 FOR DOT=@ TO H 170 IF A(7*PASS+DOT+1)=1 THEN P=P+2^(6-DOT) 180 NEXT DOT 190 P0=127-P: IF PASS=LAST THEN P0=P0+1-2^(7-R) For each pass of the print head (zero to LAST), the program calculates the pin patterns, seven dots at a time. Line 170 calculates P, and line 190 calculates its complement, PO. Appendix F discusses problem codes and the P variable. Adjust the line spacing to match the y-dot passes: 120 LPRINT CHR$(27)"1"; If this spacing produces slight gaps between rows, adjust it with CHR$(27)"3"CHR$(20). The length of the array depends entirely on the variables in line 20. The following lines adjust the pin patterns (I' and PO) for the last pass of the print head if the array length is not a multiple of seven. Add: 130 LAST=INT(C/7): R=C-7*LAST 150 H=6: IF PASS=LAST THEN H=R-1 On the last pass, R represents the number of pins used, and H is set to one less than the number of pins to be fired. 192
-
 1
1 -
2
-
3
-
4
-
5
-
6
-
7
-
8
-
9
-
10
-
11
-
12
-
13
-
14
-
15
-
16
-
17
-
18
-
19
-
20
-
21
-
22
-
23
-
24
-
25
-
26
-
27
-
28
-
29
-
30
-
31
-
32
-
33
-
34
-
35
-
36
-
37
-
38
-
39
-
40
-
41
-
42
-
43
-
44
-
45
-
46
-
47
-
48
-
49
-
50
-
51
-
52
-
53
-
54
-
55
-
56
-
57
-
58
-
59
-
60
-
61
-
62
-
63
-
64
-
65
-
66
-
67
-
68
-
69
-
70
-
71
-
72
-
73
-
74
-
75
-
76
-
77
-
78
-
79
-
80
-
81
-
82
-
83
-
84
-
85
-
86
-
87
-
88
-
89
-
90
-
91
-
92
-
93
-
94
-
95
-
96
-
97
-
98
-
99
-
100
-
101
-
102
-
103
-
104
-
105
-
106
-
107
-
108
-
109
-
110
-
111
-
112
-
113
-
114
-
115
-
116
-
117
-
118
-
119
-
120
-
121
-
122
-
123
-
124
-
125
-
126
-
127
-
128
-
129
-
130
-
131
-
132
-
133
-
134
-
135
-
136
-
137
-
138
-
139
-
140
-
141
-
142
-
143
-
144
-
145
-
146
-
147
-
148
-
149
-
150
-
151
-
152
-
153
-
154
-
155
-
156
-
157
-
158
-
159
-
160
-
161
-
162
-
163
-
164
-
165
-
166
-
167
-
168
-
169
-
170
-
171
-
172
-
173
-
174
-
175
-
176
-
177
-
178
-
179
-
180
-
181
-
182
-
183
-
184
-
185
-
186
-
187
-
188
-
189
-
190
-
191
-
192
-
193
-
194
-
195
-
196
-
197
-
198
-
199
-
200
-
201
-
202
-
203
-
 204
204 -
 205
205 -
 206
206 -
 207
207 -
 208
208 -
 209
209 -
 210
210 -
 211
211 -
 212
212 -
 213
213 -
 214
214 -
215
-
216
-
217
-
218
-
219
-
220
-
221
-
222
-
223
-
224
-
225
-
226
-
227
-
228
-
229
-
230
-
231
-
232
-
233
-
234
-
235
-
236
-
237
-
238
-
239
-
240
-
241
-
242
-
243
-
244
-
245
-
246
-
247
-
248
-
249
-
250
-
251
-
252
-
253
-
254
-
255
-
256
-
257
-
258
-
259
-
260
-
261
-
262
-
263
-
264
-
265
-
266
-
267
-
268
 |
 |
