Epson FX-185 User Manual - Page 34
Printer Preparation, Paper separator, Paper path
 |
View all Epson FX-185 manuals
Add to My Manuals
Save this manual to your list of manuals |
Page 34 highlights
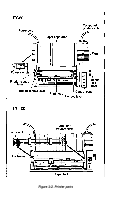
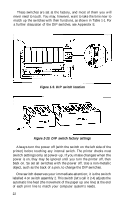
Figure 1-3. Paper path Printer Preparation Once you've found a good home for FX, you'll need to do some preparing before you can print. This section describes the first steps, which include installing a few parts, checking the setting of some internal switches, and then inserting the ribbon cartridge. Note: The printer should be turned OFF during all set-up operations. Paper separator To install the paper separator, hold it vertically so that it rests on the two slots at the back of the metal frame as shown in Figure 1-4. Press down gently but firmly until the separator snaps into place. To remove the separator, pull up on the left side first, letting the right side slide out of its slot. 17
-
 1
1 -
2
-
3
-
4
-
5
-
6
-
7
-
8
-
9
-
10
-
11
-
12
-
13
-
14
-
15
-
16
-
17
-
18
-
19
-
20
-
21
-
22
-
23
-
24
-
25
-
26
-
27
-
28
-
 29
29 -
 30
30 -
 31
31 -
 32
32 -
 33
33 -
 34
34 -
 35
35 -
 36
36 -
 37
37 -
 38
38 -
 39
39 -
40
-
41
-
42
-
43
-
44
-
45
-
46
-
47
-
48
-
49
-
50
-
51
-
52
-
53
-
54
-
55
-
56
-
57
-
58
-
59
-
60
-
61
-
62
-
63
-
64
-
65
-
66
-
67
-
68
-
69
-
70
-
71
-
72
-
73
-
74
-
75
-
76
-
77
-
78
-
79
-
80
-
81
-
82
-
83
-
84
-
85
-
86
-
87
-
88
-
89
-
90
-
91
-
92
-
93
-
94
-
95
-
96
-
97
-
98
-
99
-
100
-
101
-
102
-
103
-
104
-
105
-
106
-
107
-
108
-
109
-
110
-
111
-
112
-
113
-
114
-
115
-
116
-
117
-
118
-
119
-
120
-
121
-
122
-
123
-
124
-
125
-
126
-
127
-
128
-
129
-
130
-
131
-
132
-
133
-
134
-
135
-
136
-
137
-
138
-
139
-
140
-
141
-
142
-
143
-
144
-
145
-
146
-
147
-
148
-
149
-
150
-
151
-
152
-
153
-
154
-
155
-
156
-
157
-
158
-
159
-
160
-
161
-
162
-
163
-
164
-
165
-
166
-
167
-
168
-
169
-
170
-
171
-
172
-
173
-
174
-
175
-
176
-
177
-
178
-
179
-
180
-
181
-
182
-
183
-
184
-
185
-
186
-
187
-
188
-
189
-
190
-
191
-
192
-
193
-
194
-
195
-
196
-
197
-
198
-
199
-
200
-
201
-
202
-
203
-
204
-
205
-
206
-
207
-
208
-
209
-
210
-
211
-
212
-
213
-
214
-
215
-
216
-
217
-
218
-
219
-
220
-
221
-
222
-
223
-
224
-
225
-
226
-
227
-
228
-
229
-
230
-
231
-
232
-
233
-
234
-
235
-
236
-
237
-
238
-
239
-
240
-
241
-
242
-
243
-
244
-
245
-
246
-
247
-
248
-
249
-
250
-
251
-
252
-
253
-
254
-
255
-
256
-
257
-
258
-
259
-
260
-
261
-
262
-
263
-
264
-
265
-
266
-
267
-
268
 |
 |

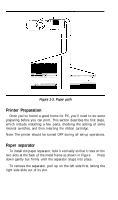
Figure 1-3. Paper path
Printer Preparation
Once you’ve found a good home for FX, you’ll need to do some
preparing before you can print. This section describes the first steps,
which include installing a few parts, checking the setting of some
internal switches, and then inserting the ribbon cartridge.
Note: The printer should be turned OFF during all set-up operations.
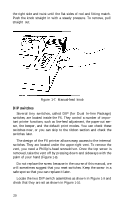
Paper separator
To install the paper separator, hold it vertically so that it rests on the
two slots at the back of the metal frame as shown in Figure
1-4.
Press
down gently but firmly until the separator snaps into place.
To remove the separator, pull up on the left side first, letting the
right side slide out of its slot.
17