Epson FX-185 User Manual - Page 225
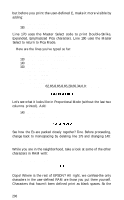
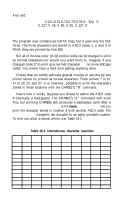
Redefining Control Codes, LPRINT CHR$27&CHR$0rt, FOR Y=1 TO 3: LPRINT CHR$139, NEXT Y
 |
View all Epson FX-185 manuals
Add to My Manuals
Save this manual to your list of manuals |
Page 225 highlights
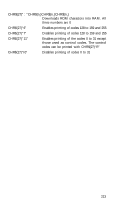
and make these changes: 130 LPRINT CHR$(27)"&"CHR$(0)"rt"; 140 FOR Y=1 TO 3: LPRINT CHR$(139); 160 NEXT Y 180 LPRINT "rst" ARE Line 130 controls the reading of the data. It expects data for three characters: r, s, and t. This example uses lowercase characters. If necessary, you can use CHR$(114) and CHR$(l16) in place of the "rt". The attribute byte for each character is sent in line 140 and the other 11 bytes are read from DATA lines. This method is nice for quick and easy character definition. If you intend to print your characters in Proportional Mode, you'll want to add a different attribute byte to the start of each DATA line and adjust the READ routine for 12 numbers. Don't forget the attribute byte or you'll end up with results you won't like. Redefining Control Codes For some of you dedicated users, the range from 32 to 126 and 160 to 254 may not be large enough to accommodate all the characters you want. Perhaps you have a passion for Egyptian hieroglyphics, or maybe you need a complete set of mathematics symbols. And what about the entire Japanese character set (it has some 4000 symbols)? If you get carried away with user-defined characters, you may end up searching for more storage. Anticipating this need, Epson provides commands that will allow you to define and print certain control codes in the same way that you treat other characters. (Remember that the low-order control codes are the ASCII codes 0 through 31 plus 127, and the high-order control codes are 128 through 159 plus 255.) These codes do not normally print symbols on paper, rather they cause the printer to change modes. To make them print as normal symbols requires an extra command. For example, the command to "normalize" the high-order control codes is: LPRINT CHR$(27)"6" 208
-
 1
1 -
2
-
3
-
4
-
5
-
6
-
7
-
8
-
9
-
10
-
11
-
12
-
13
-
14
-
15
-
16
-
17
-
18
-
19
-
20
-
21
-
22
-
23
-
24
-
25
-
26
-
27
-
28
-
29
-
30
-
31
-
32
-
33
-
34
-
35
-
36
-
37
-
38
-
39
-
40
-
41
-
42
-
43
-
44
-
45
-
46
-
47
-
48
-
49
-
50
-
51
-
52
-
53
-
54
-
55
-
56
-
57
-
58
-
59
-
60
-
61
-
62
-
63
-
64
-
65
-
66
-
67
-
68
-
69
-
70
-
71
-
72
-
73
-
74
-
75
-
76
-
77
-
78
-
79
-
80
-
81
-
82
-
83
-
84
-
85
-
86
-
87
-
88
-
89
-
90
-
91
-
92
-
93
-
94
-
95
-
96
-
97
-
98
-
99
-
100
-
101
-
102
-
103
-
104
-
105
-
106
-
107
-
108
-
109
-
110
-
111
-
112
-
113
-
114
-
115
-
116
-
117
-
118
-
119
-
120
-
121
-
122
-
123
-
124
-
125
-
126
-
127
-
128
-
129
-
130
-
131
-
132
-
133
-
134
-
135
-
136
-
137
-
138
-
139
-
140
-
141
-
142
-
143
-
144
-
145
-
146
-
147
-
148
-
149
-
150
-
151
-
152
-
153
-
154
-
155
-
156
-
157
-
158
-
159
-
160
-
161
-
162
-
163
-
164
-
165
-
166
-
167
-
168
-
169
-
170
-
171
-
172
-
173
-
174
-
175
-
176
-
177
-
178
-
179
-
180
-
181
-
182
-
183
-
184
-
185
-
186
-
187
-
188
-
189
-
190
-
191
-
192
-
193
-
194
-
195
-
196
-
197
-
198
-
199
-
200
-
201
-
202
-
203
-
204
-
205
-
206
-
207
-
208
-
209
-
210
-
211
-
212
-
213
-
214
-
215
-
216
-
217
-
218
-
219
-
 220
220 -
 221
221 -
 222
222 -
 223
223 -
 224
224 -
 225
225 -
 226
226 -
 227
227 -
 228
228 -
 229
229 -
 230
230 -
231
-
232
-
233
-
234
-
235
-
236
-
237
-
238
-
239
-
240
-
241
-
242
-
243
-
244
-
245
-
246
-
247
-
248
-
249
-
250
-
251
-
252
-
253
-
254
-
255
-
256
-
257
-
258
-
259
-
260
-
261
-
262
-
263
-
264
-
265
-
266
-
267
-
268
 |
 |