Epson FX-185 User Manual - Page 49
Top-of-form position, Paper-thickness lever, Starting Up
 |
View all Epson FX-185 manuals
Add to My Manuals
Save this manual to your list of manuals |
Page 49 highlights
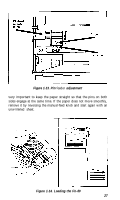
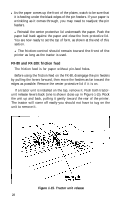
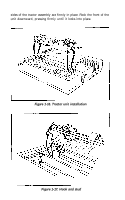
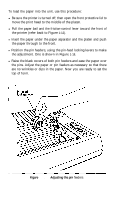
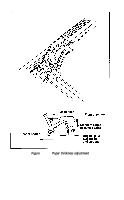
Top-of-form position After you have loaded the paper, you should set it to the top of form, which is the position of the print head when you turn the printer on. (Since the computer term form corresponds to the word page, it may be easier for you to think of this as the top of the page.) To make this setting, advance the paper until a perforation lies slightly below the top of the ribbon. The relationship between the perforation and the printhead is the same on both models of the printer, as you can see in Figure 1-19. You need to leave some paper above the ribbon so that the paper moves up smoothly. When you have the position set, lower the bail and replace or reposition the lids or cover. Although you have arranged the paper correctly, you are not done. The printer will not recognize the top of form until the next time you turn it on. The FX considers a form to be 66 lines long unless you change this length as discussed in Chapter 8. Paper-thickness lever The paper-thickness lever shown in Figure 1-20 moves the print head to accommodate various paper thicknesses. The factory sets it for ordinary paper (which is 1/500th of an inch thick), but you can adjust it for printing one original and up to two copies. For thick paper or multiple copies, move it toward the front. Do not use the extreme rear setting, however. This position is used for head alignment and will shorten the life of the print head if used in normal operation. Starting Up It is finally time to connect the printer to the computer; remember that some computers need interface kits and all need cables. First make sure the power switch is off. Connect the printer end of the printer cable to the connector at the right rear of the FX (as shown in Figure 32
-
 1
1 -
2
-
3
-
4
-
5
-
6
-
7
-
8
-
9
-
10
-
11
-
12
-
13
-
14
-
15
-
16
-
17
-
18
-
19
-
20
-
21
-
22
-
23
-
24
-
25
-
26
-
27
-
28
-
29
-
30
-
31
-
32
-
33
-
34
-
35
-
36
-
37
-
38
-
39
-
40
-
41
-
42
-
43
-
 44
44 -
 45
45 -
 46
46 -
 47
47 -
 48
48 -
 49
49 -
 50
50 -
 51
51 -
 52
52 -
 53
53 -
 54
54 -
55
-
56
-
57
-
58
-
59
-
60
-
61
-
62
-
63
-
64
-
65
-
66
-
67
-
68
-
69
-
70
-
71
-
72
-
73
-
74
-
75
-
76
-
77
-
78
-
79
-
80
-
81
-
82
-
83
-
84
-
85
-
86
-
87
-
88
-
89
-
90
-
91
-
92
-
93
-
94
-
95
-
96
-
97
-
98
-
99
-
100
-
101
-
102
-
103
-
104
-
105
-
106
-
107
-
108
-
109
-
110
-
111
-
112
-
113
-
114
-
115
-
116
-
117
-
118
-
119
-
120
-
121
-
122
-
123
-
124
-
125
-
126
-
127
-
128
-
129
-
130
-
131
-
132
-
133
-
134
-
135
-
136
-
137
-
138
-
139
-
140
-
141
-
142
-
143
-
144
-
145
-
146
-
147
-
148
-
149
-
150
-
151
-
152
-
153
-
154
-
155
-
156
-
157
-
158
-
159
-
160
-
161
-
162
-
163
-
164
-
165
-
166
-
167
-
168
-
169
-
170
-
171
-
172
-
173
-
174
-
175
-
176
-
177
-
178
-
179
-
180
-
181
-
182
-
183
-
184
-
185
-
186
-
187
-
188
-
189
-
190
-
191
-
192
-
193
-
194
-
195
-
196
-
197
-
198
-
199
-
200
-
201
-
202
-
203
-
204
-
205
-
206
-
207
-
208
-
209
-
210
-
211
-
212
-
213
-
214
-
215
-
216
-
217
-
218
-
219
-
220
-
221
-
222
-
223
-
224
-
225
-
226
-
227
-
228
-
229
-
230
-
231
-
232
-
233
-
234
-
235
-
236
-
237
-
238
-
239
-
240
-
241
-
242
-
243
-
244
-
245
-
246
-
247
-
248
-
249
-
250
-
251
-
252
-
253
-
254
-
255
-
256
-
257
-
258
-
259
-
260
-
261
-
262
-
263
-
264
-
265
-
266
-
267
-
268
 |
 |