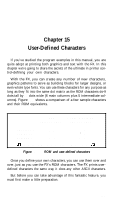
Epson FX-185 User Manual - Page 217
Preparation, Character Definition, LPRINT CHR$27&CHR$rCHR$c, CHR$c
 |
View all Epson FX-185 manuals
Add to My Manuals
Save this manual to your list of manuals |
Page 217 highlights
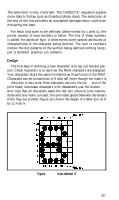
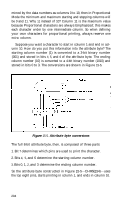
Preparation DIP switch 1-4 controls the use of the FX's 2K RAM buffer. You can use this RAM memory as a large text buffer to smooth printer/computer communications, or you can store in it a set of user-defined characters. Unfortunately, it can't serve both purposes simultaneously. In this and succeeding chapters, we'll use this RAM area for user-defined characters. So set switch 1-4 off before proceeding. Character Definition Characters are defined with the ESCape "&" command sequence. The format is: LPRINT CHR$(27)"&"CHR$(r)CHR$(c1)CHR$(c2); The r tells the printer in which RAM area the characters are to be stored. With a stock printer, there is only one area available: RAM area 0. The notations c1 and c2 specify the range of characters to be defined. You can use the entire range of ASCII numbers from 0 to 255 (for which the ROM characters are shown in Appendix A), except for those areas where control codes reside (0 to 31, 127 to 159, and 255). You can also use some of the control-code locations, but only after special ESCape codes are issued. We'll get to that a bit later. Here's how c1 and c2 work. Suppose you want to redefine the letters from A to E. The associated ASCII numbers are 65 to 69, so you simply let c1 be 65(A) and c2 be 69(E). Any of the keyboard characters can be redefined in a similar manner. For example, defining c1 as 97 and c2 as 101 selects lowercase letters a through e; defining c1 as 33 and cz as 43 selects the symbols ! through + . To simplify things a bit, the ASCII symbols can be used in place of CHR$(c1) and CHR$(c2). For example, either: LPRINT CHR$(27)"&"CHR$(0)CHR$(65)CHR$(69); or: LPRINT CHR$(27)"&"CHR$(0)"AE"; selects characters A through E. On some occasions you may wish to define only one character. That's O.K., too. Just use the same number or letter for c1 and c2: 130 LPRINT CHR$(27)"&"CHRS(0)"EE"; 200
-
 1
1 -
2
-
3
-
4
-
5
-
6
-
7
-
8
-
9
-
10
-
11
-
12
-
13
-
14
-
15
-
16
-
17
-
18
-
19
-
20
-
21
-
22
-
23
-
24
-
25
-
26
-
27
-
28
-
29
-
30
-
31
-
32
-
33
-
34
-
35
-
36
-
37
-
38
-
39
-
40
-
41
-
42
-
43
-
44
-
45
-
46
-
47
-
48
-
49
-
50
-
51
-
52
-
53
-
54
-
55
-
56
-
57
-
58
-
59
-
60
-
61
-
62
-
63
-
64
-
65
-
66
-
67
-
68
-
69
-
70
-
71
-
72
-
73
-
74
-
75
-
76
-
77
-
78
-
79
-
80
-
81
-
82
-
83
-
84
-
85
-
86
-
87
-
88
-
89
-
90
-
91
-
92
-
93
-
94
-
95
-
96
-
97
-
98
-
99
-
100
-
101
-
102
-
103
-
104
-
105
-
106
-
107
-
108
-
109
-
110
-
111
-
112
-
113
-
114
-
115
-
116
-
117
-
118
-
119
-
120
-
121
-
122
-
123
-
124
-
125
-
126
-
127
-
128
-
129
-
130
-
131
-
132
-
133
-
134
-
135
-
136
-
137
-
138
-
139
-
140
-
141
-
142
-
143
-
144
-
145
-
146
-
147
-
148
-
149
-
150
-
151
-
152
-
153
-
154
-
155
-
156
-
157
-
158
-
159
-
160
-
161
-
162
-
163
-
164
-
165
-
166
-
167
-
168
-
169
-
170
-
171
-
172
-
173
-
174
-
175
-
176
-
177
-
178
-
179
-
180
-
181
-
182
-
183
-
184
-
185
-
186
-
187
-
188
-
189
-
190
-
191
-
192
-
193
-
194
-
195
-
196
-
197
-
198
-
199
-
200
-
201
-
202
-
203
-
204
-
205
-
206
-
207
-
208
-
209
-
210
-
211
-
 212
212 -
 213
213 -
 214
214 -
 215
215 -
 216
216 -
 217
217 -
 218
218 -
 219
219 -
 220
220 -
 221
221 -
 222
222 -
223
-
224
-
225
-
226
-
227
-
228
-
229
-
230
-
231
-
232
-
233
-
234
-
235
-
236
-
237
-
238
-
239
-
240
-
241
-
242
-
243
-
244
-
245
-
246
-
247
-
248
-
249
-
250
-
251
-
252
-
253
-
254
-
255
-
256
-
257
-
258
-
259
-
260
-
261
-
262
-
263
-
264
-
265
-
266
-
267
-
268
 |
 |