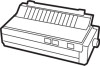
Epson FX-185 User Manual - Page 40
Ribbon installation, Switch 1
 |
View all Epson FX-185 manuals
Add to My Manuals
Save this manual to your list of manuals |
Page 40 highlights
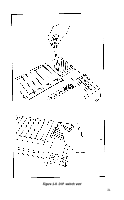
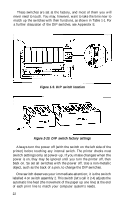
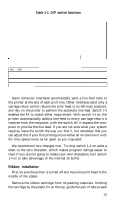
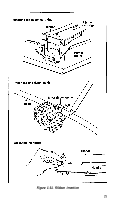
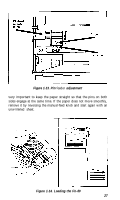
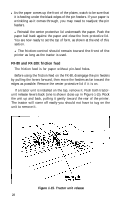
Table 1-1. DIP switch functions Switch 1 No. O N 1-8 ON 1-7 ON 1-6 ON 1-5 Emphasized 1-4 2K buffer 1-3 Inactive 1-2 0 (slashed) 1-1 Compressed Function International character International character International character Print weight RAM memory Paper-out sensor Zero character Print pitch OFF OFF OFF OFF Single strike User-defined characters Active 0 Pica Switch 2 No. ON Function 2-4 CR + LF Automatic line feed 2-3 ON 2-2 Sounds Skip-over-perforation feature Beeper 2-1 Active Printer select Note: The shaded boxes show the factory settings. I OFF CR only OFF Mute Inactive Some computer interfaces automatically send a line-feed code to the printer at the end of each print line. Other interfaces send only a carriage return (which returns the print head to its left-most position), and rely on the printer to perform the automatic line feed. Switch 2-4 enables the FX to match either requirement. With switch 2-4 on, the printer automatically adds a line feed to every carriage return it receives from the computer; with the switch off, it expects the computer to provide the line feed. If you are not sure what your system requires, leave the switch the way you find it, but remember that you can adjust this if your first printing occurs either all on one line or with the lines spaces twice as far apart as you requested. We recommend two changes now. Turning switch 1-2 on adds a slash to the zero character, which makes program listings easier to read. If you are not going to create your own characters, turn switch 1-4 on to take advantage of the internal 2K buffer. Ribbon installation First, be sure the printer is turned off and move the print head to the middle of the platen. Remove the ribbon cartridge from its packing materials. Holding the cartridge by the plastic fin on the top, guide the pair of tabs at each 23
-
 1
1 -
2
-
3
-
4
-
5
-
6
-
7
-
8
-
9
-
10
-
11
-
12
-
13
-
14
-
15
-
16
-
17
-
18
-
19
-
20
-
21
-
22
-
23
-
24
-
25
-
26
-
27
-
28
-
29
-
30
-
31
-
32
-
33
-
34
-
 35
35 -
 36
36 -
 37
37 -
 38
38 -
 39
39 -
 40
40 -
 41
41 -
 42
42 -
 43
43 -
 44
44 -
 45
45 -
46
-
47
-
48
-
49
-
50
-
51
-
52
-
53
-
54
-
55
-
56
-
57
-
58
-
59
-
60
-
61
-
62
-
63
-
64
-
65
-
66
-
67
-
68
-
69
-
70
-
71
-
72
-
73
-
74
-
75
-
76
-
77
-
78
-
79
-
80
-
81
-
82
-
83
-
84
-
85
-
86
-
87
-
88
-
89
-
90
-
91
-
92
-
93
-
94
-
95
-
96
-
97
-
98
-
99
-
100
-
101
-
102
-
103
-
104
-
105
-
106
-
107
-
108
-
109
-
110
-
111
-
112
-
113
-
114
-
115
-
116
-
117
-
118
-
119
-
120
-
121
-
122
-
123
-
124
-
125
-
126
-
127
-
128
-
129
-
130
-
131
-
132
-
133
-
134
-
135
-
136
-
137
-
138
-
139
-
140
-
141
-
142
-
143
-
144
-
145
-
146
-
147
-
148
-
149
-
150
-
151
-
152
-
153
-
154
-
155
-
156
-
157
-
158
-
159
-
160
-
161
-
162
-
163
-
164
-
165
-
166
-
167
-
168
-
169
-
170
-
171
-
172
-
173
-
174
-
175
-
176
-
177
-
178
-
179
-
180
-
181
-
182
-
183
-
184
-
185
-
186
-
187
-
188
-
189
-
190
-
191
-
192
-
193
-
194
-
195
-
196
-
197
-
198
-
199
-
200
-
201
-
202
-
203
-
204
-
205
-
206
-
207
-
208
-
209
-
210
-
211
-
212
-
213
-
214
-
215
-
216
-
217
-
218
-
219
-
220
-
221
-
222
-
223
-
224
-
225
-
226
-
227
-
228
-
229
-
230
-
231
-
232
-
233
-
234
-
235
-
236
-
237
-
238
-
239
-
240
-
241
-
242
-
243
-
244
-
245
-
246
-
247
-
248
-
249
-
250
-
251
-
252
-
253
-
254
-
255
-
256
-
257
-
258
-
259
-
260
-
261
-
262
-
263
-
264
-
265
-
266
-
267
-
268
 |
 |