HP 635n HP Jetdirect Print Server Administrator's Guide - Page 158
Printing a Test File, Add a Remote Printer, Actions, Examples
 |
UPC - 882780301016
View all HP 635n manuals
Add to My Manuals
Save this manual to your list of manuals |
Page 158 highlights
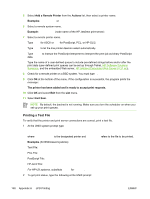
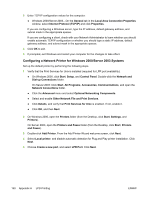
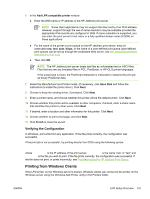
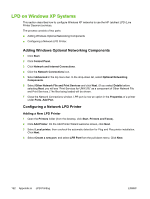
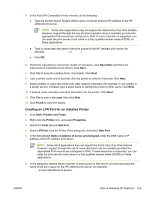
5 Select Add a Remote Printer from the Actions list, then select a printer name. Examples: my_printer or printer1 6 Select a remote system name. Example: jetdirect1 (node name of the HP Jetdirect print server) 7 Select a remote printer name. Type text for ASCII or raw for PostScript, PCL, or HP-GL/2. Type auto to let the line printer daemon select automatically. Type binps to instruct the PostScript interpreter to interpret the print job as binary PostScript data. Type the name of a user-defined queue to include pre-defined strings before and/or after the print data (user-defined print queues can be set up through Telnet, HP Software Solutions Summary, and the embedded Web server, HP Jetdirect Embedded Web Server (V.31.xx)). 8 Check for a remote printer on a BSD system. You must type Y. 9 Click OK at the bottom of the menu. If the configuration is successful, the program prints the message: The printer has been added and is ready to accept print requests. 10 Click OK and select Exit from the List menu. 11 Select Exit Sam. NOTE By default, the lpsched is not running. Make sure you turn the scheduler on when you set up your print queues. Printing a Test File To verify that the printer and print server connections are correct, print a test file. 1 At the UNIX system prompt type: lpr -Pprinter_name file_name where printer_name is the designated printer and file_name refers to the file to be printed. Examples (for BSD-based systems): Text File: lpr -Ptext1 textfile PCL File: lpr -Praw1 pclfile.pcl PostScript File: lpr -Praw1 psfile.ps HP-GL/2 File: lpr -Praw1 hpglfile.hpg For HP-UX systems, substitute lp -d for lpr -P. 2 To get print status, type the following at the UNIX prompt: 148 Appendix A LPD Printing ENWW
-
 1
1 -
2
-
3
-
4
-
5
-
6
-
7
-
8
-
9
-
10
-
11
-
12
-
13
-
14
-
15
-
16
-
17
-
18
-
19
-
20
-
21
-
22
-
23
-
24
-
25
-
26
-
27
-
28
-
29
-
30
-
31
-
32
-
33
-
34
-
35
-
36
-
37
-
38
-
39
-
40
-
41
-
42
-
43
-
44
-
45
-
46
-
47
-
48
-
49
-
50
-
51
-
52
-
53
-
54
-
55
-
56
-
57
-
58
-
59
-
60
-
61
-
62
-
63
-
64
-
65
-
66
-
67
-
68
-
69
-
70
-
71
-
72
-
73
-
74
-
75
-
76
-
77
-
78
-
79
-
80
-
81
-
82
-
83
-
84
-
85
-
86
-
87
-
88
-
89
-
90
-
91
-
92
-
93
-
94
-
95
-
96
-
97
-
98
-
99
-
100
-
101
-
102
-
103
-
104
-
105
-
106
-
107
-
108
-
109
-
110
-
111
-
112
-
113
-
114
-
115
-
116
-
117
-
118
-
119
-
120
-
121
-
122
-
123
-
124
-
125
-
126
-
127
-
128
-
129
-
130
-
131
-
132
-
133
-
134
-
135
-
136
-
137
-
138
-
139
-
140
-
141
-
142
-
143
-
144
-
145
-
146
-
147
-
148
-
149
-
150
-
151
-
152
-
 153
153 -
 154
154 -
 155
155 -
 156
156 -
 157
157 -
 158
158 -
 159
159 -
 160
160 -
 161
161 -
 162
162 -
 163
163 -
164
-
165
-
166
-
167
-
168
-
169
-
170
-
171
-
172
-
173
-
174
-
175
-
176
-
177
-
178
-
179
-
180
-
181
-
182
-
183
-
184
-
185
-
186
-
187
-
188
-
189
-
190
-
191
-
192
-
193
-
194
 |
 |