HP LaserJet 3052 Service Manual - Page 216
Troubleshooting process
 |
View all HP LaserJet 3052 manuals
Add to My Manuals
Save this manual to your list of manuals |
Page 216 highlights
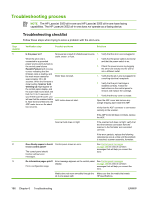
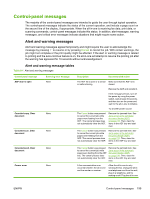
Troubleshooting process NOTE The HP LaserJet 3050 all-in-one and HP LaserJet 3055 all-in-one have faxing capabilities. The HP LaserJet 3052 all-in-one does not operate as a faxing device. Troubleshooting checklist Follow these steps when trying to solve a problem with the all-in-one. Step number 1 2 3 Verification step Possible problems Solutions Is the power on? When the all-in-one is connected to a grounded power source and is turned on, the control panel shows Hewlett-Packard with moving cursors indicating that the firmware code is loading, and the main motor rotates for approximately 45 to 60 seconds. When the firmware is done loading, Scanner bulb warming up might appear on the control-panel display, and the scan head moves back and forth for 10 to 15 seconds. If you lift the scanner cover, you will see that the scanner bulb is lit. Near the end of this time, the ADF motor turns on for about two seconds. No power as a result of a failed power source, cable, switch, or fuse. Motor does not start. ADF motor does not start. 1. Verify that the all-in-one is plugged in. 2. Verify that the power cable is functional and that the power switch is on. 3. Check the power source by plugging the all-in-one directly into the wall or into a different outlet. 1. Verify that the all-in-one is plugged into a working electrical receptacle. 2. Verify that the print cartridge is installed correctly. Follow the instructions on the control panel to remove and replace the cartridge. 3. Verify that the top cover is closed. Open the ADF cover and remove any orange shipping tape inside the ADF. Verify that the ADF connector is connected correctly to the scanner. If the ADF motor still does not rotate, replace the ADF. Scanner bulb does not light. If the scanner bulb does not light, verify that the wire-harness connectors from the scanner to the formatter are connected correctly. If the error persists, replace the following components one at a time until the problem is resolved: scanner assembly, formatter. Does Ready appear in the all- Control panel shows an error. in-one control panel? The control panel should function without error messages. See Control-panel messages on page 199 for a list of common messages that will help you correct the error. Do information pages print? Print a configuration page. Error message appears on the control-panel display. See Control-panel messages on page 199 for a list of common messages that will help you correct the error. Media does not move smoothly through the Make sure that the media that meets all-in-one paper path. HP specifications. 196 Chapter 6 Troubleshooting ENWW
-
 1
1 -
2
-
3
-
4
-
5
-
6
-
7
-
8
-
9
-
10
-
11
-
12
-
13
-
14
-
15
-
16
-
17
-
18
-
19
-
20
-
21
-
22
-
23
-
24
-
25
-
26
-
27
-
28
-
29
-
30
-
31
-
32
-
33
-
34
-
35
-
36
-
37
-
38
-
39
-
40
-
41
-
42
-
43
-
44
-
45
-
46
-
47
-
48
-
49
-
50
-
51
-
52
-
53
-
54
-
55
-
56
-
57
-
58
-
59
-
60
-
61
-
62
-
63
-
64
-
65
-
66
-
67
-
68
-
69
-
70
-
71
-
72
-
73
-
74
-
75
-
76
-
77
-
78
-
79
-
80
-
81
-
82
-
83
-
84
-
85
-
86
-
87
-
88
-
89
-
90
-
91
-
92
-
93
-
94
-
95
-
96
-
97
-
98
-
99
-
100
-
101
-
102
-
103
-
104
-
105
-
106
-
107
-
108
-
109
-
110
-
111
-
112
-
113
-
114
-
115
-
116
-
117
-
118
-
119
-
120
-
121
-
122
-
123
-
124
-
125
-
126
-
127
-
128
-
129
-
130
-
131
-
132
-
133
-
134
-
135
-
136
-
137
-
138
-
139
-
140
-
141
-
142
-
143
-
144
-
145
-
146
-
147
-
148
-
149
-
150
-
151
-
152
-
153
-
154
-
155
-
156
-
157
-
158
-
159
-
160
-
161
-
162
-
163
-
164
-
165
-
166
-
167
-
168
-
169
-
170
-
171
-
172
-
173
-
174
-
175
-
176
-
177
-
178
-
179
-
180
-
181
-
182
-
183
-
184
-
185
-
186
-
187
-
188
-
189
-
190
-
191
-
192
-
193
-
194
-
195
-
196
-
197
-
198
-
199
-
200
-
201
-
202
-
203
-
204
-
205
-
206
-
207
-
208
-
209
-
210
-
 211
211 -
 212
212 -
 213
213 -
 214
214 -
 215
215 -
 216
216 -
 217
217 -
 218
218 -
 219
219 -
 220
220 -
 221
221 -
222
-
223
-
224
-
225
-
226
-
227
-
228
-
229
-
230
-
231
-
232
-
233
-
234
-
235
-
236
-
237
-
238
-
239
-
240
-
241
-
242
-
243
-
244
-
245
-
246
-
247
-
248
-
249
-
250
-
251
-
252
-
253
-
254
-
255
-
256
-
257
-
258
-
259
-
260
-
261
-
262
-
263
-
264
-
265
-
266
-
267
-
268
-
269
-
270
-
271
-
272
-
273
-
274
-
275
-
276
-
277
-
278
-
279
-
280
-
281
-
282
-
283
-
284
-
285
-
286
-
287
-
288
-
289
-
290
-
291
-
292
-
293
-
294
-
295
-
296
-
297
-
298
-
299
-
300
-
301
-
302
-
303
-
304
-
305
-
306
-
307
-
308
-
309
-
310
-
311
-
312
-
313
-
314
-
315
-
316
-
317
-
318
-
319
-
320
-
321
-
322
-
323
-
324
-
325
-
326
-
327
-
328
-
329
-
330
-
331
-
332
-
333
-
334
-
335
-
336
-
337
-
338
-
339
-
340
-
341
-
342
-
343
-
344
-
345
-
346
-
347
-
348
-
349
-
350
-
351
-
352
-
353
-
354
-
355
-
356
-
357
-
358
-
359
-
360
-
361
-
362
-
363
-
364
-
365
-
366
-
367
-
368
-
369
-
370
-
371
-
372
-
373
-
374
-
375
-
376
-
377
-
378
-
379
-
380
-
381
-
382
-
383
-
384
-
385
-
386
-
387
-
388
-
389
-
390
-
391
-
392
-
393
-
394
-
395
-
396
-
397
-
398
-
399
-
400
-
401
-
402
-
403
-
404
-
405
-
406
 |
 |
