HP LaserJet 3052 Service Manual - Page 267
Functional checks, Control-panel test, Half self-test functional check, Passed MEM Test, Scroll
 |
View all HP LaserJet 3052 manuals
Add to My Manuals
Save this manual to your list of manuals |
Page 267 highlights
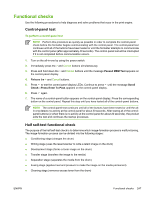
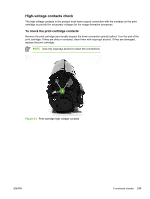
Functional checks Use the following procedures to help diagnose and solve problems that occur in the print engine. Control-panel test To perform a control-panel test NOTE Perform this procedure as quickly as possible in order to complete the control-panel check before the formatter begins communicating with the control panel. The control-panel test continues until all of the buttons have been tested or until the formatter attempts to communicate with the control panel (after approximately 40 seconds). The control-panel test will be interrupted if it is not completed before communication occurs. 1. Turn on the all-in-one by using the power switch. 2. Immediately press the > and Cancel buttons simultaneously. 3. Press and hold down the > and Cancel buttons until the message Passed MEM Test appears on the control-panel display. 4. Release the > and Cancel buttons. 5. Press to test the control-panel display LEDs. Continue to press until the message Scroll Check-Press Enter To Pass appears on the control-panel display. 6. Press again. 7. The name of a control-panel button appears on the control-panel display. Press the corresponding button on the control panel. Repeat this step until you have tested all of the control-panel buttons. NOTE The control-panel test continues until all of the buttons have been tested or until the allin-one detects no activity at the control panel for about 20 seconds. After testing all of the controlpanel buttons (or when there is no activity at the control panel for about 20 seconds), the product exits the test and continues the startup processes. Half self-test functional check The purpose of the half self-test check is to determine which image-formation process is malfunctioning. The image-formation process can be divided into the following stages: ● Conditioning stage (charges the drum) ● Writing stage (uses the laser/scanner to write a latent image on the drum) ● Development stage (forms a toner image on the drum) ● Transfer stage (transfers the image to the media) ● Separation stage (separates the media from the drum) ● Fusing stage (applies heat and pressure to make the image on the media permanent) ● Cleaning stage (removes excess toner from the drum) ENWW Functional checks 247
-
 1
1 -
2
-
3
-
4
-
5
-
6
-
7
-
8
-
9
-
10
-
11
-
12
-
13
-
14
-
15
-
16
-
17
-
18
-
19
-
20
-
21
-
22
-
23
-
24
-
25
-
26
-
27
-
28
-
29
-
30
-
31
-
32
-
33
-
34
-
35
-
36
-
37
-
38
-
39
-
40
-
41
-
42
-
43
-
44
-
45
-
46
-
47
-
48
-
49
-
50
-
51
-
52
-
53
-
54
-
55
-
56
-
57
-
58
-
59
-
60
-
61
-
62
-
63
-
64
-
65
-
66
-
67
-
68
-
69
-
70
-
71
-
72
-
73
-
74
-
75
-
76
-
77
-
78
-
79
-
80
-
81
-
82
-
83
-
84
-
85
-
86
-
87
-
88
-
89
-
90
-
91
-
92
-
93
-
94
-
95
-
96
-
97
-
98
-
99
-
100
-
101
-
102
-
103
-
104
-
105
-
106
-
107
-
108
-
109
-
110
-
111
-
112
-
113
-
114
-
115
-
116
-
117
-
118
-
119
-
120
-
121
-
122
-
123
-
124
-
125
-
126
-
127
-
128
-
129
-
130
-
131
-
132
-
133
-
134
-
135
-
136
-
137
-
138
-
139
-
140
-
141
-
142
-
143
-
144
-
145
-
146
-
147
-
148
-
149
-
150
-
151
-
152
-
153
-
154
-
155
-
156
-
157
-
158
-
159
-
160
-
161
-
162
-
163
-
164
-
165
-
166
-
167
-
168
-
169
-
170
-
171
-
172
-
173
-
174
-
175
-
176
-
177
-
178
-
179
-
180
-
181
-
182
-
183
-
184
-
185
-
186
-
187
-
188
-
189
-
190
-
191
-
192
-
193
-
194
-
195
-
196
-
197
-
198
-
199
-
200
-
201
-
202
-
203
-
204
-
205
-
206
-
207
-
208
-
209
-
210
-
211
-
212
-
213
-
214
-
215
-
216
-
217
-
218
-
219
-
220
-
221
-
222
-
223
-
224
-
225
-
226
-
227
-
228
-
229
-
230
-
231
-
232
-
233
-
234
-
235
-
236
-
237
-
238
-
239
-
240
-
241
-
242
-
243
-
244
-
245
-
246
-
247
-
248
-
249
-
250
-
251
-
252
-
253
-
254
-
255
-
256
-
257
-
258
-
259
-
260
-
261
-
 262
262 -
 263
263 -
 264
264 -
 265
265 -
 266
266 -
 267
267 -
 268
268 -
 269
269 -
 270
270 -
 271
271 -
 272
272 -
273
-
274
-
275
-
276
-
277
-
278
-
279
-
280
-
281
-
282
-
283
-
284
-
285
-
286
-
287
-
288
-
289
-
290
-
291
-
292
-
293
-
294
-
295
-
296
-
297
-
298
-
299
-
300
-
301
-
302
-
303
-
304
-
305
-
306
-
307
-
308
-
309
-
310
-
311
-
312
-
313
-
314
-
315
-
316
-
317
-
318
-
319
-
320
-
321
-
322
-
323
-
324
-
325
-
326
-
327
-
328
-
329
-
330
-
331
-
332
-
333
-
334
-
335
-
336
-
337
-
338
-
339
-
340
-
341
-
342
-
343
-
344
-
345
-
346
-
347
-
348
-
349
-
350
-
351
-
352
-
353
-
354
-
355
-
356
-
357
-
358
-
359
-
360
-
361
-
362
-
363
-
364
-
365
-
366
-
367
-
368
-
369
-
370
-
371
-
372
-
373
-
374
-
375
-
376
-
377
-
378
-
379
-
380
-
381
-
382
-
383
-
384
-
385
-
386
-
387
-
388
-
389
-
390
-
391
-
392
-
393
-
394
-
395
-
396
-
397
-
398
-
399
-
400
-
401
-
402
-
403
-
404
-
405
-
406
 |
 |