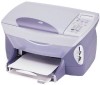
HP PSC 950 HP PSC 900 Series - (English) Reference Guide - Page 22
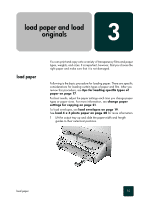
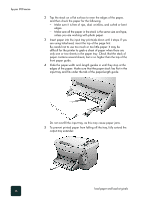
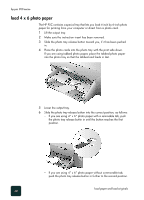
Slide the paper-width and -length guides in until they stop at the, front paper guide. - printer
 |
UPC - 725184893704
View all HP PSC 950 manuals
Add to My Manuals
Save this manual to your list of manuals |
Page 22 highlights
hp psc 900 series 2 Tap the stack on a flat surface to even the edges of the paper, and then check the paper for the following: - Make sure it is free of rips, dust, wrinkles, and curled or bent edges. - Make sure all the paper in the stack is the same size and type, unless you are working with photo paper. 3 Insert paper into the input tray print-side down until it stops. If you are using letterhead, insert the top of the page first. Be careful not to use too much or too little paper. It may be difficult for the printer to grab a sheet of paper when there are only one or two sheets in the paper tray. Check that the stack of paper contains several sheets, but is no higher than the top of the front paper guide. 4 Slide the paper-width and -length guides in until they stop at the edges of the paper. Make sure that the paper stack lies flat in the input tray and fits under the tab of the paper-length guide. Do not overfill the input tray, as this may cause paper jams. 5 To prevent printed paper from falling off the tray, fully extend the output-tray extender. load paper and load originals 16
-
 1
1 -
2
-
3
-
4
-
5
-
6
-
7
-
8
-
9
-
10
-
11
-
12
-
13
-
14
-
15
-
16
-
 17
17 -
 18
18 -
 19
19 -
 20
20 -
 21
21 -
 22
22 -
 23
23 -
 24
24 -
 25
25 -
 26
26 -
 27
27 -
28
-
29
-
30
-
31
-
32
-
33
-
34
-
35
-
36
-
37
-
38
-
39
-
40
-
41
-
42
-
43
-
44
-
45
-
46
-
47
-
48
-
49
-
50
-
51
-
52
-
53
-
54
-
55
-
56
-
57
-
58
-
59
-
60
-
61
-
62
-
63
-
64
-
65
-
66
-
67
-
68
-
69
-
70
-
71
-
72
-
73
-
74
-
75
-
76
-
77
-
78
-
79
-
80
 |
 |
