HP PSC 950 HP PSC 900 Series - (English) Reference Guide - Page 26
load 4 x 6 photo paper, Slide the photo tray release button into the correct position, as follows
 |
UPC - 725184893704
View all HP PSC 950 manuals
Add to My Manuals
Save this manual to your list of manuals |
Page 26 highlights
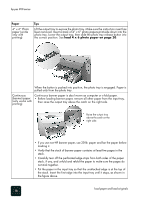
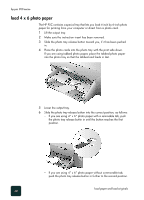
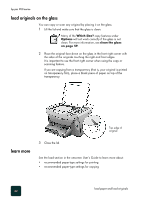
hp psc 900 series load 4 x 6 photo paper The HP PSC contains a special tray that lets you load 4-inch by 6-inch photo paper for printing from your computer or direct from a photo card. 1 Lift the output tray. 2 Make sure the instruction insert has been removed. 3 Slide the photo tray release button toward you, if it has been pushed in. 4 Place the photo cards into the photo tray with the print side down. If you are using tabbed photo paper, place the tabbed photo paper into the photo tray so that the tabbed end feeds in last. 5 Lower the output tray. 6 Slide the photo tray release button into the correct position, as follows: - If you are using 4" x 6" photo paper with a removable tab, push the photo tray release buttin in until the button reaches the first position. - If you are using 4" x 6" photo paper without a removable tab, push the photo tray release button in further to the second position. load paper and load originals 20
-
 1
1 -
2
-
3
-
4
-
5
-
6
-
7
-
8
-
9
-
10
-
11
-
12
-
13
-
14
-
15
-
16
-
17
-
18
-
19
-
20
-
 21
21 -
 22
22 -
 23
23 -
 24
24 -
 25
25 -
 26
26 -
 27
27 -
 28
28 -
 29
29 -
 30
30 -
 31
31 -
32
-
33
-
34
-
35
-
36
-
37
-
38
-
39
-
40
-
41
-
42
-
43
-
44
-
45
-
46
-
47
-
48
-
49
-
50
-
51
-
52
-
53
-
54
-
55
-
56
-
57
-
58
-
59
-
60
-
61
-
62
-
63
-
64
-
65
-
66
-
67
-
68
-
69
-
70
-
71
-
72
-
73
-
74
-
75
-
76
-
77
-
78
-
79
-
80
 |
 |
