HP PSC 950 HP PSC 900 Series - (English) Reference Guide - Page 46
print individual photos, Save Photos to PC?, Print What? Photos on Card, Enter
 |
UPC - 725184893704
View all HP PSC 950 manuals
Add to My Manuals
Save this manual to your list of manuals |
Page 46 highlights
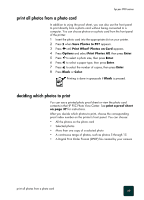
hp psc 900 series print individual photos If you don't know the photo index number, you may want to print a photo proof sheet before selecting individual photos to print. Index number Date File name 1 Insert the photo card into the appropriate slot on your printer. 2 Press 2 when Save Photos to PC? appears. 3 Press until Print What? Photos on Card appears, then press Enter. 4 Press until Print Photos - Select Photos appears, then press Enter. 5 Enter the photo index numbers for the photos you want to print. A comma is inserted automatically as the cursor advances to the right. Tip! You can specify a range by pressing the Symbols button to enter a dash (-). You can erase number entries by pressing . As the bottom line gets filled, the data entry field scrolls left to show the number as it is entered. 6 Press Enter when you are finished entering the photo index numbers you want to print. 7 Press to select a photo size, then press Enter. 8 Press to select a paper type, then press Enter. 9 Press to select the number of copies, then press Enter. 10 Press Black or Color. use a photo card 40
-
 1
1 -
2
-
3
-
4
-
5
-
6
-
7
-
8
-
9
-
10
-
11
-
12
-
13
-
14
-
15
-
16
-
17
-
18
-
19
-
20
-
21
-
22
-
23
-
24
-
25
-
26
-
27
-
28
-
29
-
30
-
31
-
32
-
33
-
34
-
35
-
36
-
37
-
38
-
39
-
40
-
 41
41 -
 42
42 -
 43
43 -
 44
44 -
 45
45 -
 46
46 -
 47
47 -
 48
48 -
 49
49 -
 50
50 -
 51
51 -
52
-
53
-
54
-
55
-
56
-
57
-
58
-
59
-
60
-
61
-
62
-
63
-
64
-
65
-
66
-
67
-
68
-
69
-
70
-
71
-
72
-
73
-
74
-
75
-
76
-
77
-
78
-
79
-
80
 |
 |
