HP StorageWorks P2000 HP StorageWorks P2000 G3 MSA System SMU Reference Guide - Page 24
Related topics, About volume mapping
 |
View all HP StorageWorks P2000 manuals
Add to My Manuals
Save this manual to your list of manuals |
Page 24 highlights
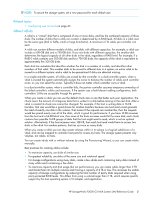
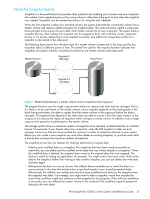
• Enable CHAP on the storage system. Note that this applies to all iSCSI hosts, in order to avoid security exposures. • Define CHAP secret in the host iSCSI initiator. • Request host login to the storage system. The host should be displayable by the system, as well as the ports through which connections were made. If it becomes necessary to add more hosts after CHAP is enabled, additional CHAP node names and secrets can be added. If a host attempts to login to the storage system, it will become visible to the system, even if the full login is not successful due to incompatible CHAP definitions. This information may be useful in configuring CHAP entries for new hosts. This information becomes visible when an iSCSI discovery session is established, because the storage system does not require discovery sessions to be authenticated. Related topics • Using the Configuration Wizard on page 37 • Changing host interface settings on page 45 • Adding a host on page 71 • Removing hosts on page 71 • Changing a host's name on page 71 • Changing host mappings on page 72 • Viewing information about a host (page 94) or all hosts (page 94) About volume mapping Each volume has default host-access settings that are set when the volume is created; these settings are called the default mapping. The default mapping applies to any host that has not been explicitly mapped using different settings. Explicit mappings for a volume override its default mapping. Default mapping enables all attached hosts to see a volume using a specified LUN and access permissions set by the administrator. This means that when the volume is first created, all connected hosts can immediately access the volume using the advertised default mapping settings. This behavior is expected by some operating systems, such as Microsoft Windows, which can immediately discover the volume. The advantage of a default mapping is that all connected hosts can discover the volume with no additional work by the administrator. The disadvantage is that all connected hosts can discover the volume with no restrictions. Therefore, this process is not recommended for specialized volumes that require restricted access. You can change a volume's default mapping, and create, modify, or delete explicit mappings. A mapping can specify read-write, read-only, or no access through one or more controller host ports to a volume. When a mapping specifies no access, the volume is masked. You can apply access privileges to one or more of the host ports on either controller. To maximize performance, map a volume to at least one host port on the controller that owns it. To sustain I/O in the event of controller failure, map to at least one host port on each controller. For example, a payroll volume could be mapped with read-write access for the Human Resources host and be masked for all other hosts. An engineering volume could be mapped with read-write access for the Engineering host and read-only access for other departments' hosts. A LUN identifies a mapped volume to a host. Both controllers share a set of LUNs, and any unused LUN can be assigned to a mapping; however, each LUN can only be used once per volume as its default LUN. For example, if LUN 5 is the default for Volume1, no other volume in the storage system can use LUN 5 as its default LUN. For explicit mappings, the rules differ: LUNs used in default mappings can be reused in explicit mappings for other volumes and other hosts. TIP: When an explicit mapping is deleted, the volume's default mapping takes effect. Therefore, it is recommended to use the same LUN for explicit mappings as for the default mapping. Volume mapping settings are stored in disk metadata. If enough of the disks used by a volume are moved into a different enclosure, the volume's vdisk can be reconstructed and the mapping data is preserved. 24 Getting started
-
 1
1 -
2
-
3
-
4
-
5
-
6
-
7
-
8
-
9
-
10
-
11
-
12
-
13
-
14
-
15
-
16
-
17
-
18
-
 19
19 -
 20
20 -
 21
21 -
 22
22 -
 23
23 -
 24
24 -
 25
25 -
 26
26 -
 27
27 -
 28
28 -
 29
29 -
30
-
31
-
32
-
33
-
34
-
35
-
36
-
37
-
38
-
39
-
40
-
41
-
42
-
43
-
44
-
45
-
46
-
47
-
48
-
49
-
50
-
51
-
52
-
53
-
54
-
55
-
56
-
57
-
58
-
59
-
60
-
61
-
62
-
63
-
64
-
65
-
66
-
67
-
68
-
69
-
70
-
71
-
72
-
73
-
74
-
75
-
76
-
77
-
78
-
79
-
80
-
81
-
82
-
83
-
84
-
85
-
86
-
87
-
88
-
89
-
90
-
91
-
92
-
93
-
94
-
95
-
96
-
97
-
98
-
99
-
100
-
101
-
102
-
103
-
104
-
105
-
106
-
107
-
108
-
109
-
110
-
111
-
112
-
113
-
114
-
115
-
116
-
117
-
118
-
119
-
120
-
121
-
122
-
123
-
124
-
125
-
126
-
127
-
128
-
129
-
130
-
131
-
132
-
133
-
134
-
135
-
136
-
137
-
138
-
139
-
140
-
141
-
142
 |
 |