HP Z600 HP Z600 Workstation Maintenance and Service Guide - Page 174
Solving power supply problems, Testing power supply
 |
UPC - 884962074053
View all HP Z600 manuals
Add to My Manuals
Save this manual to your list of manuals |
Page 174 highlights
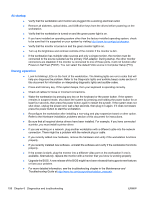
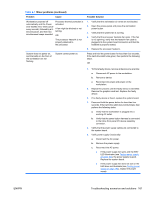
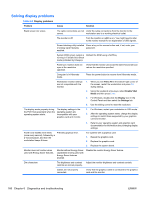
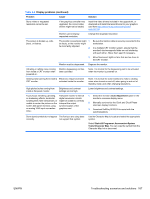
Solving power supply problems This section presents power supply troubleshooting scenarios. Testing power supply Before replacing the power supply, use the Built-In Self-Test (BIST) feature to learn if the power supply still works. To test the power supply: 1. Unplug the AC power. 2. Remove the power supply. 3. Plug in AC power and verify the following: ● If the green BIST LED on the rear of the workstation is illuminated and the fan is spinning, the power supply is functional. ● If the green BIST LED is not illuminated or the fan is not spinning, replace the power supply. See the Rear panel components section of this service guide to locate the BIST LED on this workstation. Table 6-2 Power supply problems Problem Cause Solution Power supply shuts down intermittently. Power supply fault. Replace the power supply. Workstation powers off and the Processor thermal protection 1. Ensure that the workstation air vents are not blocked. Power LED flashes red 2 times is activated. (once every second), followed by a 2. Open the access panel and press the workstation 2-second pause. A fan might be blocked or not power button. turning. 3. Verify that the system fan is running. OR 4. Verify that the processor heatsink fan spins. The processor heatsink fan assembly is not properly attached to the processor. If the heatsink fan is not spinning, verify that the fan cable is plugged into the system board connector. Verify that the fan is properly seated. 5. Replace the processor heatsink. Power LED flashes red (once every Power failure (power supply is 1. Determine whether a device is causing the problem 2 seconds). overloaded). by performing the following: a. Disconnect AC power. b. Remove all attached devices. c. Power on the workstation. If the system enters the POST, perform the following: a. Power off the workstation. b. Replace one device at a time and repeat this procedure until a failure occurs. c. Replace the device causing the failure d. Continue adding devices one at a time to verify that all devices are functioning. 2. Verify power supply functionality. 162 Chapter 6 Diagnostics and troubleshooting ENWW
-
 1
1 -
2
-
3
-
4
-
5
-
6
-
7
-
8
-
9
-
10
-
11
-
12
-
13
-
14
-
15
-
16
-
17
-
18
-
19
-
20
-
21
-
22
-
23
-
24
-
25
-
26
-
27
-
28
-
29
-
30
-
31
-
32
-
33
-
34
-
35
-
36
-
37
-
38
-
39
-
40
-
41
-
42
-
43
-
44
-
45
-
46
-
47
-
48
-
49
-
50
-
51
-
52
-
53
-
54
-
55
-
56
-
57
-
58
-
59
-
60
-
61
-
62
-
63
-
64
-
65
-
66
-
67
-
68
-
69
-
70
-
71
-
72
-
73
-
74
-
75
-
76
-
77
-
78
-
79
-
80
-
81
-
82
-
83
-
84
-
85
-
86
-
87
-
88
-
89
-
90
-
91
-
92
-
93
-
94
-
95
-
96
-
97
-
98
-
99
-
100
-
101
-
102
-
103
-
104
-
105
-
106
-
107
-
108
-
109
-
110
-
111
-
112
-
113
-
114
-
115
-
116
-
117
-
118
-
119
-
120
-
121
-
122
-
123
-
124
-
125
-
126
-
127
-
128
-
129
-
130
-
131
-
132
-
133
-
134
-
135
-
136
-
137
-
138
-
139
-
140
-
141
-
142
-
143
-
144
-
145
-
146
-
147
-
148
-
149
-
150
-
151
-
152
-
153
-
154
-
155
-
156
-
157
-
158
-
159
-
160
-
161
-
162
-
163
-
164
-
165
-
166
-
167
-
168
-
 169
169 -
 170
170 -
 171
171 -
 172
172 -
 173
173 -
 174
174 -
 175
175 -
 176
176 -
 177
177 -
 178
178 -
 179
179 -
180
-
181
-
182
-
183
-
184
-
185
-
186
-
187
-
188
-
189
-
190
-
191
-
192
-
193
-
194
-
195
-
196
-
197
-
198
-
199
-
200
-
201
-
202
-
203
-
204
-
205
-
206
-
207
-
208
-
209
-
210
-
211
-
212
-
213
-
214
-
215
-
216
-
217
-
218
-
219
-
220
-
221
-
222
-
223
-
224
-
225
-
226
-
227
-
228
-
229
-
230
-
231
-
232
-
233
-
234
-
235
-
236
-
237
 |
 |