HP Z600 HP Z600 Workstation Maintenance and Service Guide - Page 175
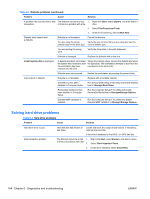
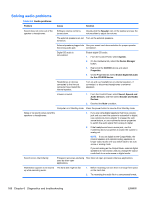
Solving diskette problems, Problem, Cause, Solution, Start, Explore, File>Properties>Tools
 |
UPC - 884962074053
View all HP Z600 manuals
Add to My Manuals
Save this manual to your list of manuals |
Page 175 highlights
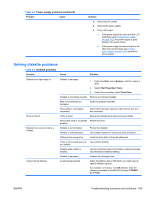
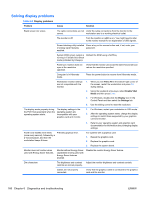
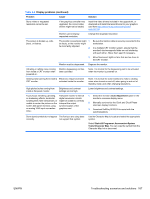
Table 6-2 Power supply problems (continued) Problem Cause Solution a. Disconnect AC power. b. Remove the power supply. c. Plug in AC power. ● If the power supply fan spins and the LED illuminates (see Testing power supply on page 162), the power supply is good. Replace the system board. ● If the power supply fan does not spin or the LED does not illuminate (see Testing power supply on page 162), replace the power supply. Solving diskette problems Table 6-3 Diskette problems Problem Cause Solution Diskette drive light stays on. Diskette is damaged. 1. Right-click Start, select Explore, and then select a drive. 2. Select File>Properties>Tools. 3. Under Error-checking, select Check Now. Diskette is incorrectly inserted. Remove and reinsert diskette. Files on the diskette are damaged. Verify the program diskettes. Drive cable is not properly connected. Reconnect the power cable and verify that all four pins are connected. Drive not found. Cable is loose. Reseat the diskette drive data and power cables. Removable drive is not seated Reseat the drive. properly. Diskette drive cannot write to a diskette. Diskette is not formatted. Diskette is write-protected. Format the diskette. Use another diskette or remove the write protection. Writing to the wrong drive. Verify the drive letter in the path statement. There is not enough space on Use another diskette. the diskette. Diskette write-control is enabled. Use the Computer Setup (F10) Utility to verify the storage security feature disabled settings. Diskette is damaged. Replace the damaged disk. Cannot format diskette. Invalid media reported. When formatting a disk in MS-DOS, you might need to specify diskette capacity. For example, to format a 1.44-MB diskette, enter the following command at the MS-DOS prompt: FORMAT A: /F:1440 ENWW Troubleshooting scenarios and solutions 163
-
 1
1 -
2
-
3
-
4
-
5
-
6
-
7
-
8
-
9
-
10
-
11
-
12
-
13
-
14
-
15
-
16
-
17
-
18
-
19
-
20
-
21
-
22
-
23
-
24
-
25
-
26
-
27
-
28
-
29
-
30
-
31
-
32
-
33
-
34
-
35
-
36
-
37
-
38
-
39
-
40
-
41
-
42
-
43
-
44
-
45
-
46
-
47
-
48
-
49
-
50
-
51
-
52
-
53
-
54
-
55
-
56
-
57
-
58
-
59
-
60
-
61
-
62
-
63
-
64
-
65
-
66
-
67
-
68
-
69
-
70
-
71
-
72
-
73
-
74
-
75
-
76
-
77
-
78
-
79
-
80
-
81
-
82
-
83
-
84
-
85
-
86
-
87
-
88
-
89
-
90
-
91
-
92
-
93
-
94
-
95
-
96
-
97
-
98
-
99
-
100
-
101
-
102
-
103
-
104
-
105
-
106
-
107
-
108
-
109
-
110
-
111
-
112
-
113
-
114
-
115
-
116
-
117
-
118
-
119
-
120
-
121
-
122
-
123
-
124
-
125
-
126
-
127
-
128
-
129
-
130
-
131
-
132
-
133
-
134
-
135
-
136
-
137
-
138
-
139
-
140
-
141
-
142
-
143
-
144
-
145
-
146
-
147
-
148
-
149
-
150
-
151
-
152
-
153
-
154
-
155
-
156
-
157
-
158
-
159
-
160
-
161
-
162
-
163
-
164
-
165
-
166
-
167
-
168
-
169
-
 170
170 -
 171
171 -
 172
172 -
 173
173 -
 174
174 -
 175
175 -
 176
176 -
 177
177 -
 178
178 -
 179
179 -
 180
180 -
181
-
182
-
183
-
184
-
185
-
186
-
187
-
188
-
189
-
190
-
191
-
192
-
193
-
194
-
195
-
196
-
197
-
198
-
199
-
200
-
201
-
202
-
203
-
204
-
205
-
206
-
207
-
208
-
209
-
210
-
211
-
212
-
213
-
214
-
215
-
216
-
217
-
218
-
219
-
220
-
221
-
222
-
223
-
224
-
225
-
226
-
227
-
228
-
229
-
230
-
231
-
232
-
233
-
234
-
235
-
236
-
237
 |
 |