HP xw3400 HP xw3400 Workstation - Service and Technical Reference Guide - Page 23
Computer Setup-Advanced for advanced users continued - video
 |
View all HP xw3400 manuals
Add to My Manuals
Save this manual to your list of manuals |
Page 23 highlights
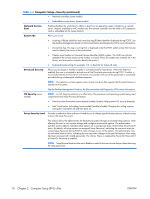
Table 2-6 Computer Setup-Advanced (for advanced users) (continued) PCI Devices ● Lists currently installed PCI devices and their IRQ settings. ● Allows you to reconfigure IRQ settings for these devices or to disable them entirely. These settings have no effect under an ACPI-based operating system. PCI VGA Configuration Displayed only if there are one or more PCI graphics controllers in the system and the integrated video is enabled. Allows you to specify which VGA controller will be the "boot" or primary VGA controller. Bus Options On some models, allows you to enable or disable: ● PCI SERR# generation. ● PCI VGA palette snooping, which sets the VGA palette snooping bit in PCI configuration space; only needed when more than one graphics controller is installed. Device Options Allows you to set: ● Printer mode (Bi-Directional, EPP + ECP, Output Only). ● Num Lock state at power-on (off/on). ● S5 Wake on LAN (enable/disable). ◦ To disable Wake on LAN during the off state (S5), use the arrow (left and right) keys to select the Advanced > Device Options menu and set the S5 Wake on LAN feature to Disable. This obtains the lowest power consumption available on the workstation during S5. It does not affect the ability of the workstation to Wake on LAN from suspend or hibernation, but will prevent it from waking from S5 via the network. It does not affect operation of the network connection while the workstation is on. ◦ If a network connection is not required, completely disable the network controller (NIC) by using the arrow (left and right) keys to select the Security > Device Security menu. Set the Network Controller option to Device Hidden. This prevents the network controller from being used by the operating system and reduces the power used by the workstation in S5. ● Processor cache (enable/disable). ● Integrated Graphics Memory Size (Automatic, 32M, 64M, 128M, 256M). This allows the user to control the size of the memory used by the integrated graphics controller. Automatic allows the BIOS to choose the optimal size. Available sizes may be limited by the installed system memory. ● Integrated Video (enable/disable). Allows you to use integrated video and PCI Up Solution video at the same time (available on some models only). NOTE: After Integrated Video is enabled and changes saved, a new menu item appears under Advanced to allow you to select the primary VGA controller video device. ● Internal speaker (some models) (enable/disable) (does not affect external speakers) ● Monitor Tracking (enable/disable). Allows BIOS to save monitor asset information. ● NIC PXE Option ROM Download (enable/disable). The BIOS contains an embedded NIC option ROM to allow the unit to boot through the network to a PXE server. This is typically used to download a corporate image to a hard drive. The NIC option ROM takes up memory space below 1MB commonly referred to as DOS Compatibility Hole (DCH) space. This space is limited. This F10 option will allow users to disable the downloading of this embedded NIC option ROM thus giving more DCH space for additional PCI cards which may need option ROM space. The default will be to have the NIC option-ROM-enabled. ● Surround View (enable/disable). This enables the ATI Surround View option that allows the integrated graphics controller and an ATI PCI Express graphics card to work at the same time for multi-monitor support. ENWW Computer Setup (F10) utilities 13
-
 1
1 -
2
-
3
-
4
-
5
-
6
-
7
-
8
-
9
-
10
-
11
-
12
-
13
-
14
-
15
-
16
-
17
-
 18
18 -
 19
19 -
 20
20 -
 21
21 -
 22
22 -
 23
23 -
 24
24 -
 25
25 -
 26
26 -
 27
27 -
 28
28 -
29
-
30
-
31
-
32
-
33
-
34
-
35
-
36
-
37
-
38
-
39
-
40
-
41
-
42
-
43
-
44
-
45
-
46
-
47
-
48
-
49
-
50
-
51
-
52
-
53
-
54
-
55
-
56
-
57
-
58
-
59
-
60
-
61
-
62
-
63
-
64
-
65
-
66
-
67
-
68
-
69
-
70
-
71
-
72
-
73
-
74
-
75
-
76
-
77
-
78
-
79
-
80
-
81
-
82
-
83
-
84
-
85
-
86
-
87
-
88
-
89
-
90
-
91
-
92
-
93
-
94
-
95
-
96
-
97
-
98
-
99
-
100
-
101
-
102
-
103
-
104
-
105
-
106
-
107
-
108
-
109
-
110
-
111
-
112
-
113
-
114
-
115
-
116
-
117
-
118
-
119
-
120
-
121
-
122
-
123
-
124
-
125
-
126
-
127
-
128
-
129
-
130
-
131
-
132
-
133
-
134
-
135
-
136
-
137
-
138
-
139
-
140
-
141
-
142
-
143
-
144
-
145
-
146
-
147
-
148
-
149
-
150
-
151
-
152
-
153
-
154
-
155
-
156
-
157
-
158
-
159
-
160
-
161
-
162
-
163
-
164
-
165
-
166
-
167
-
168
-
169
-
170
-
171
-
172
-
173
-
174
-
175
-
176
-
177
-
178
-
179
-
180
-
181
-
182
 |
 |