Intel SR2400SYSD2 User Guide - Page 38
Removing and Installing the Chassis Cover, Removing the Chassis Cover
 |
UPC - 735858169172
View all Intel SR2400SYSD2 manuals
Add to My Manuals
Save this manual to your list of manuals |
Page 38 highlights
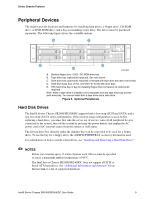
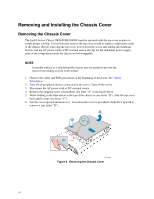
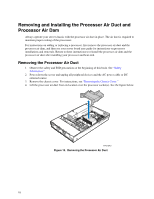
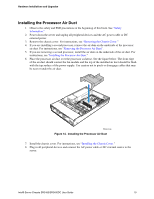
Removing and Installing the Chassis Cover Removing the Chassis Cover The Intel® Server Chassis SR2400/SR2400DC must be operated with the top cover in place to ensure proper cooling. You will need to remove the top cover to add or replace components inside of the chassis. Before removing the top cover, power down the server and unplug all peripheral devices and the AC power cable or DC external source. Except for the redundant power supply, none of the components inside the chassis are hot-swappable. NOTE A nonskid surface or a stop behind the chassis may be needed to prevent the chassis from sliding on your work surface. 1. Observe the safety and ESD precautions at the beginning of this book. See "Safety Information." 2. Turn off all peripheral devices connected to the server. Turn off the server. 3. Disconnect the AC power cord or DC external source. 4. Remove the shipping screw (if installed). See letter "A" in the figure below. 5. While holding in the blue button at the top of the chassis in (see letter "B"), slide the top cover back until it stops (see letter "C"). 6. Lift the cover upward and remove it. A notch in the cover is provided to help lift it upward to remove it (see letter "D"). C B A D TP01092 Figure 9. Removing the Chassis Cover 14
-
 1
1 -
2
-
3
-
4
-
5
-
6
-
7
-
8
-
9
-
10
-
11
-
12
-
13
-
14
-
15
-
16
-
17
-
18
-
19
-
20
-
21
-
22
-
23
-
24
-
25
-
26
-
27
-
28
-
29
-
30
-
31
-
32
-
 33
33 -
 34
34 -
 35
35 -
 36
36 -
 37
37 -
 38
38 -
 39
39 -
 40
40 -
 41
41 -
 42
42 -
 43
43 -
44
-
45
-
46
-
47
-
48
-
49
-
50
-
51
-
52
-
53
-
54
-
55
-
56
-
57
-
58
-
59
-
60
-
61
-
62
-
63
-
64
-
65
-
66
-
67
-
68
-
69
-
70
-
71
-
72
-
73
-
74
-
75
-
76
-
77
-
78
-
79
-
80
-
81
-
82
-
83
-
84
-
85
-
86
-
87
-
88
-
89
-
90
-
91
-
92
-
93
-
94
-
95
-
96
-
97
-
98
-
99
-
100
-
101
-
102
-
103
-
104
-
105
-
106
-
107
-
108
-
109
-
110
-
111
-
112
-
113
-
114
-
115
-
116
-
117
-
118
-
119
-
120
-
121
-
122
-
123
-
124
-
125
-
126
-
127
-
128
-
129
-
130
-
131
-
132
-
133
-
134
-
135
-
136
-
137
-
138
-
139
 |
 |
