Intel SR2400SYSD2 User Guide - Page 44
Removing the Processor Air Dam, Safety, Information., Removing the Chassis Cover.
 |
UPC - 735858169172
View all Intel SR2400SYSD2 manuals
Add to My Manuals
Save this manual to your list of manuals |
Page 44 highlights
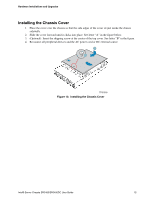
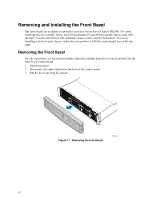
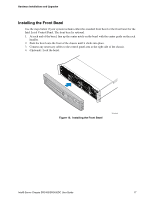
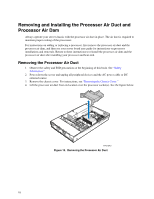
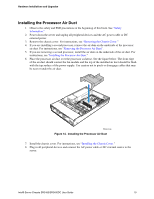
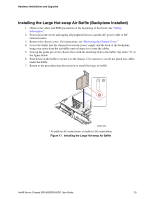
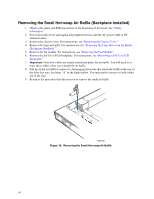
Removing the Processor Air Dam If you install only a single processor, the processor air dam must be installed on the underside of the processor air duct. If you install two processors, the air dam must be removed from the air duct. For instructions on adding or replacing a processor, first remove the processor air duct and the processor air dam, and then see your server board user guide for instructions on processor installations and removals. Return to these instructions to reinstall the processor air dam and the processor air duct. 1. Observe the safety and ESD precautions at the beginning of this book. See "Safety Information." 2. Power down the server and unplug all peripheral devices and the AC power cable or DC external source. 3. Remove the chassis cover. For instructions, see "Removing the Chassis Cover." 4. Remove the processor air duct. For instructions, see "Removing the Processor Air Duct." 5. Turn the processor air duct over to reveal the underside of it. 6. Remove the air dam by sliding the slotted holes from the duct pins. See the figure below. Save the air dam for future use. TP01117 Figure 15. Installing the Processor Air Dam 7. Install the processor air duct. For instructions, see "Installing the Processor Air Duct." 8. Install the chassis cover. For instructions, see "Installing the Chassis Cover." 9. Plug in all peripheral devices and connect the AC power cable or DC external source to the server. 20
-
 1
1 -
2
-
3
-
4
-
5
-
6
-
7
-
8
-
9
-
10
-
11
-
12
-
13
-
14
-
15
-
16
-
17
-
18
-
19
-
20
-
21
-
22
-
23
-
24
-
25
-
26
-
27
-
28
-
29
-
30
-
31
-
32
-
33
-
34
-
35
-
36
-
37
-
38
-
 39
39 -
 40
40 -
 41
41 -
 42
42 -
 43
43 -
 44
44 -
 45
45 -
 46
46 -
 47
47 -
 48
48 -
 49
49 -
50
-
51
-
52
-
53
-
54
-
55
-
56
-
57
-
58
-
59
-
60
-
61
-
62
-
63
-
64
-
65
-
66
-
67
-
68
-
69
-
70
-
71
-
72
-
73
-
74
-
75
-
76
-
77
-
78
-
79
-
80
-
81
-
82
-
83
-
84
-
85
-
86
-
87
-
88
-
89
-
90
-
91
-
92
-
93
-
94
-
95
-
96
-
97
-
98
-
99
-
100
-
101
-
102
-
103
-
104
-
105
-
106
-
107
-
108
-
109
-
110
-
111
-
112
-
113
-
114
-
115
-
116
-
117
-
118
-
119
-
120
-
121
-
122
-
123
-
124
-
125
-
126
-
127
-
128
-
129
-
130
-
131
-
132
-
133
-
134
-
135
-
136
-
137
-
138
-
139
 |
 |
