Kyocera FS-4200DN FS-2100DN/4100DN/4200DN/4300DN Operation Guide - Page 100
Reset Type Adj. (Resets customized settings), Media Type Set., Transparency, Preprinted, Exit ]
 |
View all Kyocera FS-4200DN manuals
Add to My Manuals
Save this manual to your list of manuals |
Page 100 highlights
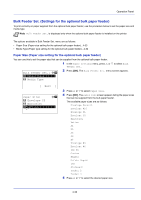
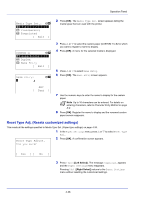
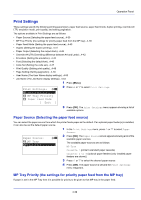
Operation Panel Media Type Set.: a b *1***P*l*a*i*n************2 Transparency 3 Preprinted [ Exit ] CUSTOM 1: a b *1**P*a*p*e*r**W*e**i*g*h*t*****- 2 Duplex 3 Name Entry [ Exit ] Name Entry: a b * S 2 Press [OK]. The Media Type Set. screen appears listing the media types that can used with the printer. 3 Press or to select the custom paper (CUSTOM 1 to 8) for which you want to register a name to display. 4 Press [OK]. A menu for the selected media is displayed. 5 Press or to select Name Entry. 6 Press [OK]. The Name Entry screen appears. ABC [ Text ] 7 Use the numeric keys to enter the name to display for the custom paper. Note Up to 16 characters can be entered. For details on entering characters, refer to Character Entry Method on page A-2. 8 Press [OK]. Register the name to display and the renamed custom paper screen reappears. Reset Type Adj. (Resets customized settings) This resets all the settings specified in Media Type Set. (Paper type settings) on page 4-34. 1 In the Paper Settings menu, press or to select Reset Type Adj.. Reset Type Adjust. 2 Press [OK]. A confirmation screen appears. Are you sure? [ Yes ] [ No ] 3 Press [Yes] ([Left Select]). The message Completed. appears and the Paper Settings menu reappears. Pressing [No] ([Right Select]) returns to the Paper Settings menu without resetting the customized settings. 4-38
-
 1
1 -
2
-
3
-
4
-
5
-
6
-
7
-
8
-
9
-
10
-
11
-
12
-
13
-
14
-
15
-
16
-
17
-
18
-
19
-
20
-
21
-
22
-
23
-
24
-
25
-
26
-
27
-
28
-
29
-
30
-
31
-
32
-
33
-
34
-
35
-
36
-
37
-
38
-
39
-
40
-
41
-
42
-
43
-
44
-
45
-
46
-
47
-
48
-
49
-
50
-
51
-
52
-
53
-
54
-
55
-
56
-
57
-
58
-
59
-
60
-
61
-
62
-
63
-
64
-
65
-
66
-
67
-
68
-
69
-
70
-
71
-
72
-
73
-
74
-
75
-
76
-
77
-
78
-
79
-
80
-
81
-
82
-
83
-
84
-
85
-
86
-
87
-
88
-
89
-
90
-
91
-
92
-
93
-
94
-
 95
95 -
 96
96 -
 97
97 -
 98
98 -
 99
99 -
 100
100 -
 101
101 -
 102
102 -
 103
103 -
 104
104 -
 105
105 -
106
-
107
-
108
-
109
-
110
-
111
-
112
-
113
-
114
-
115
-
116
-
117
-
118
-
119
-
120
-
121
-
122
-
123
-
124
-
125
-
126
-
127
-
128
-
129
-
130
-
131
-
132
-
133
-
134
-
135
-
136
-
137
-
138
-
139
-
140
-
141
-
142
-
143
-
144
-
145
-
146
-
147
-
148
-
149
-
150
-
151
-
152
-
153
-
154
-
155
-
156
-
157
-
158
-
159
-
160
-
161
-
162
-
163
-
164
-
165
-
166
-
167
-
168
-
169
-
170
-
171
-
172
-
173
-
174
-
175
-
176
-
177
-
178
-
179
-
180
-
181
-
182
-
183
-
184
-
185
-
186
-
187
-
188
-
189
-
190
-
191
-
192
-
193
-
194
-
195
-
196
-
197
-
198
-
199
-
200
-
201
-
202
-
203
-
204
-
205
-
206
-
207
-
208
-
209
-
210
-
211
-
212
-
213
-
214
-
215
-
216
-
217
-
218
-
219
-
220
-
221
-
222
-
223
-
224
-
225
-
226
-
227
-
228
-
229
-
230
-
231
-
232
-
233
-
234
-
235
-
236
-
237
-
238
-
239
-
240
-
241
-
242
-
243
-
244
-
245
-
246
-
247
-
248
-
249
-
250
-
251
-
252
-
253
-
254
-
255
-
256
-
257
-
258
-
259
-
260
-
261
-
262
-
263
-
264
-
265
-
266
-
267
-
268
-
269
-
270
-
271
-
272
-
273
-
274
-
275
-
276
-
277
-
278
-
279
-
280
-
281
-
282
-
283
-
284
-
285
-
286
-
287
-
288
-
289
-
290
-
291
-
292
-
293
-
294
-
295
-
296
-
297
-
298
-
299
-
300
-
301
-
302
-
303
-
304
-
305
-
306
-
307
-
308
-
309
-
310
-
311
-
312
-
313
-
314
-
315
-
316
 |
 |
