Kyocera FS-4200DN FS-2100DN/4100DN/4200DN/4300DN Operation Guide - Page 171
DataSanitization Sanitizing the stored data, Internal Mem.:Complet
 |
View all Kyocera FS-4200DN manuals
Add to My Manuals
Save this manual to your list of manuals |
Page 171 highlights
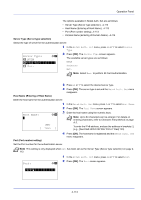
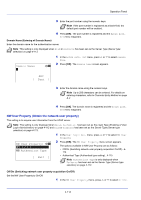
Task is completed. Turn the main power switch off and on. Operation Panel 4 When the initialization is finished Task is completed. is displayed. Turn the power switch off and then on. DataSanitization (Sanitizing the stored data) This is to completely delete the address information registered on the machine and the stored image data. IMPORTANT To complete this process requires about 30 minutes when an optional SSD (HD-6) is installed and a few minutes when an SSD (HD-6) is not installed. You can only performing this operation by logging in with machine administrator privileges. It is not possible to cancel the process once it has started. Remove the USB cable and network cable, etc., before performing this operation. Do not turn off the power supply whilst the deletion is ongoing. If the power switch off during the deletion then the deletion will automatically be performed when the power is switched back on, but a complete operation cannot be guaranteed. The data deleted is as listed below. • Job settings • Machine settings (Network settings) • Certificates • User settings (user list, document boxes) • Machine administration (job logs, job accounting) Note It is possible to check the status of data sanitization implementation on the Status page. For details, refer to Status Page (Printing a printer's status page) on page 4-12. Sanitize the data. Are you sure? * This process will take a while. [ Yes ] [ No ] 1 In the Data Security menu, press or to select DataSanitization. 2 Press [OK]. A confirmation message is displayed. 3 Press [Yes] ([Left Select]). The message Sanitizing the data. appears and the data sanitization begins. Note When an optional SSD (HD-6) is installed, the printer automatically restarts before data sanitization. Pressing [No] ([Right Select]) returns to the Data Security menu without sanitizing the data. Sanitizing the data. Main Memory :Complet Internal Mem.:Complet [ OK ] 4 When the data sanitization is finished Complet is displayed. Press [OK] ([Right Select]) and turn the power switch off. Note It is possible to check the result of data sanitization on the Status page. For details, refer to Status Page (Printing a printer's status page) on page 4-12. 4-109
-
 1
1 -
2
-
3
-
4
-
5
-
6
-
7
-
8
-
9
-
10
-
11
-
12
-
13
-
14
-
15
-
16
-
17
-
18
-
19
-
20
-
21
-
22
-
23
-
24
-
25
-
26
-
27
-
28
-
29
-
30
-
31
-
32
-
33
-
34
-
35
-
36
-
37
-
38
-
39
-
40
-
41
-
42
-
43
-
44
-
45
-
46
-
47
-
48
-
49
-
50
-
51
-
52
-
53
-
54
-
55
-
56
-
57
-
58
-
59
-
60
-
61
-
62
-
63
-
64
-
65
-
66
-
67
-
68
-
69
-
70
-
71
-
72
-
73
-
74
-
75
-
76
-
77
-
78
-
79
-
80
-
81
-
82
-
83
-
84
-
85
-
86
-
87
-
88
-
89
-
90
-
91
-
92
-
93
-
94
-
95
-
96
-
97
-
98
-
99
-
100
-
101
-
102
-
103
-
104
-
105
-
106
-
107
-
108
-
109
-
110
-
111
-
112
-
113
-
114
-
115
-
116
-
117
-
118
-
119
-
120
-
121
-
122
-
123
-
124
-
125
-
126
-
127
-
128
-
129
-
130
-
131
-
132
-
133
-
134
-
135
-
136
-
137
-
138
-
139
-
140
-
141
-
142
-
143
-
144
-
145
-
146
-
147
-
148
-
149
-
150
-
151
-
152
-
153
-
154
-
155
-
156
-
157
-
158
-
159
-
160
-
161
-
162
-
163
-
164
-
165
-
 166
166 -
 167
167 -
 168
168 -
 169
169 -
 170
170 -
 171
171 -
 172
172 -
 173
173 -
 174
174 -
 175
175 -
 176
176 -
177
-
178
-
179
-
180
-
181
-
182
-
183
-
184
-
185
-
186
-
187
-
188
-
189
-
190
-
191
-
192
-
193
-
194
-
195
-
196
-
197
-
198
-
199
-
200
-
201
-
202
-
203
-
204
-
205
-
206
-
207
-
208
-
209
-
210
-
211
-
212
-
213
-
214
-
215
-
216
-
217
-
218
-
219
-
220
-
221
-
222
-
223
-
224
-
225
-
226
-
227
-
228
-
229
-
230
-
231
-
232
-
233
-
234
-
235
-
236
-
237
-
238
-
239
-
240
-
241
-
242
-
243
-
244
-
245
-
246
-
247
-
248
-
249
-
250
-
251
-
252
-
253
-
254
-
255
-
256
-
257
-
258
-
259
-
260
-
261
-
262
-
263
-
264
-
265
-
266
-
267
-
268
-
269
-
270
-
271
-
272
-
273
-
274
-
275
-
276
-
277
-
278
-
279
-
280
-
281
-
282
-
283
-
284
-
285
-
286
-
287
-
288
-
289
-
290
-
291
-
292
-
293
-
294
-
295
-
296
-
297
-
298
-
299
-
300
-
301
-
302
-
303
-
304
-
305
-
306
-
307
-
308
-
309
-
310
-
311
-
312
-
313
-
314
-
315
-
316
 |
 |
