Netgear GS752TP GS728TP/GS728TPP/GS752TP Software Administration Manual - Page 102
PORTS, Port Priority, Port Path Cost, APPLY
 |
View all Netgear GS752TP manuals
Add to My Manuals
Save this manual to your list of manuals |
Page 102 highlights
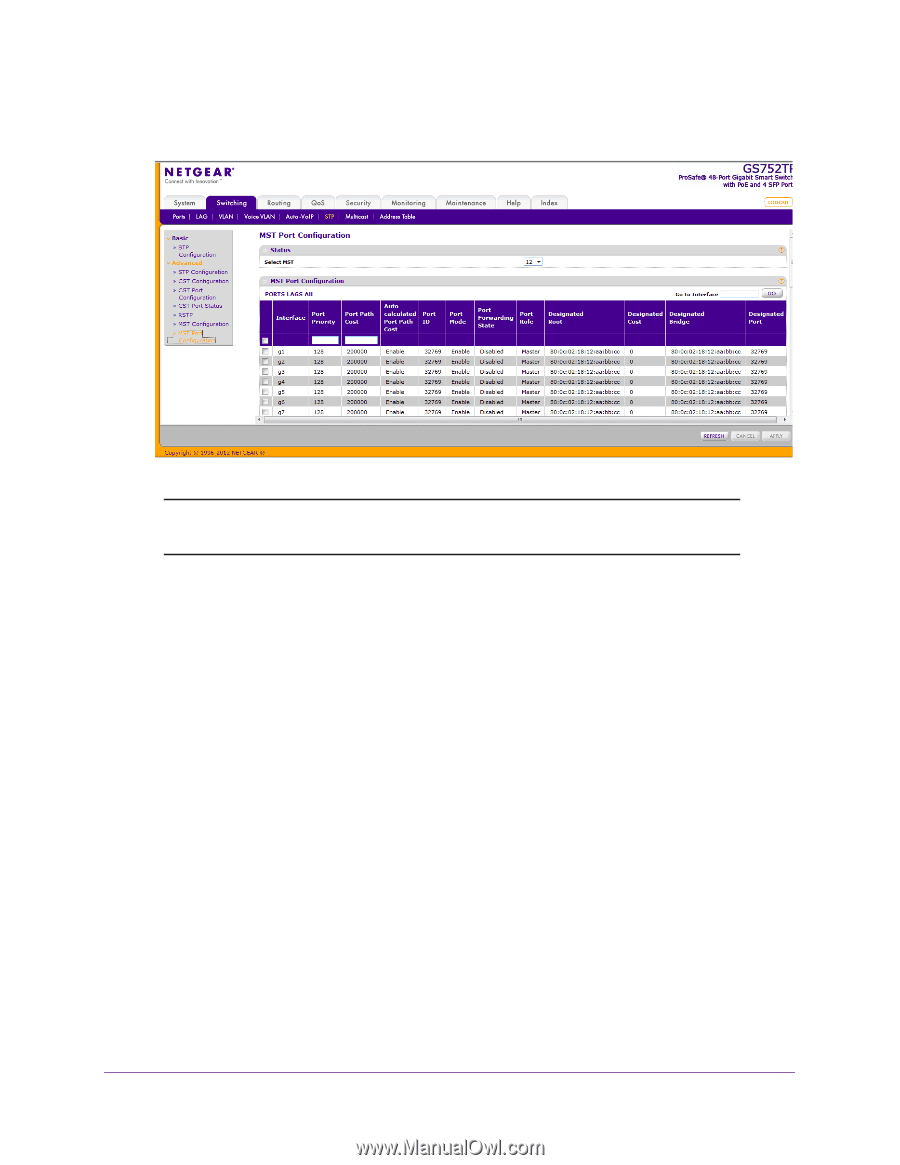
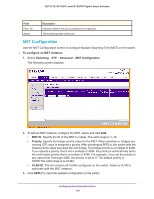
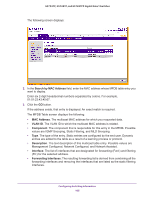
GS752TP, GS728TP, and GS728TPP Gigabit Smart Switches The following screen displays: Note: If no MST instances have been configured on the switch, the screen displays a "No MSTs Available" message. 2. To view CST settings for an interface, click PORTS, LAGS, or All. 3. Select the check box next to the port or LAG to configure. You can select multiple ports and LAGs to apply the same setting to the selected interfaces. Select the check box in the heading row to apply the same settings to all interfaces. 4. Configure the MST values for the selected ports or LAGs: • Port Priority. The priority for a particular port within the selected MST instance. The port priority is set in multiples of 16. If you specify a value that is not a multiple of 16, the priority is automatically set to the next lowest priority that is a multiple of 16. For example, if you set a value from 0 through 15, the priority is set to 0. If you specify a number from 16 through 31, the priority is set to 16. The valid range is 0-240. • Port Path Cost. Set the path cost to a new value for the specified port in the selected MST instance. The valid range is 0-200000000. If you enter 0, the device recalculates the path cost. 5. Click APPLY to send the updated configuration to the switch. Configuration changes take place immediately. The following table describes the read-only MST port configuration information displayed on the CST Configuration screen. Configuring Switching Information 102
-
 1
1 -
2
-
3
-
4
-
5
-
6
-
7
-
8
-
9
-
10
-
11
-
12
-
13
-
14
-
15
-
16
-
17
-
18
-
19
-
20
-
21
-
22
-
23
-
24
-
25
-
26
-
27
-
28
-
29
-
30
-
31
-
32
-
33
-
34
-
35
-
36
-
37
-
38
-
39
-
40
-
41
-
42
-
43
-
44
-
45
-
46
-
47
-
48
-
49
-
50
-
51
-
52
-
53
-
54
-
55
-
56
-
57
-
58
-
59
-
60
-
61
-
62
-
63
-
64
-
65
-
66
-
67
-
68
-
69
-
70
-
71
-
72
-
73
-
74
-
75
-
76
-
77
-
78
-
79
-
80
-
81
-
82
-
83
-
84
-
85
-
86
-
87
-
88
-
89
-
90
-
91
-
92
-
93
-
94
-
95
-
96
-
 97
97 -
 98
98 -
 99
99 -
 100
100 -
 101
101 -
 102
102 -
 103
103 -
 104
104 -
 105
105 -
 106
106 -
 107
107 -
108
-
109
-
110
-
111
-
112
-
113
-
114
-
115
-
116
-
117
-
118
-
119
-
120
-
121
-
122
-
123
-
124
-
125
-
126
-
127
-
128
-
129
-
130
-
131
-
132
-
133
-
134
-
135
-
136
-
137
-
138
-
139
-
140
-
141
-
142
-
143
-
144
-
145
-
146
-
147
-
148
-
149
-
150
-
151
-
152
-
153
-
154
-
155
-
156
-
157
-
158
-
159
-
160
-
161
-
162
-
163
-
164
-
165
-
166
-
167
-
168
-
169
-
170
-
171
-
172
-
173
-
174
-
175
-
176
-
177
-
178
-
179
-
180
-
181
-
182
-
183
-
184
-
185
-
186
-
187
-
188
-
189
-
190
-
191
-
192
-
193
-
194
-
195
-
196
-
197
-
198
-
199
-
200
-
201
-
202
-
203
-
204
-
205
-
206
-
207
-
208
-
209
-
210
-
211
-
212
-
213
-
214
-
215
-
216
-
217
-
218
-
219
-
220
-
221
-
222
-
223
-
224
-
225
-
226
-
227
-
228
-
229
-
230
-
231
-
232
-
233
-
234
-
235
-
236
-
237
-
238
-
239
-
240
-
241
-
242
-
243
-
244
-
245
-
246
-
247
-
248
-
249
-
250
-
251
-
252
-
253
-
254
-
255
-
256
-
257
-
258
-
259
-
260
-
261
-
262
-
263
-
264
-
265
-
266
-
267
-
268
-
269
-
270
-
271
-
272
-
273
-
274
-
275
 |
 |