Netgear GS752TP GS728TP/GS728TPP/GS752TP Software Administration Manual - Page 71
APPLY, DELETE, CLEAR, Table 13., DHCP Snooping Dynamic Binding Configuration fields.
 |
View all Netgear GS752TP manuals
Add to My Manuals
Save this manual to your list of manuals |
Page 71 highlights
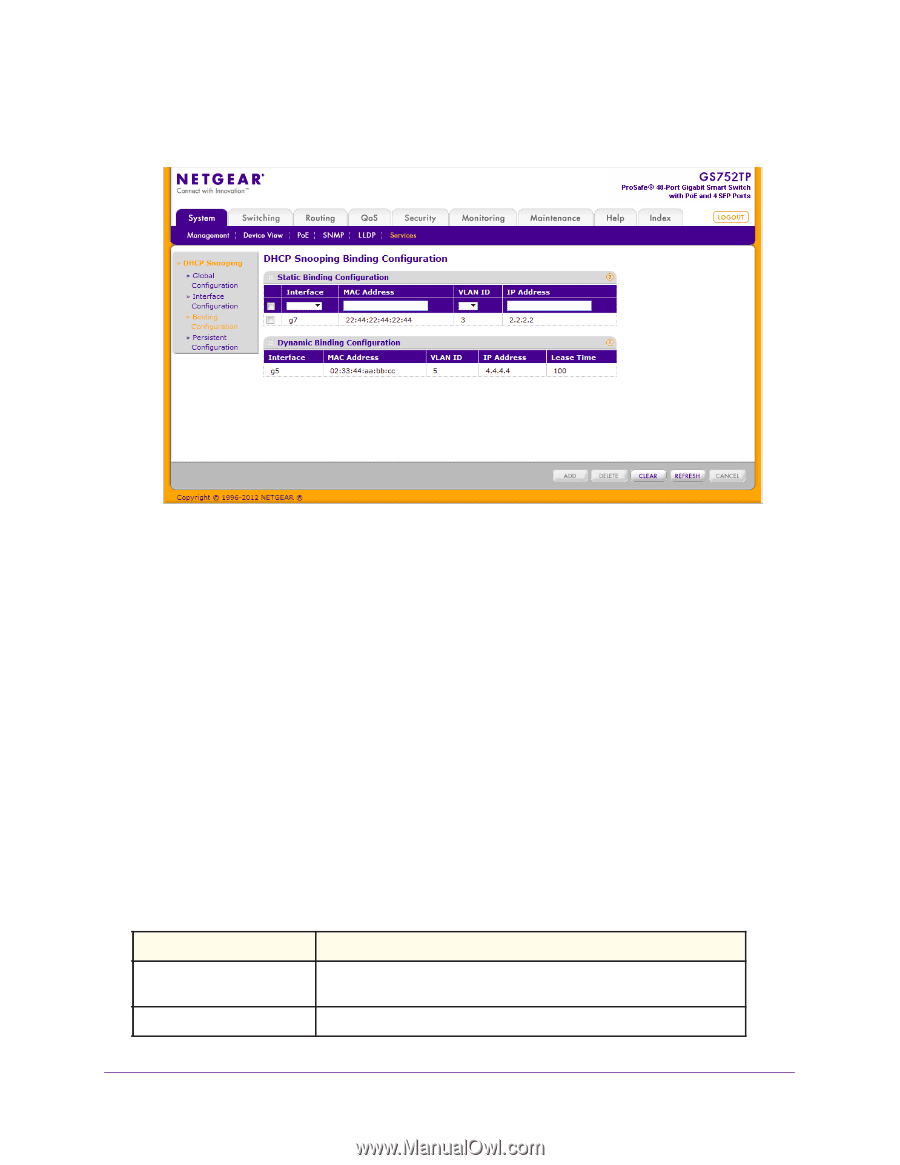
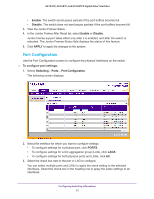
GS752TP, GS728TP, and GS728TPP Gigabit Smart Switches The following screen displays: 2. In the Static Binding Configuration section, in the Interface list, select the interface for which to add a binding to the DHCP snooping database. 3. In the MAC Address field, specify the MAC address for the binding to be added. This MAC address is the key to the binding database. 4. In the VLAN ID list, select the VLAN from the list for the binding rule. The valid range of the VLAN ID is 1-4093. 5. In the IP Address field, specify a valid IP address for the binding rule. 6. Click ADD to add the DHCP snooping binding entry to the database. 7. Click APPLY to apply the change to the system. Configuration changes take effect immediately. Click DELETE to delete selected DHCP snooping binding static entries from the database, or CLEAR to delete all DHCP snooping binding entries from the database. The following table describes the information that displays for DHCP Snooping Dynamic Binding Configuration: Table 13. DHCP Snooping Dynamic Binding Configuration fields. Field Interface MAC Address Description Displays information about the interface to which a binding entry in the DHCP snooping database. The MAC address for the binding entry in the binding database. Configuring System Information 71
-
 1
1 -
2
-
3
-
4
-
5
-
6
-
7
-
8
-
9
-
10
-
11
-
12
-
13
-
14
-
15
-
16
-
17
-
18
-
19
-
20
-
21
-
22
-
23
-
24
-
25
-
26
-
27
-
28
-
29
-
30
-
31
-
32
-
33
-
34
-
35
-
36
-
37
-
38
-
39
-
40
-
41
-
42
-
43
-
44
-
45
-
46
-
47
-
48
-
49
-
50
-
51
-
52
-
53
-
54
-
55
-
56
-
57
-
58
-
59
-
60
-
61
-
62
-
63
-
64
-
65
-
 66
66 -
 67
67 -
 68
68 -
 69
69 -
 70
70 -
 71
71 -
 72
72 -
 73
73 -
 74
74 -
 75
75 -
 76
76 -
77
-
78
-
79
-
80
-
81
-
82
-
83
-
84
-
85
-
86
-
87
-
88
-
89
-
90
-
91
-
92
-
93
-
94
-
95
-
96
-
97
-
98
-
99
-
100
-
101
-
102
-
103
-
104
-
105
-
106
-
107
-
108
-
109
-
110
-
111
-
112
-
113
-
114
-
115
-
116
-
117
-
118
-
119
-
120
-
121
-
122
-
123
-
124
-
125
-
126
-
127
-
128
-
129
-
130
-
131
-
132
-
133
-
134
-
135
-
136
-
137
-
138
-
139
-
140
-
141
-
142
-
143
-
144
-
145
-
146
-
147
-
148
-
149
-
150
-
151
-
152
-
153
-
154
-
155
-
156
-
157
-
158
-
159
-
160
-
161
-
162
-
163
-
164
-
165
-
166
-
167
-
168
-
169
-
170
-
171
-
172
-
173
-
174
-
175
-
176
-
177
-
178
-
179
-
180
-
181
-
182
-
183
-
184
-
185
-
186
-
187
-
188
-
189
-
190
-
191
-
192
-
193
-
194
-
195
-
196
-
197
-
198
-
199
-
200
-
201
-
202
-
203
-
204
-
205
-
206
-
207
-
208
-
209
-
210
-
211
-
212
-
213
-
214
-
215
-
216
-
217
-
218
-
219
-
220
-
221
-
222
-
223
-
224
-
225
-
226
-
227
-
228
-
229
-
230
-
231
-
232
-
233
-
234
-
235
-
236
-
237
-
238
-
239
-
240
-
241
-
242
-
243
-
244
-
245
-
246
-
247
-
248
-
249
-
250
-
251
-
252
-
253
-
254
-
255
-
256
-
257
-
258
-
259
-
260
-
261
-
262
-
263
-
264
-
265
-
266
-
267
-
268
-
269
-
270
-
271
-
272
-
273
-
274
-
275
 |
 |