Pioneer AVIC U310BT Owner's Manual - Page 11
Inserting and ejecting a disc, Inserting and ejecting an, SD memory card, Before you start - lcd screen
 |
UPC - 012562956299
View all Pioneer AVIC U310BT manuals
Add to My Manuals
Save this manual to your list of manuals |
Page 11 highlights
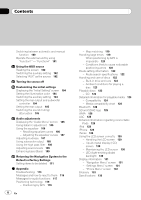
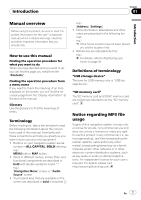
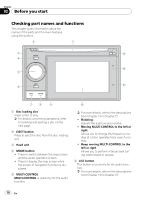
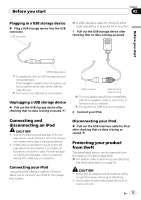
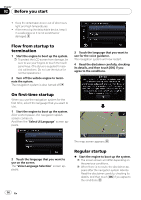
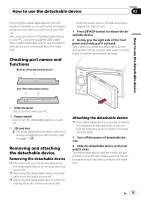
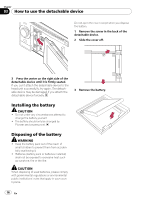
Before you start Chapter 02 Before you start 7 SRC/OFF button This button is used only for the audio function. = For more details, refer to the descriptions from Chapter 13 to Chapter 27. 8 BAND/ESC button This button is used only for the audio function. = For more details, refer to the descriptions from Chapter 13 to Chapter 27. 9 Detachable device a LCD screen b RESET button = For details, refer to Resetting the microprocessor on page 8. c Bluetooth connection status indicator Lights up when your phone is paired to the navigation system by Bluetooth wireless technology. d DETACH button Press to remove the detachable device from the head unit. Inserting and ejecting a disc Inserting a disc % Insert a disc into the disc loading slot. Ejecting a disc % Press the EJECT button. The disc is ejected. Inserting and ejecting an SD memory card CAUTION ! Keep the dummy SD card out of the reach of small children to prevent them from accidentally swallowing it. ! To prevent data loss and damage to the storage device, never remove it from this navigation system while data is being transferred. ! If data loss or corruption occurs on the storage device for any reason, it is usually not possible to recover the data. Pioneer accepts no liability for damages, costs or expenses arising from data loss or corruption. Inserting an SD memory card 1 Remove the detachable device from the head unit. = For details, refer to Removing and attaching the detachable device on page 15. 2 Insert an SD memory card into the SD card slot. Insert it with the contact the top of the detachable device and press the card until it clicks and completely locks. Label side p Do not insert anything other than a disc into the disc loading slot. En 11
-
 1
1 -
2
-
3
-
4
-
5
-
 6
6 -
 7
7 -
 8
8 -
 9
9 -
 10
10 -
 11
11 -
 12
12 -
 13
13 -
 14
14 -
 15
15 -
 16
16 -
17
-
18
-
19
-
20
-
21
-
22
-
23
-
24
-
25
-
26
-
27
-
28
-
29
-
30
-
31
-
32
-
33
-
34
-
35
-
36
-
37
-
38
-
39
-
40
-
41
-
42
-
43
-
44
-
45
-
46
-
47
-
48
-
49
-
50
-
51
-
52
-
53
-
54
-
55
-
56
-
57
-
58
-
59
-
60
-
61
-
62
-
63
-
64
-
65
-
66
-
67
-
68
-
69
-
70
-
71
-
72
-
73
-
74
-
75
-
76
-
77
-
78
-
79
-
80
-
81
-
82
-
83
-
84
-
85
-
86
-
87
-
88
-
89
-
90
-
91
-
92
-
93
-
94
-
95
-
96
-
97
-
98
-
99
-
100
-
101
-
102
-
103
-
104
-
105
-
106
-
107
-
108
-
109
-
110
-
111
-
112
-
113
-
114
-
115
-
116
-
117
-
118
-
119
-
120
-
121
-
122
-
123
-
124
-
125
-
126
-
127
-
128
-
129
-
130
-
131
-
132
-
133
-
134
-
135
-
136
-
137
 |
 |