Pioneer AVIC U310BT Owner's Manual - Page 29
The basic flow of creating, your route, Checking the location on, the map, Checking the calculated
 |
UPC - 012562956299
View all Pioneer AVIC U310BT manuals
Add to My Manuals
Save this manual to your list of manuals |
Page 29 highlights
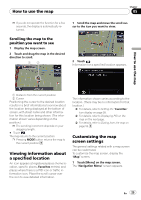
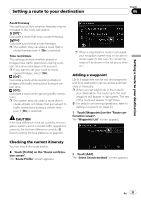
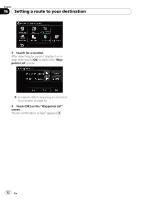
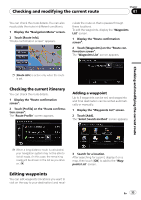
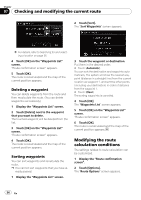
Setting a route to your destination Chapter 06 Setting a route to your destination CAUTION For safety reasons, these route-setting functions are not available while your vehicle is in motion. To enable these functions, you must stop in a safe place and put on the parking brake before setting your route. p Some information regarding traffic regulations depends on the time when the route calculation is performed. Thus, the information may not correspond with a certain traffic regulation when your vehicle actually passes through the location in question. Also, the information on the traffic regulations provided will be for a passenger vehicle, and not for a truck or other delivery vehicles. Always follow the actual traffic regulations when driving. 8 Your navigation system sets the route to your destination, and the map of your surroundings appears. 9 After releasing the parking brake, drive in accordance with navigation guidance. Checking the location on the map After searching for the destination, the "Location confirmation screen" appears. Location confirmation screen The basic flow of creating your route 1 Park your vehicle in a safe place, and apply the parking brake. 2 Display the "Navigation Menu" screen. 3 Select the method of searching for your destination. = For details, refer to Searching for and selecting a location on page 36. 4 Enter the information about your destination to calculate route. 5 Confirm the location on the map. = For details, refer to Checking the location on the map on this page. 6 The navigation system calculates the route to your destination, and then shows the route on the map. 7 Check and decide the route. = For details, refer to Checking the calculated route on this page. % Touch [OK]. The destination is set, and then route calculation starts. p If you press MODE button during route calculation, the calculation is canceled and the map display appears. # Touch [Scroll]. The map display changes to the scroll mode. You can fine-tune the location in the scroll mode, and then you can set the location as your destination or do various operations. = For details, refer to Registering a location by scroll mode on page 42. # Touch [Waypoint]. The location is added to the "Waypoints List" screen. p If a destination is not set, [Waypoint] is not available. Checking the calculated route After the destination is set, route calculation starts. En 29
-
 1
1 -
2
-
3
-
4
-
5
-
6
-
7
-
8
-
9
-
10
-
11
-
12
-
13
-
14
-
15
-
16
-
17
-
18
-
19
-
20
-
21
-
22
-
23
-
 24
24 -
 25
25 -
 26
26 -
 27
27 -
 28
28 -
 29
29 -
 30
30 -
 31
31 -
 32
32 -
 33
33 -
 34
34 -
35
-
36
-
37
-
38
-
39
-
40
-
41
-
42
-
43
-
44
-
45
-
46
-
47
-
48
-
49
-
50
-
51
-
52
-
53
-
54
-
55
-
56
-
57
-
58
-
59
-
60
-
61
-
62
-
63
-
64
-
65
-
66
-
67
-
68
-
69
-
70
-
71
-
72
-
73
-
74
-
75
-
76
-
77
-
78
-
79
-
80
-
81
-
82
-
83
-
84
-
85
-
86
-
87
-
88
-
89
-
90
-
91
-
92
-
93
-
94
-
95
-
96
-
97
-
98
-
99
-
100
-
101
-
102
-
103
-
104
-
105
-
106
-
107
-
108
-
109
-
110
-
111
-
112
-
113
-
114
-
115
-
116
-
117
-
118
-
119
-
120
-
121
-
122
-
123
-
124
-
125
-
126
-
127
-
128
-
129
-
130
-
131
-
132
-
133
-
134
-
135
-
136
-
137
 |
 |