Ricoh Aficio SP C320DN Manuals - Page 193
Correcting the Color Gradation, Setting the Gradation Correction Value, Test Pattern 2] respectively.
 |
View all Ricoh Aficio SP C320DN manuals
Add to My Manuals
Save this manual to your list of manuals |
Page 193 highlights
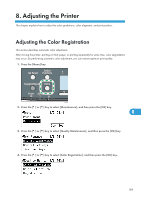
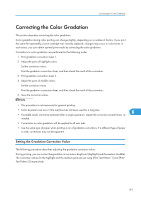
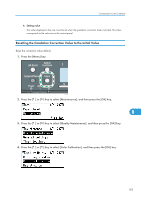
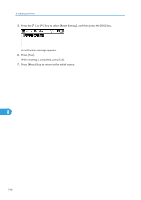
Correcting the Color Gradation Correcting the Color Gradation This section describes correcting the color gradation. Color gradation during color printing can change slightly, depending on a number of factors. If you print the same file repeatedly or print cartridge was recently replaced, changes may occur in color tones. In such cases, you can obtain optimal print results by correcting the color gradation. Corrections to color gradation are performed in the following order: 1. Print gradation correction sheet 1. 2. Adjust the parts of highlight colors. Set the correction value. Print the gradation correction sheet, and then check the result of the correction. 3. Print gradation correction sheet 2. 4. Adjust the parts of middle colors. Set the correction value. Print the gradation correction sheet, and then check the result of the correction. 5. Save the correction value. • This procedure is not necessary for general printing. • Color deviation can occur if the machine has not been used for a long time. • If suitable results cannot be obtained after a single operation, repeat the correction several times, as 8 needed. • Corrections to color gradation will be applied to all user jobs. • Use the same type of paper when printing a run of gradation corrections. If a different type of paper is used, corrections may not be apparent. Setting the Gradation Correction Value The following procedure describes adjusting the gradation correction value. During printing, you can correct the gradation in two areas: bright part (highlight) and the medium (middle). The correction values for the highlight and the medium parts are set using [Print Test Pattern 1] and [Print Test Pattern 2] respectively. 191
-
 1
1 -
2
-
3
-
4
-
5
-
6
-
7
-
8
-
9
-
10
-
11
-
12
-
13
-
14
-
15
-
16
-
17
-
18
-
19
-
20
-
21
-
22
-
23
-
24
-
25
-
26
-
27
-
28
-
29
-
30
-
31
-
32
-
33
-
34
-
35
-
36
-
37
-
38
-
39
-
40
-
41
-
42
-
43
-
44
-
45
-
46
-
47
-
48
-
49
-
50
-
51
-
52
-
53
-
54
-
55
-
56
-
57
-
58
-
59
-
60
-
61
-
62
-
63
-
64
-
65
-
66
-
67
-
68
-
69
-
70
-
71
-
72
-
73
-
74
-
75
-
76
-
77
-
78
-
79
-
80
-
81
-
82
-
83
-
84
-
85
-
86
-
87
-
88
-
89
-
90
-
91
-
92
-
93
-
94
-
95
-
96
-
97
-
98
-
99
-
100
-
101
-
102
-
103
-
104
-
105
-
106
-
107
-
108
-
109
-
110
-
111
-
112
-
113
-
114
-
115
-
116
-
117
-
118
-
119
-
120
-
121
-
122
-
123
-
124
-
125
-
126
-
127
-
128
-
129
-
130
-
131
-
132
-
133
-
134
-
135
-
136
-
137
-
138
-
139
-
140
-
141
-
142
-
143
-
144
-
145
-
146
-
147
-
148
-
149
-
150
-
151
-
152
-
153
-
154
-
155
-
156
-
157
-
158
-
159
-
160
-
161
-
162
-
163
-
164
-
165
-
166
-
167
-
168
-
169
-
170
-
171
-
172
-
173
-
174
-
175
-
176
-
177
-
178
-
179
-
180
-
181
-
182
-
183
-
184
-
185
-
186
-
187
-
 188
188 -
 189
189 -
 190
190 -
 191
191 -
 192
192 -
 193
193 -
 194
194 -
 195
195 -
 196
196 -
 197
197 -
 198
198 -
199
-
200
-
201
-
202
-
203
-
204
-
205
-
206
-
207
-
208
-
209
-
210
-
211
-
212
-
213
-
214
-
215
-
216
-
217
-
218
-
219
-
220
-
221
-
222
-
223
-
224
-
225
-
226
-
227
-
228
-
229
-
230
-
231
-
232
-
233
-
234
-
235
-
236
-
237
-
238
-
239
-
240
-
241
-
242
-
243
-
244
-
245
-
246
-
247
-
248
-
249
-
250
-
251
-
252
-
253
-
254
-
255
-
256
-
257
-
258
-
259
-
260
 |
 |