Ricoh Aficio SP C320DN Manuals - Page 47
Installing Options, Available Options, Order of Option Installation, Where to Install Options
 |
View all Ricoh Aficio SP C320DN manuals
Add to My Manuals
Save this manual to your list of manuals |
Page 47 highlights
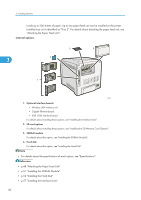
3. Installing Options This chapter explains how to install various options for this printer. Available Options By installing options, you can improve printer performance and expand the available features. • Before installing or removing options, always disconnect the power cord plugs from the wall outlet 3 and allow time for the main unit to fully cool. Failing to take these precautions could result in burns. Order of Option Installation When installing multiple options, the following order is recommended: 1. Attach the paper feed unit. Attach the paper feed unit to the bottom of the printer. You can attach up to one paper feed unit. Up to 1100 sheets of paper can be loaded in total. 2. Install the SDRAM module. There are two types of memory units, 256 MB and 512 MB. 3. Install the hard disk. 4. Install the optional interface board. Install the optional Gigabit Ethernet board, Wireless LAN interface unit, or IEEE 1284 interface board in the slot. 5. Insert SD card options. Install the data overwrite security unit, NetWare card, camera direct print card, VM card, or HDD encryption unit. Insert these units into the SD card slot. If you want to use two or more SD cards that can be inserted in the same slot, contact your sales and service representative. Where to Install Options Install options in the locations shown in the following illustrations. External options • Paper feed unit 45
-
 1
1 -
2
-
3
-
4
-
5
-
6
-
7
-
8
-
9
-
10
-
11
-
12
-
13
-
14
-
15
-
16
-
17
-
18
-
19
-
20
-
21
-
22
-
23
-
24
-
25
-
26
-
27
-
28
-
29
-
30
-
31
-
32
-
33
-
34
-
35
-
36
-
37
-
38
-
39
-
40
-
41
-
 42
42 -
 43
43 -
 44
44 -
 45
45 -
 46
46 -
 47
47 -
 48
48 -
 49
49 -
 50
50 -
 51
51 -
 52
52 -
53
-
54
-
55
-
56
-
57
-
58
-
59
-
60
-
61
-
62
-
63
-
64
-
65
-
66
-
67
-
68
-
69
-
70
-
71
-
72
-
73
-
74
-
75
-
76
-
77
-
78
-
79
-
80
-
81
-
82
-
83
-
84
-
85
-
86
-
87
-
88
-
89
-
90
-
91
-
92
-
93
-
94
-
95
-
96
-
97
-
98
-
99
-
100
-
101
-
102
-
103
-
104
-
105
-
106
-
107
-
108
-
109
-
110
-
111
-
112
-
113
-
114
-
115
-
116
-
117
-
118
-
119
-
120
-
121
-
122
-
123
-
124
-
125
-
126
-
127
-
128
-
129
-
130
-
131
-
132
-
133
-
134
-
135
-
136
-
137
-
138
-
139
-
140
-
141
-
142
-
143
-
144
-
145
-
146
-
147
-
148
-
149
-
150
-
151
-
152
-
153
-
154
-
155
-
156
-
157
-
158
-
159
-
160
-
161
-
162
-
163
-
164
-
165
-
166
-
167
-
168
-
169
-
170
-
171
-
172
-
173
-
174
-
175
-
176
-
177
-
178
-
179
-
180
-
181
-
182
-
183
-
184
-
185
-
186
-
187
-
188
-
189
-
190
-
191
-
192
-
193
-
194
-
195
-
196
-
197
-
198
-
199
-
200
-
201
-
202
-
203
-
204
-
205
-
206
-
207
-
208
-
209
-
210
-
211
-
212
-
213
-
214
-
215
-
216
-
217
-
218
-
219
-
220
-
221
-
222
-
223
-
224
-
225
-
226
-
227
-
228
-
229
-
230
-
231
-
232
-
233
-
234
-
235
-
236
-
237
-
238
-
239
-
240
-
241
-
242
-
243
-
244
-
245
-
246
-
247
-
248
-
249
-
250
-
251
-
252
-
253
-
254
-
255
-
256
-
257
-
258
-
259
-
260
 |
 |