Samsung SCH-R740C User Manual - Page 37
Controlling synchronization, Sync Google Play Books
 |
View all Samsung SCH-R740C manuals
Add to My Manuals
Save this manual to your list of manuals |
Page 37 highlights
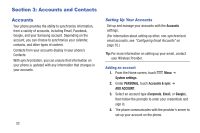
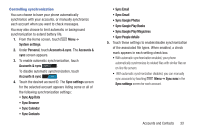
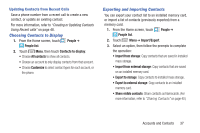
Controlling synchronization You can choose to have your phone automatically synchronize with your accounts, or manually synchronize each account when you want to check messages. You may also choose to limit automatic or background synchronization to extend battery life. 1. From the Home screen, touch Menu ➔ System settings. 2. Under Personal, touch Accounts & sync. The Accounts & sync screen appears. 3. To enable automatic synchronization, touch Accounts & sync . To disable automatic synchronization, touch Accounts & sync . 4. Touch the desired account ID. The Sync settings screen for the selected account appears listing some or all of the following synchronization settings: • Sync App Data • Sync Browser • Sync Calendar • Sync Contacts • Sync Email • Sync Gmail • Sync Google Photos • Sync Google Play Books • Sync Google Play Magazines • Sync People details 5. Touch these settings to enable/disable synchronization of the associated file types. When enabled, a check mark appears in each setting check box. • With automatic synchronization enabled, your phone automatically synchronizes its related files with similar files on on-line file servers. • With automatic synchronization disabled, you can manually sync accounts by touching Menu ➔ Sync now in the Sync settings screen for each account. Accounts and Contacts 33
-
 1
1 -
2
-
3
-
4
-
5
-
6
-
7
-
8
-
9
-
10
-
11
-
12
-
13
-
14
-
15
-
16
-
17
-
18
-
19
-
20
-
21
-
22
-
23
-
24
-
25
-
26
-
27
-
28
-
29
-
30
-
31
-
 32
32 -
 33
33 -
 34
34 -
 35
35 -
 36
36 -
 37
37 -
 38
38 -
 39
39 -
 40
40 -
 41
41 -
 42
42 -
43
-
44
-
45
-
46
-
47
-
48
-
49
-
50
-
51
-
52
-
53
-
54
-
55
-
56
-
57
-
58
-
59
-
60
-
61
-
62
-
63
-
64
-
65
-
66
-
67
-
68
-
69
-
70
-
71
-
72
-
73
-
74
-
75
-
76
-
77
-
78
-
79
-
80
-
81
-
82
-
83
-
84
-
85
-
86
-
87
-
88
-
89
-
90
-
91
-
92
-
93
-
94
-
95
-
96
-
97
-
98
-
99
-
100
-
101
-
102
-
103
-
104
-
105
-
106
-
107
-
108
-
109
-
110
-
111
-
112
-
113
-
114
-
115
-
116
-
117
-
118
-
119
-
120
-
121
-
122
-
123
-
124
-
125
-
126
-
127
-
128
-
129
-
130
-
131
-
132
-
133
-
134
-
135
-
136
-
137
-
138
-
139
-
140
-
141
-
142
-
143
-
144
-
145
-
146
-
147
-
148
-
149
-
150
-
151
-
152
-
153
-
154
-
155
-
156
-
157
-
158
-
159
-
160
-
161
-
162
-
163
-
164
-
165
-
166
-
167
 |
 |
