Samsung SCH-R740C User Manual - Page 61
Corporate Account Settings, Sync Calendar
 |
View all Samsung SCH-R740C manuals
Add to My Manuals
Save this manual to your list of manuals |
Page 61 highlights
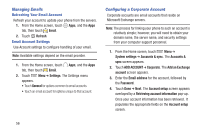
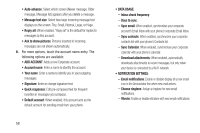
5. Enter your Domain name ahead of your account Username (which should already display on the screen). 6. Verify the Server name. Enter any needed changes. 7. Verify the enabled/disabled states of the following options: • Use secure connection (SSL) • Accept all SSL certificates Touch the check boxes to enable or disable the associated option. (A check mark indicates an option is enabled.) 8. Touch Done ➔ Next. 9. Follow any additional prompts to complete the link. 10. When you are advised Your account is set up, and email is on it's way!, enter a name for the account, if desired. 11. Touch Next. The Accounts & sync screen appears with your new account listed. Corporate Account Settings The values you select or enter for these settings affect the appearance of your Corporate email messages and how your phone handles them. 1. From the Home screen, touch Menu ➔ System settings ➔ Accounts & sync. The Accounts & sync screen appears. 2. Touch a Corporate account. The Sync settings screen appears. 3. To change the DATA & SYNCHRONIZATION settings for the account, touch the following options: • Sync Calendar: When enabled, synchronizes your corporate calendar with your phone's calendar. • Sync Contacts: When enabled, synchronizes your corporate contacts list with your phone's Contacts list. • Sync Email: When enabled, synchronizes your corporate account's Email Inbox with your phone's corporate Email Inbox. 4. To access additional options for this account, touch Account settings. The Settings screen appears. 5. Touch General. The following options are available: Messaging 57
-
 1
1 -
2
-
3
-
4
-
5
-
6
-
7
-
8
-
9
-
10
-
11
-
12
-
13
-
14
-
15
-
16
-
17
-
18
-
19
-
20
-
21
-
22
-
23
-
24
-
25
-
26
-
27
-
28
-
29
-
30
-
31
-
32
-
33
-
34
-
35
-
36
-
37
-
38
-
39
-
40
-
41
-
42
-
43
-
44
-
45
-
46
-
47
-
48
-
49
-
50
-
51
-
52
-
53
-
54
-
55
-
 56
56 -
 57
57 -
 58
58 -
 59
59 -
 60
60 -
 61
61 -
 62
62 -
 63
63 -
 64
64 -
 65
65 -
 66
66 -
67
-
68
-
69
-
70
-
71
-
72
-
73
-
74
-
75
-
76
-
77
-
78
-
79
-
80
-
81
-
82
-
83
-
84
-
85
-
86
-
87
-
88
-
89
-
90
-
91
-
92
-
93
-
94
-
95
-
96
-
97
-
98
-
99
-
100
-
101
-
102
-
103
-
104
-
105
-
106
-
107
-
108
-
109
-
110
-
111
-
112
-
113
-
114
-
115
-
116
-
117
-
118
-
119
-
120
-
121
-
122
-
123
-
124
-
125
-
126
-
127
-
128
-
129
-
130
-
131
-
132
-
133
-
134
-
135
-
136
-
137
-
138
-
139
-
140
-
141
-
142
-
143
-
144
-
145
-
146
-
147
-
148
-
149
-
150
-
151
-
152
-
153
-
154
-
155
-
156
-
157
-
158
-
159
-
160
-
161
-
162
-
163
-
164
-
165
-
166
-
167
 |
 |