Samsung SM-N900T User Manual T-mobile Wireless Sm-n900t Galaxy Note 3 Jb Engli - Page 131
Front Camera/Dual Camera, Rich tone HDR
 |
View all Samsung SM-N900T manuals
Add to My Manuals
Save this manual to your list of manuals |
Page 131 highlights
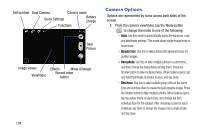
- Sound & shot: Use this mode to enrich pictures by adding background sounds for a few seconds. The background sound is recorded for up to 9 seconds after taking the photo. - Drama: Use this to take a series of photos of a moving object and then merge them together into one image. - Animated photo: Use this to create a picture in which a few selected static objects move by animating objects detected by the device. - Golf: Use this feature to take pictures of a gold swing and then play the pictures back (forwards or backwards). - Rich tone (HDR): Use this to take photos with richer colors and contrasts by merging images taken at different exposure levels. - Eraser: Saves the best of 5 taken pictures and removes any passers by. - Panorama: Use this to take wide panoramic photos. Press the Shutter button to take a photo, and then move the camera in any direction. When the blue frame aligns with the preview screen, the camera automatically takes another shot in the panoramic sequence. To stop shooting, press the Shutter button again. - Surround shot: Use this to take a 360-degree pictures that are then used to create a spherical panorama. - Sports: Use this to take fast action photos. 2. From the top of the camera, the following shortcuts are available for the camera: Focus area: displays the area of the image used as the main focus area. If the image is too close, the square will turn red. Self portrait: allows you to set the front camera so you can take pictures of yourself. Front Camera/Dual Camera: allows you to activate both the front and rear cameras simultaneously. For more information, refer to "Taking Dual Camera Photos" on page 127. Quick Settings: activates the Quick Settings menu bar from where you can select several additional settings.For more information, refer to "Quick Settings" on page 126. Multimedia 125
-
 1
1 -
2
-
3
-
4
-
5
-
6
-
7
-
8
-
9
-
10
-
11
-
12
-
13
-
14
-
15
-
16
-
17
-
18
-
19
-
20
-
21
-
22
-
23
-
24
-
25
-
26
-
27
-
28
-
29
-
30
-
31
-
32
-
33
-
34
-
35
-
36
-
37
-
38
-
39
-
40
-
41
-
42
-
43
-
44
-
45
-
46
-
47
-
48
-
49
-
50
-
51
-
52
-
53
-
54
-
55
-
56
-
57
-
58
-
59
-
60
-
61
-
62
-
63
-
64
-
65
-
66
-
67
-
68
-
69
-
70
-
71
-
72
-
73
-
74
-
75
-
76
-
77
-
78
-
79
-
80
-
81
-
82
-
83
-
84
-
85
-
86
-
87
-
88
-
89
-
90
-
91
-
92
-
93
-
94
-
95
-
96
-
97
-
98
-
99
-
100
-
101
-
102
-
103
-
104
-
105
-
106
-
107
-
108
-
109
-
110
-
111
-
112
-
113
-
114
-
115
-
116
-
117
-
118
-
119
-
120
-
121
-
122
-
123
-
124
-
125
-
 126
126 -
 127
127 -
 128
128 -
 129
129 -
 130
130 -
 131
131 -
 132
132 -
 133
133 -
 134
134 -
 135
135 -
 136
136 -
137
-
138
-
139
-
140
-
141
-
142
-
143
-
144
-
145
-
146
-
147
-
148
-
149
-
150
-
151
-
152
-
153
-
154
-
155
-
156
-
157
-
158
-
159
-
160
-
161
-
162
-
163
-
164
-
165
-
166
-
167
-
168
-
169
-
170
-
171
-
172
-
173
-
174
-
175
-
176
-
177
-
178
-
179
-
180
-
181
-
182
-
183
-
184
-
185
-
186
-
187
-
188
-
189
-
190
-
191
-
192
-
193
-
194
-
195
-
196
-
197
-
198
-
199
-
200
-
201
-
202
-
203
-
204
-
205
-
206
-
207
-
208
-
209
-
210
-
211
-
212
-
213
-
214
-
215
-
216
-
217
-
218
-
219
-
220
-
221
-
222
-
223
-
224
-
225
-
226
-
227
-
228
-
229
-
230
-
231
-
232
-
233
-
234
-
235
-
236
-
237
-
238
-
239
-
240
-
241
-
242
-
243
-
244
-
245
-
246
-
247
-
248
-
249
-
250
-
251
-
252
-
253
-
254
-
255
-
256
-
257
-
258
-
259
-
260
-
261
-
262
-
263
-
264
-
265
-
266
-
267
-
268
-
269
-
270
-
271
-
272
-
273
-
274
-
275
-
276
-
277
-
278
-
279
-
280
-
281
-
282
-
283
-
284
-
285
-
286
-
287
-
288
-
289
-
290
-
291
-
292
-
293
-
294
-
295
-
296
-
297
-
298
-
299
-
300
-
301
-
302
-
303
-
304
-
305
-
306
-
307
-
308
-
309
-
310
-
311
-
312
-
313
-
314
-
315
-
316
-
317
-
318
-
319
-
320
-
321
-
322
-
323
-
324
-
325
-
326
-
327
-
328
-
329
-
330
-
331
-
332
-
333
-
334
-
335
-
336
-
337
-
338
-
339
-
340
-
341
-
342
-
343
-
344
-
345
-
346
-
347
-
348
-
349
-
350
-
351
-
352
-
353
-
354
-
355
-
356
-
357
-
358
-
359
-
360
-
361
-
362
-
363
-
364
-
365
-
366
-
367
-
368
-
369
-
370
-
371
-
372
-
373
-
374
-
375
 |
 |
