Toshiba ESTUDIO355 Troubleshooting Guide - Page 11
Messages Displayed on the Touch Panel, Message, Problem Description, Corrective Action
 |
View all Toshiba ESTUDIO355 manuals
Add to My Manuals
Save this manual to your list of manuals |
Page 11 highlights
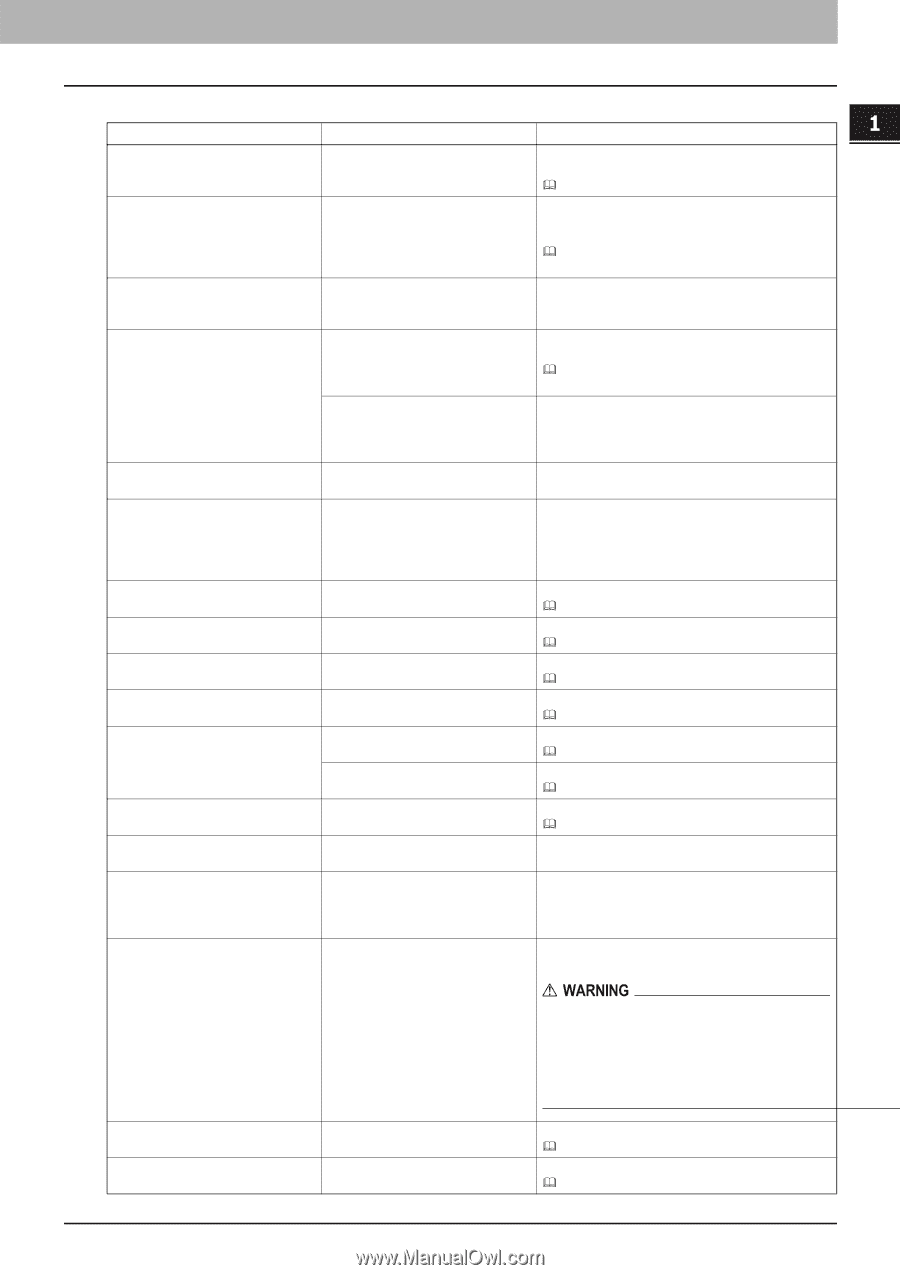
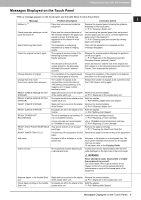
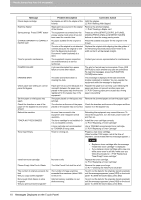
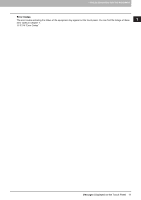
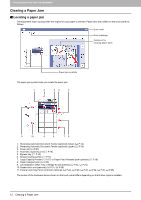
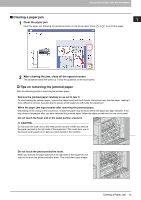
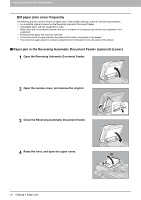
1 TROUBLESHOOTING FOR THE HARDWARE Messages Displayed on the Touch Panel When a message appears on the touch panel, see the table below to solve the problem. Message Misfeed in *** Check paper size setting on control panel for drawer N Wait (Performing Self-check) Check the original and set it again Change direction of original Change from this mode Count over, cannot store anymore READY (CHECK SADDLE STITCH STAPLER) READY (CHECK SADDLE STITCH STAPLER) READY (CHECK STAPLER) READY (CHECK STAPLER) READY (TONER NOT RECOGNIZED) READY (HOLE PUNCH DUST BIN IS FULL) READY (INNER TRAY FULL) Add paper Call for service Problem Description Paper jam has occurred inside the equipment. Paper jam has occurred because of the mismatch between the paper size placed in drawer N and the size registered for the drawer N in the equipment. The equipment is undergoing maintenance to keep its imaging quality. The original is jammed inside of the Reversing Automatic Document Feeder (optional). The direction or the size of the original placed on the Reversing Automatic Document Feeder is incorrect. The orientation of the original placed on the original glass is incorrect. The number of originals to be scanned has reached the limit of 1000 sheets during scanning. (The magazine sort or page number function is used.) Staple jam has occurred in the stapler of the saddle stitch unit. No staples are left in the stapler of the saddle stitch unit. Staple jam has occurred in the stapler of the finisher. No staples are left in the stapler of the finisher. The toner cartridge is not installed. Or it is not installed correctly. A toner cartridge not recommended by TOSHIBA is being used. Hole punch dust bin is full of paper punchings. The exit tray of the equipment is full of paper. No paper is left in a drawer or on the bypass tray. The equipment requires adjusting by a service technician. Corrective Action Remove the jammed paper following the guidance displayed on the touch panel. P.12 "Clearing a Paper Jam" Just removing the jammed paper does not prevent another paper jam. Be sure to correctly register the paper size in the equipment. P.39 "Clearing paper jams caused by a wrong paper size setting" Wait until the adjustment is completed and the message disappears. Remove the jammed original following the guidance on the touch panel. P.14 "Paper jam in the Reversing Automatic Document Feeder (optional) (Lower)" Check the direction and the size of the original and then replace it on the Reversing Automatic Document Feeder. Then reattempt the operation. Change the orientation of the original by 90 degrees and place it on the original glass. Reduce the number of originals to be scanned to less than 1000 sheets, and try again. Remove the jammed staples. P.51 "Staple jam in the saddle stitch unit" Refill the staples. P.67 "Refilling saddle stitch unit staples" Remove the jammed staples. P.44 "Clearing a Staple Jam" Refill the staples. P.60 "Refilling With Staples" Install the toner cartridge correctly. P.54 "Replacing a Toner Cartridge" Use a TOSHIBA-recommended toner cartridge. P.54 "Replacing a Toner Cartridge" Remove the paper punchings. P.71 "Cleaning the Hole Punch Dust Bin" Remove the paper from the exit tray of the equipment. Set paper in the drawer or on the bypass tray. The touch panel indicates which drawer (or the bypass tray) has no paper. To set paper, refer to the Copying Guide. Contact your service representative with the error code displayed on the right side of the touch panel. Never attempt to repair, disassemble or modify the equipment by yourself. You could cause a fire or get an electric shock. Always contact your service representative for maintenance or repair of the internal parts of the equipment. Examine stapler in the Saddle Stitch unit Check staple cartridge in the Saddle Stitch unit Staple jam has occurred in the stapler of the saddle stitch unit. No staples are left in the stapler of the saddle stitch unit. Remove the jammed staples. P.51 "Staple jam in the saddle stitch unit" Refill the staples. P.60 "Refilling With Staples" Messages Displayed on the Touch Panel 9
-
 1
1 -
2
-
3
-
4
-
5
-
 6
6 -
 7
7 -
 8
8 -
 9
9 -
 10
10 -
 11
11 -
 12
12 -
 13
13 -
 14
14 -
 15
15 -
 16
16 -
17
-
18
-
19
-
20
-
21
-
22
-
23
-
24
-
25
-
26
-
27
-
28
-
29
-
30
-
31
-
32
-
33
-
34
-
35
-
36
-
37
-
38
-
39
-
40
-
41
-
42
-
43
-
44
-
45
-
46
-
47
-
48
-
49
-
50
-
51
-
52
-
53
-
54
-
55
-
56
-
57
-
58
-
59
-
60
-
61
-
62
-
63
-
64
-
65
-
66
-
67
-
68
-
69
-
70
-
71
-
72
-
73
-
74
-
75
-
76
-
77
-
78
-
79
-
80
-
81
-
82
-
83
-
84
-
85
-
86
-
87
-
88
-
89
-
90
-
91
-
92
-
93
-
94
-
95
-
96
-
97
-
98
-
99
-
100
-
101
-
102
-
103
-
104
-
105
-
106
-
107
-
108
-
109
-
110
-
111
-
112
-
113
-
114
-
115
-
116
-
117
-
118
-
119
-
120
-
121
-
122
-
123
-
124
-
125
-
126
-
127
-
128
-
129
-
130
-
131
-
132
 |
 |