Toshiba S1 User Manual - Page 51
Slim Select Bay modules, DVD-ROM drive Black
 |
View all Toshiba S1 manuals
Add to My Manuals
Save this manual to your list of manuals |
Page 51 highlights
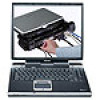
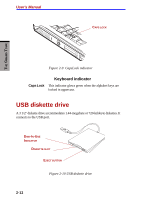
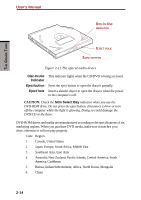
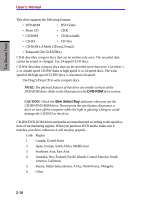
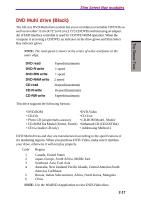
Slim Select Bay modules THE GRAND TOUR Disk-In-Use Indicator Diskette slot Eject button This indicator lights when the diskette is being accessed. Insert diskette in this slot. When a diskette is fully seated in the drive, the eject button pops out. To remove a diskette, push in the eject button and the diskette pops out partially for removal. CAUTION: Check the Disk-In-Use indicator when you use the diskette drive. Do not press the eject button or turn off the computer while the light is glowing. Doing so could destroy data and damage the diskette or the drive. NOTES: 1. The external diskette drive should be placed on a flat, horizontal surface when in use. Do not set the drive on an incline greater than 20o while it is operating. 2. Do not set anything on top of the diskette drive. Slim Select Bay modules The Slim Select Bay can accommodate the following modules: DVD-ROM drive, CD-ROM drive, CD-RW/DVD-ROM drive, DVD multi drive, optional Slim Select Bay HDD adaptor and optional Slim Select Bay 2nd battery pack. DVD-ROM drive (Black) An optional full-size DVD-ROM drive module lets you run either 12 cm (4.72") or 8 cm (3.15") CD/DVDs without using an adaptor. It may be selected as a standard component or as an option. NOTE: The read speed is slower at the center of a disk and faster at the outer edge. The maximum (outer edge) speeds for DVDs and CDs are: DVD 8speed(maximum) CD 24speed(maximum) This drive supports the following formats: • DVD-ROM • DVD-Video • Photo CD • CD-R (read only) • CD-ROM • CD-Rewritable (read only) • CD-ROMxA • CD-DA • CD-EXTRA • CD-Text 2-13
-
 1
1 -
2
-
3
-
4
-
5
-
6
-
7
-
8
-
9
-
10
-
11
-
12
-
13
-
14
-
15
-
16
-
17
-
18
-
19
-
20
-
21
-
22
-
23
-
24
-
25
-
26
-
27
-
28
-
29
-
30
-
31
-
32
-
33
-
34
-
35
-
36
-
37
-
38
-
39
-
40
-
41
-
42
-
43
-
44
-
45
-
 46
46 -
 47
47 -
 48
48 -
 49
49 -
 50
50 -
 51
51 -
 52
52 -
 53
53 -
 54
54 -
 55
55 -
 56
56 -
57
-
58
-
59
-
60
-
61
-
62
-
63
-
64
-
65
-
66
-
67
-
68
-
69
-
70
-
71
-
72
-
73
-
74
-
75
-
76
-
77
-
78
-
79
-
80
-
81
-
82
-
83
-
84
-
85
-
86
-
87
-
88
-
89
-
90
-
91
-
92
-
93
-
94
-
95
-
96
-
97
-
98
-
99
-
100
-
101
-
102
-
103
-
104
-
105
-
106
-
107
-
108
-
109
-
110
-
111
-
112
-
113
-
114
-
115
-
116
-
117
-
118
-
119
-
120
-
121
-
122
-
123
-
124
-
125
-
126
-
127
-
128
-
129
-
130
-
131
-
132
-
133
-
134
-
135
-
136
-
137
-
138
-
139
-
140
-
141
-
142
-
143
-
144
-
145
-
146
-
147
-
148
-
149
-
150
-
151
-
152
-
153
-
154
-
155
-
156
-
157
-
158
-
159
-
160
-
161
-
162
-
163
-
164
-
165
-
166
-
167
-
168
-
169
-
170
-
171
-
172
-
173
-
174
-
175
-
176
-
177
-
178
-
179
-
180
-
181
-
182
-
183
-
184
-
185
-
186
-
187
-
188
-
189
-
190
-
191
-
192
-
193
-
194
-
195
-
196
-
197
-
198
-
199
-
200
-
201
-
202
-
203
-
204
-
205
-
206
-
207
-
208
-
209
-
210
-
211
-
212
-
213
-
214
-
215
-
216
-
217
-
218
-
219
-
220
-
221
-
222
-
223
-
224
-
225
-
226
-
227
-
228
-
229
-
230
-
231
-
232
-
233
-
234
-
235
-
236
 |
 |