Toshiba S1 User Manual - Page 73
Connecting 3 1/2\, Safety Remove Hardware, Unplug or Eject Hardware
 |
View all Toshiba S1 manuals
Add to My Manuals
Save this manual to your list of manuals |
Page 73 highlights
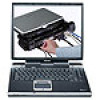
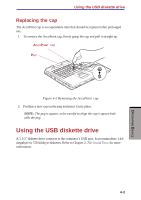
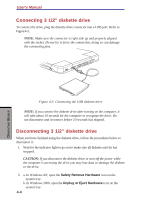
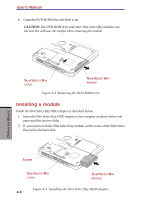
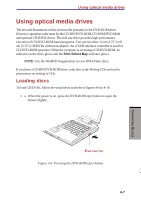
User's Manual Connecting 3 1/2" diskette drive To connect the drive, plug the diskette drive connector into a USB port. Refer to Figure 4-3. NOTE: Make sure the connector is right side up and properly aligned with the socket. Do not try to force the connection, doing so can damage the connecting pins. Figure 4-3 Connecting the USB diskette drive NOTE: If you connect the diskette drive after turning on the computer, it will take about 10 seconds for the computer to recognize the drive. Do not disconnect and reconnect before 10 seconds has elapsed. Disconnecting 3 1/2" diskette drive When you have finished using the diskette drive, follow the procedures below to disconnect it: 1. Wait for the indicator light to go out to make sure all diskette activity has stopped. CAUTION: If you disconnect the diskette drive or turn off the power while the computer is accessing the drive you may lose data or damage the diskette or the drive. 2. a. In Windows XP, open the Safety Remove Hardware icon on the system tray. b. In Windows 2000, open the Unplug or Eject Hardware icon on the system tray. 4-4 OPERATING BASICS
-
 1
1 -
2
-
3
-
4
-
5
-
6
-
7
-
8
-
9
-
10
-
11
-
12
-
13
-
14
-
15
-
16
-
17
-
18
-
19
-
20
-
21
-
22
-
23
-
24
-
25
-
26
-
27
-
28
-
29
-
30
-
31
-
32
-
33
-
34
-
35
-
36
-
37
-
38
-
39
-
40
-
41
-
42
-
43
-
44
-
45
-
46
-
47
-
48
-
49
-
50
-
51
-
52
-
53
-
54
-
55
-
56
-
57
-
58
-
59
-
60
-
61
-
62
-
63
-
64
-
65
-
66
-
67
-
 68
68 -
 69
69 -
 70
70 -
 71
71 -
 72
72 -
 73
73 -
 74
74 -
 75
75 -
 76
76 -
 77
77 -
 78
78 -
79
-
80
-
81
-
82
-
83
-
84
-
85
-
86
-
87
-
88
-
89
-
90
-
91
-
92
-
93
-
94
-
95
-
96
-
97
-
98
-
99
-
100
-
101
-
102
-
103
-
104
-
105
-
106
-
107
-
108
-
109
-
110
-
111
-
112
-
113
-
114
-
115
-
116
-
117
-
118
-
119
-
120
-
121
-
122
-
123
-
124
-
125
-
126
-
127
-
128
-
129
-
130
-
131
-
132
-
133
-
134
-
135
-
136
-
137
-
138
-
139
-
140
-
141
-
142
-
143
-
144
-
145
-
146
-
147
-
148
-
149
-
150
-
151
-
152
-
153
-
154
-
155
-
156
-
157
-
158
-
159
-
160
-
161
-
162
-
163
-
164
-
165
-
166
-
167
-
168
-
169
-
170
-
171
-
172
-
173
-
174
-
175
-
176
-
177
-
178
-
179
-
180
-
181
-
182
-
183
-
184
-
185
-
186
-
187
-
188
-
189
-
190
-
191
-
192
-
193
-
194
-
195
-
196
-
197
-
198
-
199
-
200
-
201
-
202
-
203
-
204
-
205
-
206
-
207
-
208
-
209
-
210
-
211
-
212
-
213
-
214
-
215
-
216
-
217
-
218
-
219
-
220
-
221
-
222
-
223
-
224
-
225
-
226
-
227
-
228
-
229
-
230
-
231
-
232
-
233
-
234
-
235
-
236
 |
 |
