Yamaha CVP-201 Owner's Manual - Page 17
Changing a Setting
 |
View all Yamaha CVP-201 manuals
Add to My Manuals
Save this manual to your list of manuals |
Page 17 highlights
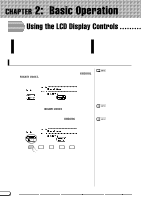
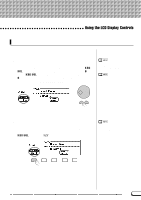
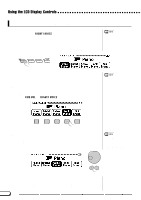
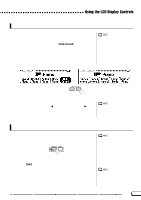
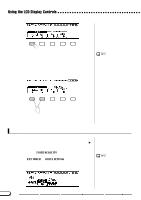
Using the LCD Display Controls Changing a Setting There are several ways to change a function's value. Here are two of the main ways: s Using the data dial or [-] and [+] buttons Once you have selected a function, you can change its setting with the data dial or the [-] and [+] buttons. Since you have just selected KBD VOL, try turning the dial or pressing the [-] button until it reads 0. The KBD VOL function sets the keyboard volume. When you set it to 0, you will find that the keyboard won't produce any sound, no matter how high you set the [MASTER VOLUME] slider! You can press the [-] and [+] buttons repeatedly to change the value a little, or hold them down to change it quickly. Refer to page 23 for details on the KBD VOL function. s Using the LCD buttons You can also increase a setting by simply pressing and holding the corresponding LCD button. For now, since you'll want to hear your keyboard later on, press and hold the leftmost LCD button until the value for KBD VOL is back up to 127. This is why you should release the LCD button quickly when you select a function: you could end up raising its value when you want to lower it! Hold down to increase. Once you've got the keyboard volume back where it belongs, you can learn about a couple of other ways to change settings. CVP-201 17 15
-
 1
1 -
2
-
3
-
4
-
5
-
6
-
7
-
8
-
9
-
10
-
11
-
 12
12 -
 13
13 -
 14
14 -
 15
15 -
 16
16 -
 17
17 -
 18
18 -
 19
19 -
 20
20 -
 21
21 -
 22
22 -
23
-
24
-
25
-
26
-
27
-
28
-
29
-
30
-
31
-
32
-
33
-
34
-
35
-
36
-
37
-
38
-
39
-
40
-
41
-
42
-
43
-
44
-
45
-
46
-
47
-
48
-
49
-
50
-
51
-
52
-
53
-
54
-
55
-
56
-
57
-
58
-
59
-
60
-
61
-
62
-
63
-
64
-
65
-
66
-
67
-
68
-
69
-
70
-
71
-
72
-
73
-
74
-
75
-
76
-
77
-
78
-
79
-
80
-
81
-
82
-
83
-
84
-
85
-
86
-
87
-
88
-
89
-
90
-
91
-
92
-
93
-
94
-
95
-
96
-
97
-
98
-
99
-
100
-
101
-
102
-
103
-
104
-
105
-
106
-
107
-
108
-
109
-
110
-
111
-
112
-
113
-
114
-
115
-
116
-
117
-
118
-
119
-
120
-
121
-
122
-
123
-
124
-
125
-
126
-
127
-
128
-
129
-
130
-
131
-
132
-
133
-
134
-
135
-
136
-
137
-
138
-
139
-
140
-
141
-
142
-
143
-
144
-
145
-
146
-
147
-
148
-
149
-
150
-
151
-
152
-
153
-
154
-
155
-
156
-
157
-
158
-
159
-
160
-
161
-
162
-
163
-
164
-
165
-
166
-
167
-
168
-
169
-
170
-
171
-
172
-
173
-
174
-
175
-
176
-
177
-
178
 |
 |