Yamaha CVP-201 Owner's Manual - Page 82
Saving Styles to Disk, Set the value or depth of the selected parameter., Repeat as necessary.
 |
View all Yamaha CVP-201 manuals
Add to My Manuals
Save this manual to your list of manuals |
Page 82 highlights
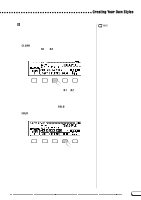
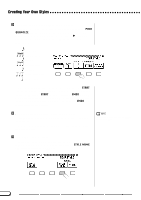
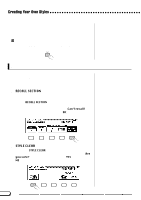
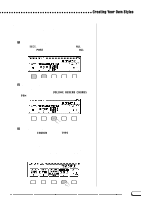
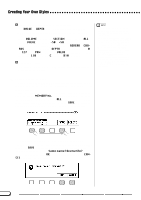
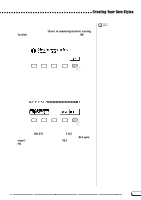
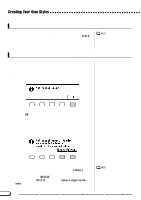
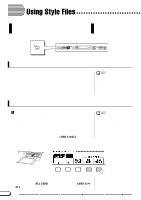
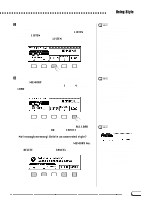
Creating Your Own Styles V Set the value or depth of the selected parameter. The VALUE (or DEPTH) function displayed above the rightmost LCD button sets the amount or depth for the parameter selected in step 2. When VOLUME is selected, the SECTION setting is fixed at ALL and the VALUE range is from -50 to +50 (this value is relative to the preset volume of the source style). When the REVERB or CHORUS parameter is selected, the DEPTH can be set in a range from 0 to 127. When PAN is selected, the VALUE function can be set in a range from L10 (full left) to C (center) to R10 (full right). B Repeat as necessary. Repeat the preceding steps to set other parameters for each part and section in the custom style. • The reverb type used for the custom style are determined by the style that was selected as the basis for custom style creation. • Normally the VALUE and chorus TYPE settings from the preset style are initially selected. If the PART function is set to ALL, the preset values for part R1 are displayed. If the SECTION function is set to ALL, the preset values for MAIN A are displayed. • The word "OTHERS" may appear as the chorus type if the preset style uses a chorus type other than those in the list. The OTHERS setting cannot be reselected once you select a different chorus type. s Saving Styles to Disk Page 5 of the CUSTOM STYLE display lets you save custom styles on a disk. You can save custom styles individually, or in a complete set of up to four styles. After inserting a properly formatted disk (page 111) in the Clavinova's disk drive, use the MEMORY No. w and v buttons to select the custom style you want to save to disk, or select ALL to save a complete set of up to four custom styles. When this is done, press the SAVE LCD button to start saving the data to disk. At this point the SAVE display appears. Enter a name for the style file. The procedure for entering the filename is the same as that used to enter a name for a custom style (page 140). Press SAVE when the name has been entered. If a file with the same name already exists, the "Same name! Overwrite?" message will be displayed. Press OK to overwrite the existing file, or CANCEL to abort the save operation. 80 82 CVP-201
-
 1
1 -
2
-
3
-
4
-
5
-
6
-
7
-
8
-
9
-
10
-
11
-
12
-
13
-
14
-
15
-
16
-
17
-
18
-
19
-
20
-
21
-
22
-
23
-
24
-
25
-
26
-
27
-
28
-
29
-
30
-
31
-
32
-
33
-
34
-
35
-
36
-
37
-
38
-
39
-
40
-
41
-
42
-
43
-
44
-
45
-
46
-
47
-
48
-
49
-
50
-
51
-
52
-
53
-
54
-
55
-
56
-
57
-
58
-
59
-
60
-
61
-
62
-
63
-
64
-
65
-
66
-
67
-
68
-
69
-
70
-
71
-
72
-
73
-
74
-
75
-
76
-
 77
77 -
 78
78 -
 79
79 -
 80
80 -
 81
81 -
 82
82 -
 83
83 -
 84
84 -
 85
85 -
 86
86 -
 87
87 -
88
-
89
-
90
-
91
-
92
-
93
-
94
-
95
-
96
-
97
-
98
-
99
-
100
-
101
-
102
-
103
-
104
-
105
-
106
-
107
-
108
-
109
-
110
-
111
-
112
-
113
-
114
-
115
-
116
-
117
-
118
-
119
-
120
-
121
-
122
-
123
-
124
-
125
-
126
-
127
-
128
-
129
-
130
-
131
-
132
-
133
-
134
-
135
-
136
-
137
-
138
-
139
-
140
-
141
-
142
-
143
-
144
-
145
-
146
-
147
-
148
-
149
-
150
-
151
-
152
-
153
-
154
-
155
-
156
-
157
-
158
-
159
-
160
-
161
-
162
-
163
-
164
-
165
-
166
-
167
-
168
-
169
-
170
-
171
-
172
-
173
-
174
-
175
-
176
-
177
-
178
 |
 |